Saturday, November 30, 2013

Tools of the Trade ~ on Making Big Prints

I recently visited the Salon de la Photo and happened to wander by the Canon floorspace.  They had a huge presence at the show, and they hung very large prints.  The images I looked at were made using the 18 mpixel Canon 7D.  I was impressed.  The prints were at least 20 x 30 inches in size.  They remained wonderfully sharp, even on close inspection.  I think anyone believing they need a 36 megapixel sensor to give you a nice, sharp, huge print would have been impressed, even if they had no idea what camera was used to make the prints.


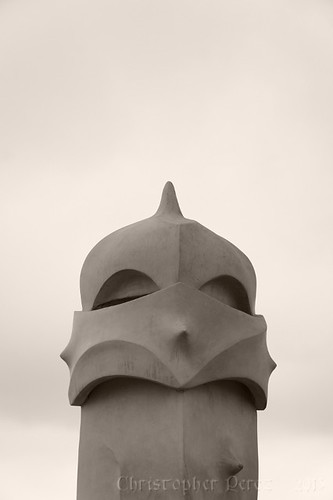
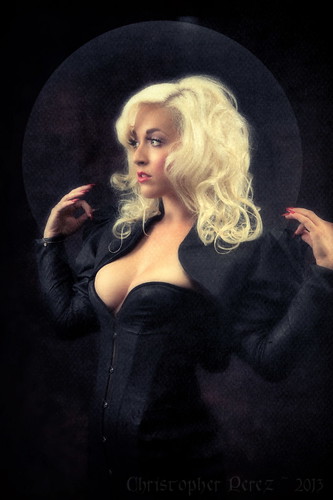
Original image (downsized to 1024 pixels), straight
out of the camera that used "Standard" processing
and in-camera actions.  The photo was made at sunset
on the middle of les Deux Pont next to l'isle St Louis.
The camera was hand-held and the kit len's OSS was enabled.

The experience made me think about an article titled "Big Sticks" that I read over on the Online Photographer blog some years back.  It's a great read and I liked the many points that were being made.  The comment that really grabbed my attention was,

"... a reader named Stephen Scharf not long ago objected to some things I said about the size of prints you can make from various size sensors. He claimed that he could make an excellent 13 x 19" (Super B/A3) print from 4-megapixel image files..."

M. Scharf used, at the time of the article, a Canon 1D.  It has a 4mpixel sensor.  By current standards, that's rather small.  Mike Johnson, the Online Photographer's editor, says "...As proof of concept, he sent me a print..."  M. Johnson was impressed, to say the least.  The print was sharp and beautiful.

M. Scharf shared his process in the article.  This got me to thinking.  So I took a look at what I could do along similar lines using different tools.

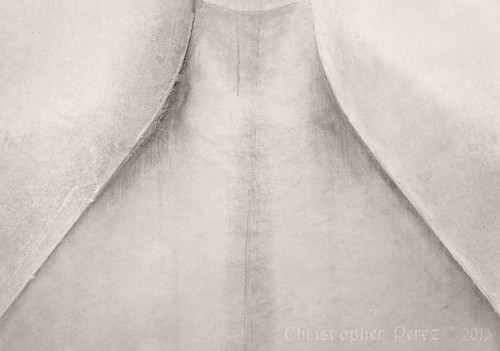
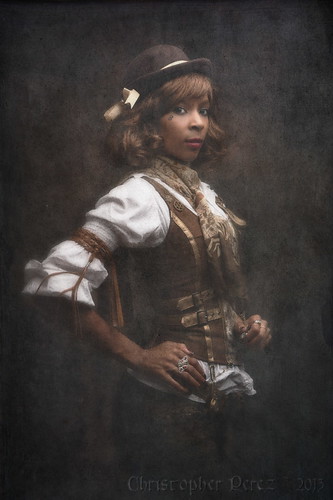
Processed original sized image, including
the first pass at Luminocity Sharpen-ing
(downsized to 1024 pixels for this blog entry)

I wanted to test the full sequence to see if I could understand and, perhaps, match M. Scharf's processing path.  If successful, I could put yet another nail in the product marketing coffin filled with half truths and outright lies.

I use the Gimp for the bulk of my image processing.  Taking a close look at M. Scharf's process, I tried to find equivalent Free Open Source Software (FOSS) equivalents to the image sharpening tools he used.  After watching how various FOSS sharpening methods impact one of my images, I settled on a script found in FX Foundary's toolkit.

A simple "unsharp mask" produced much too much noise in the smooth areas for my taste.  Other sharpening methods gave various results, but I still saw too much noise in the smooth regions.  It was after going through nearly every method available to Gimp users that I found "Luminocity Sharpen".  It's under FX-Foundary -> Photo -> Sharpen -> Luminocity Sharpen

For my test, I left the Luminocity Sharpen parameters UnSharp Mask (USM) and Find Edge Amount as default.  More recently, I've found I prefer setting the Find Edge Amount to 1.0,while leaving the USM defaults as is (0.5 in both cases).  The difference is subtle, so you would need to test to see what you like best.

Here is the test process for the images you see here:

  1. Process image in the Gimp to the point I'm happy with it
  2. Luminocity Sharpen with Find Edge Amount set to 2.0, and the USMs set to 0.5 in both cases
  3. Up-rez the file where Interpolation is set to Cubic" from Image -> Scale Image
  4. Luminocity Sharpen a second time with the same setting, Find Edge Amount to 2.0, and USMs to 0.5 in both cases
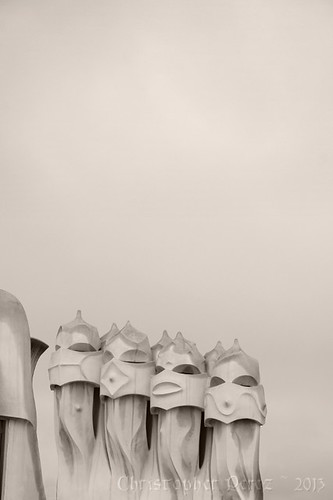
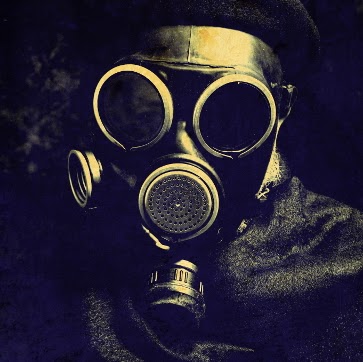
Original, processed, first Luminocity Sharpen-ed,
up-rez'd to 8000 pixels, second Luminocity
Sharpen-ing ~ This is a MASSIVE file!
(downsized to 1024 pixels for this blog entry) 


The results are enlightening.  Indeed, if I start with a low noise base image, I can up-rez a 4592 pixel in the long dimension image file to 8000 pixels in the long dimension and retain apparent resolution.  I say "apparent" because no information is being added.  It is only contrast that is carefully being added to light/dark transition areas.

For this reason, you can see that the 8000 pixel in the long dimension image has slightly more contrast than the original processed image Luminocity Sharpened just once.

The reason I'm settling on FX Foundary's Luminocity Sharpen script is that it touches only the light/dark transition areas.  The smooth tone areas are left clean and beautiful.  There is no apparent  added noise in the smooth tone regions.

Using the print size calculation I provided in an earlier blog entry, you can see we can take a Sony NEX5 (original) 14mpixel image size and enlarge it to over 30 inches in the long dimension, while retaining apparent resolution.

Obviously, this approach breaks down at some point.  For this reason it is worth the time it takes to test these kinds of processing approaches to see for yourself how far you can satisfactorily push things.  You might find that sensor size simply does not matter for the kinds of images you create.


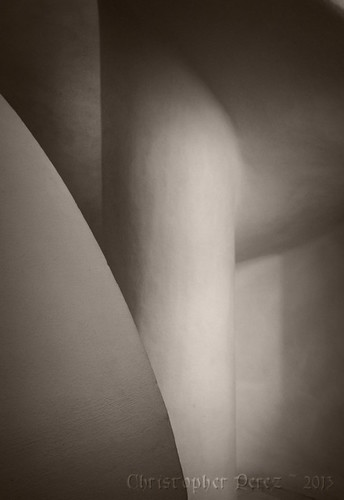
There are two things illustrated here (you might want to click on the image and make sure you're looking at it full size).  

First, the top row shows what happens when you take the raw original file, the processed original sized file, an up-rez'ed to 6000 pixels file, and the massive 8000 pixel monster file and view them at the same dimension of 8000 pixels.  You will easily see the "pixelation" that takes place up through the 6000 pixel image. 

Second, you can see the bottom row as each file is viewed at it's native size at 100 percent enlargement.  You can easily see the effect of Luminocity Sharpen-ing on the three processed files.  The contrast transitions between the light and dark areas are increased.  The original, straight out of the camera in-camera processed image is "soft" compared to the other image samples.  The simple first step Luminocity Sharpen-ing looks pretty nice and "cleans up" the light/dark transition areas.  Now look carefully at the massive 8000 pixel monster file cropped section and compare it to the other files.  While no information is being added, the up-rez'ed image looks pretty darned fine, doesn't it?

Tuesday, November 12, 2013

Tools of the Trade ~ On Considering an Important Truth

Assume, for a moment, that photographic tools are really no different than tools used by other artists.

Pencil, pen, brush, ink, paint, chisel, forge, and hammer are all tools of art.  When viewing a finished work, how the work was created is, many times, less important than how a viewer responds to a work.

Assume, for a moment, that the goal of photography is to make images that express how you feel and how you "see" the world. 

In this way, cameras, lenses, printers, and paper are simply tools of photographic art.  Carefully consider how you look at a photograph and see if you can tease apart the marketing hype and camera equipment forum driven relationship between how the image was made from how you respond to it.


~ Having a camera is many times better than not having a camera ~ 

For making truly great photos, it simply does not matter what you use. 

The properties of one camera over another are largely unimportant.  Cameras simply enable image creation.  As we have seen, the current crop of imaging sensors are more than sharp enough for just about any subject in just about any situation.  What matters is how you "see" and how you use the tools of photographic expression available to you.

On a practical level, any sensor of 4 megapixels or greater are capable to delivering critically sharp prints up to 13x19inches and well beyond.  I will write more about printing in the next blog entry on Tools of the Trade.  I hope to illustrate that, in making beautifully expressive prints or publishing to the web, sensor size simply does not matter.

Exception:
There is a interesting exception to my statement that having a camera is many times better than not having a camera.  There is a large field of photographic art that is, in the traditional sense, camera-less.  Commonly available and shockingly inexpensive flat bed scanners are the solution I'm considering here.  It is easy to find a perfectly usable high resolution flat bed scanner for 10USD/10Euro or less.

If you are curious about this photographic solution to image making and aren't already aware, check out Flickr's "Interestingness" selection of scannerart.  There are some wonderful ideas to be explored using this approach.


~ Having a lens is many times better than not having a lens ~

As we have seen, optical resolution out-performs currently available imaging sensors.  This holds true with an aperture setting anywhere from wide open down through f/11.

My claim that sensors are the limiting factor in photographic resolution, while seemingly heretical, is easily backed.  A blogger recently compared a Sony 50mm f1.8 against the much vaunted Leica Summicron 50mm f2. The author mis-understands the results by claiming equivalent optical quality between the two lenses.  From what we learn from my preceding blog entries, you can see what the role of the sensor really is.  In any event, results like these must drive Leica users crazy.  If they are interested in the finest image quality, their pricey equipment is really no better than, say, Sony's gear that's available at a fraction of the cost.

We have also seen where chromatic aberrations (CA) can effect resolution near the edge of the frame.  I talked about how to control the effects of CA in reading test results to learn which aperture settings return the lowest CA.

We have learned how to read modulation transfer function (MTF) charts.  Hopefully you can now see how contrast delivered by a lens to a sensor is different from all the other optical properties you might encounter. Field curvature and field spatial distortions could also be considered, but these details are not readily available in MTF chart information.

Yet, with all of this detailed knowledge about lenses and their properties, the single most important factor in image resolution remains the sensor.  Further, optical performance effects can be easily controlled in post-production.  Contrast, CA, and field spatial distortions can all be "processed" out of or corrected for by software you likely already own running on your computer and are many times corrected for in-camera.  In short, base optical performance need not be considered when choosing the best tools for your intended situations.

Exception:
There two interesting exceptions to my statement that having a lens is many time better than not having a lens.  There is a fascinating field of lens-less solutions that date back hundreds of thousands of years and were more recently used by medieval artists.  Solar eclipses have been safely visible for as long as there have been trees and beings to witness the event as images projected on the ground.  Much more recently, Canaletto was only one in a long line of artists who used a "camera" (the word means "room" in Italian) to project an image onto canvas from which he would paint.

In current photography, we have at our disposal two interesting lens-less solutions.  They are the pinhole and the zone plate.  If you like the style and approach of these solutions, you could altogether avoid the costs of a glass optic.  For inspiration, here is Flickr's "interestingness" images for pinhole and zone plate work.

Which might lead a reader to wonder: 
If cameras, lenses, product marketing, and on-going internet forum flame wars are not important in photographic image making, why did I spend four long blog posts and well over a decade of my life considering the minutia of photography equipment?

One answer is that I was trained and worked in software and electronics engineering.  Taking a rational view of the craft and art of photography comes naturally to me.  I have an innate curiosity about things and the way they work.

Another answer is that I felt pushed and pulled by the marketing hype and on-line discussion forums.  It seemed all to easy to be misled and to stumble on irrational explanations of things that simply were not provable.  When I say irrational, I mean it in the sense of being not rational, and in the sense of being emotional and not scientifically thought through.  So much of what passes for discussion about photography gear is nothing more than wishful thinking and unsupportable claims.

I wanted to get to the truth of the matter and that the truth I have come to understood is rationally justifiable.  Once the truth is known, I could then turn my time and energies toward other interesting things.  The truth of things allows me to safely ignore the yammering babbling masses and marketeers while concentrating on making the best images I possibly can.

If, on the other hand, it's easier to see the practical application of my conclusions, what better way than to share the work of someone who is increasingly internationally known, celebrated, and heaped upon with well deserved accolades?  While it will be easy to sort out what the photographer uses, try to postpone that search long enough to look at his results.  Perhaps you will see for yourself how effectively used photographic equipment quickly transcends marketing hype and on-line forum equipment flame wars.

As Bill Gekas recently wrote on Facebook, "Revisiting some photography groups and forums the other day made me a little sad that some things just don't change and probably never will with some people. All gear no idea!!!"

Monday, November 11, 2013

Tools of the Trade ~ Resolution and the Real World

Let's have a serious look at lenses and the ever-popular topics of resolution and IQ, shall we?

After reading my prior two posts (one and two) that set the stage for this series on Tools of the Trade, a reader should be able to easily follow details in this post.  I am about to make a potentially bold series of statements, and then will back them up with what I know from years of my own camera system testing.


1. Camera sensors currently limit image resolution.  Lenses do not. 

I know this is true from my own testing of optical resolution.  I looked at large and medium format lens performance on film, and, more recently, 35mm lens performance on digital sensors.  It took me over a decade of looking at this to understand what the results were clearly showing me from day one.  My understanding of optics, resolution, and true limiting factors to resolution were later confirmed by an optical physics professor who performs research at a university in the US.

It takes a terrible lens to see degradation in image resolution.  Are poor resolution lenses available?  It seem that there are not many, and those that exist tend to be priced accordingly.  Except if it has Zeiss or Leica label it.  Then you see the poor performers termed "quaint" or "having a certain look."  At the other end of cost, inexpensive kit lenses have had enough pressure from "pixel peepers" to force manufacturers to improve those optics (simply look at the number of 18-55mm kit lenses Canon has offered over the past decade).

Readers need to approach comments such as "...It is crop, not FF, that requires sharper lenses, since for photos displayed at the same size...", or any combination of "...this new big sensor requires sharper lenses..." with extreme caution.  The only factor of interest in terms of physics and resolution are the number of line pair per millimeter the sensor resolves.  The present limit of sensor resolution of any APS-C, micro 4/3rd's, Full Frame, Medium Format sensor remains less than 120 line pair per millimeter.

An optical physic effect called diffraction limit effects optical resolution only at very small apertures.  If your sensor resolves around 123 line pair per millimeter (center diffraction limit of any optic at f/11), you may begin to see resolution degradation start at f/16 and continue through to the end of your aperture range (to f/32 and beyond).  This leaves a very long aperture range available to you.  From wide open down through f/11, all these apertures will be available to you, and in terms of resolution, will out-perform your sensor.  This physics effect won't be seen on lower resolution sensors (including most APS-C and all Full Frame sensors in current production) until an optic is stopped down to f/16 and beyond.

Note: The obvious exceptions are "soft focus" optics that deliberately smudge a scene.  Nothing in over a hundred and fifty years of photography has changed.  


2. Modulation Transfer Function (MTF) charts do not tell us how sharp a lens is.

MTF charts only tell us the amount of scene contrast a lens is capable of passing along to the sensor at various low resolutions.  Look closely at any MTF chart and you will see lines that show the contrast given at, for instance, 10 line pair per millimeter resolution and another set of lines that show contrast retention at, for instance, 40 line pair per millimeter.  Given the physics of optics these are rather low resolution settings (scroll down to see the diffraction limit chart).

If MTF testing is not a measure of resolution, why then do lens manufacturers publish MTF charts?  It's because the human eye perceives resolution in most cases as contrast.  In practical terms, digital sensors will be able to capture a quick transition from black to white as long as a lens to provide it.  It's as simple as that.

When reading comments across the 'net, statements such as "...as you can see from the above MTF charts, now that you know how to read them, the difference that are seen can be easily be quantified..." need to be approached with extreme caution.  There is nothing in a MTF chart which correlates in any meaningful, direct way to other optical properties what you may find important.  This includes sensor resolution, field flatness, lens distortions, or chromatic aberrations.

Again, the only thing MTF is attempting to show is a lenses ability to pass contrast to the sensor.  And that, only on a flat two dimensional plane.  This last sentence has importance when we talk about field flatness.


3. Chromatic Aberrations (CA) can be measured and provide useful information about how a lens can perform at the edges of a scene at different apertures.

Many currently published lens tests measure a lenses CA.  It's worth the time it takes to review lens tests in this area as there is a real world and meaningful correlation between test results and real world camera system performance.

Let's take a look at three lenses: Canon 50mm f/1.4 USM, Zeiss 50mm f/1.4 Planar T* ZF, and Leica 50mm f/1.4 Summilux R.

What do we see?  Canon's CA, as measured at the edge of the image frame, is substantially less than one pixel width from f/1.4 all the way through f/11.  The Zeiss' CA is at least one pixel width, and varies according to aperture.  The Leica's CA also crosses over 1 pixel width at all apertures.

In the real world when using a Zeiss or Leica 50mm lens, a single pixel at the edge of a light to dark transition at the edge of the image frame may show purple or blue/green "fringing".  Is it enough to worry about?  That depends on your "pixel peeping" experiences.  A lenses inability to bring together the visible color spectrum to a common point may not be visible in a very large print.  You would need to decide.

Let's say you decide that a pixel's width of CA is important enough to you to avoid.  Taking this position, the currently priced 300USD new auto-focus Canon 50mm easily out-performs both the manual focus new 725USD Zeiss ZF and a used eBay'd 1100USD to 1600USD Leica Summulix R.  So understanding the level of CA a lens exhibits might be important in evaluating it's "performance" (using the subjective word).

Further, processing (either in-camera or on a computer) can eliminate CA effects.  Olympus and Panasonic are well known for providing this kind of processing in-camera.  In-camera CA correction by Canon, Nikon, and Sony should be catching up shortly (if they haven't already).


4. Different lens render the out of focus (OOF) areas in a scene differently.

The highly subjective phrase of "good" OOF attempts to define something called "bokeh".

You may read arguments on the 'net about OOF of one lens or other and which gives a better result than something else.  If "bokeh" is important to you, all that matters is that out of focus areas in an image give an even distribution of light across OOF highlight areas.

Out of focus area rendition testing is quite common.  On a practical level, any desired "bokeh" effect can be reviewed and compared between various lenses.  Note that there is nothing in a lens design nor in a MTF chart which would indicate how OOF will be rendered.

The exceptions, of course, are lenses that deliberately manipulate OOF areas.  Way back in the mid-1800's OOF effects were mathematically manipulated, starting with Petzval lenses.   The optical effects are in great demand today, if eBay auction results for Petzval lenses are any indication.

In the early part of the 20th century, Contax designed their lenses to produce a "creamy" OOF.  Leica lenses, on the other hand, were and are designed in a way that tend to give a "harsh" OOF.

In current times, Nikon offers two wonderful lenses, the 105 f/2 DC and 135mm f/2 DC.  Nikon's optical team used well understood optical principles that allow a user to change the lens element spacing which directly effects OOF. Twist the ring and change the OOF.


In reading comments across the 'net, statements such as "One of the areas of image quality that MTF can help determine is bokeh..." need to be approached with extreme caution.  There is absolutely nothing in a MTF chart that meaningfully relates to "bokeh".  A whitepaper from Zeiss confirms this.


5. Field flatness, or field curvature in lenses can be an important factor in determining optical performance.

Macro lenses are typically designed to ensure a flat field.  They are many times used in photographing documents, stamps, and other flat subjects.  On the other hand, many zoom and wide angle lenses suffer from varying degrees of field curvature.  Photographers using such lenses may feel, under certain circumstances, that a lens is not "good" (to use the subjective word).

If you photograph a flat two dimensional surface, such as a painting, and see that the edges are out of focus, but that the center is correctly sharp, you may be experiencing the effects of field curvature.  In this situation you could set the aperture to f/11 (which is at or above the limits of your sensor's resolution) and try again.  If the edges come into acceptable focus, your lens might suffer from only mild field curvature that is easily handled by selecting an aperture with sufficient depth of field to cover for the effect.

If you try to use MTF charts to fully evaluate a lenses performance, you can miss something important.  Take the MTF examples in this "test".  In noting the "drop off" of contrast toward the edge of the frame, the writer suggests the performance of Canon 400mm f/5.6L is superior to Canon's 100-400 f/4.5-5.6L.  It's important to realize that most MTF tests do not account for field flatness and will limit testing to a two dimensional surface.  In this case, if there is field curvature in the 100-400L the MTF results would not accurately illustrate the lenses contrast capturing abilities on the curved regions of focus.  To the MTF test, the edges of the frame would be less contrasty than the center by a fair amount.  I am making this particular point since there is a large community of photographers who claim their 100-400mm Canon L lenses are indeed quite sharp and contrasty across the field to dispute the Luminous Landscape writer's claims.

Before claiming that a lens is "bad", a user might want to check to see what the field curvature is before tossing the optic out.


6. Lens distortions (barrel or pincushion) can easily be seen and are a nuisance to correct when straight lines are important.

Lens distortions are easily measurable and many testers report their findings.

Back in my old film days, it was commonly accepted that 35mm wide angle, some "normal" and "short telephoto" lenses suffered from field distortions.  One of the most vivid examples came from a Canon SLR shooter who used an 85mm f/1.2L to photograph trains.  The photographer complained that the lenses barrel distortion was bad enough that straight lines were nearly always bent in his images.

Shooters of architecture are well aware of the issue of distortions.  I am convinced this is why companies like Sinar and Schneider continue to make cameras and lenses.  It's important to have an accurate and correct solution when you need it, and when cost is not the prime force in image generation, such solutions can provide a most direct solution..

From a lens design perspective, it is easier to control the broad range of design issues with a symmetrical lens than it is with a complex asymmetrical optic.  Look at a cross section diagram of a plasmat lens and compare it against a low cost kit lens.  What do you see?  Count the number of lens elements in each design.  Now imagine building one?  Which would be "easier"?

With the advent of software driven lens designs, manufacturers are able to build lenses of incredible complexity, while at the same time controlling and balancing trade-offs between resolution, contrast, chromatic aberration, field flatness and optical spatial distortions.

Which brings us back to resolution.  When a photographer "pixel peeps" and claims one lens is better than another, most of the time they woefully mis-understand the camera system's imaging system and it's capabilities and actual characteristics.  Further, readers of "tests" that share photos made with various lenses may be confused or under-educated by the lack of carefully gathered and properly understood and shared information.

While this blog entry has become much more complex than I originally intended, I remain interested in making sure the proper background is set for my making the claim that it does not matter what camera or which lens you use as long as you know how to use what you have.


Thursday, October 31, 2013

Tools of the Trade - Some Interesting Properties of Digital Sensors

In the previous blog post, I wrote about optics and various properties that are commonly discussed.  This post is devoted to a discussion of the other end of a camera kit, the image capturing device called a digital sensor.

Much discussion in the camera world is devoted to cameras, their sensors, and who is trouncing whom in the Great Megapixel Race.  Without using an inaccessible scientific or engineering language, I will try to shed useful light (oh, yes, keep those puns coming) on the subject.

To start, there are many sensors made by many many manufacturers in a great many sizes.  Frankly, I was shocked to see the list of all the companies that make sensors for various photographic applications.  Most of us only know the more popular camera brands, such as Canon, Sony, Nikon, Olympus, Panasonic, Sigma, Fuji, Phase One/Mamiya, Hasselblad, Leica, Samsung, and a very long list of cellphone manufacturers.  Their sensors may be manufactured by the parent camera company, but sometimes they are not.

The basic function of a photographic digital sensor is rather simple and obvious.  That is, a sensor receives light rays directed to it by a lens.  Upon receipt of these light rays, a series of very tiny sensors record the intensity and the color of the light.  Each very tiny sensor's record is an electronically generated series of numbers.  Records from millions of tiny sensors are gathered and presented in a way that we, as viewers, can interpret as an image.


Sensor Size Descriptions -
There are primarily two aspects of "size" that are used in describing photographic sensors.

The first is the physical size, or dimensions, of a sensor.  Useful physical photographic sensor sizes span everything from amazingly tiny cell phones through to medium format.  That is, some sensors are truly small and others are seemingly quite large.  When discussed, you will hear cell-phone, or APS-C, or Full Frame used as a description of the physical dimensions of the sensor. 

The second size important in understanding photographic sensors are the number of light recording sights a sensor implements.  In common language, this is the number that we refer to as megapixels, or millions of light recording sites.  You will see everything from 3.1 megapixel (from some of the earliest commercially available sensors) through to 120 megapixel sensors (as of this date) that sit on a lab bench somewhere in a camera manufacturer's Research and Development facility.


Light Sensitivity -
In the real world, lighting conditions are highly variable.  When we experience full mid-day sun, the amount of light reaching us from the sun is quite high.  When we experience light from a single candle set in the middle of a large room, the light reaching us is comparatively low.  For a camera sensor to be useful in as many lighting situations as possible, we need a camera/lens/sensor system that is flexible enough to enable image capture across a broad range of light conditions.

Lenses provide an aperture that is used to provide one of three ways to control the amount of light hitting a sensor.  For instance, the smaller the diameter of the aperture opening, the less light that will hit the sensor.  Aperture control is as old as photographic lenses (from the early 1800's).

A second way to control light reaching a sensor is with a shutter.  This is particularly useful when trying to "stop action" when shooting sports or when capturing the Milky Way on a particularly clear and beautiful night.  Shutters have been used since shortly after sensitive film emulsions required accurate control of exposure (mid to late 1800's).

The third way that is used to help balance shutter speed and aperture against the amount of light hitting a sensor is by varying the sensitivity to light of the sensor itself.  This is accomplished in a camera by controlling electronic signals to the sensor.

Borrowing terminology from the original chemical, atomic silver halide film technologies that describe how reactive a sensor is to light, we have the acronym ISO. The lower the ISO, the less sensitive a sensor is to light.  Conversely, the higher the ISO, the more sensitive a sensor becomes.


Interesting Properties to be Aware of - part one

There is an interesting relationship between image resolution and senor megapixel count.  It is precisely as follows.

As previously described, an image consists of a collection of pixels that describe light intensity and color.  It is safe to assume that, in terms of image resolution, that a sensor can accurately capture a sharp edge and reproduce it by moving from a white pixel to a black pixel.  Using this, we can look at the number of image pixels and use ideas from the USAF Resolution Test Chart and determine the maximum resolution a sensor can return.  The math is quite simple.

Resolution in Line Pairs = [(Number Information Sites) divided by (Physical Dimension of Sensor)] divided by (2 Line Pair per Millimeter)

For example, looking at an 8 megapixel Canon DSLR sensor, the 30D, we see the maximum output file dimensions are 3504 by 2336 image information sites.  The physical dimensions of the APS-C sized sensor are 22.5 by 15 millimeters.  The answer is calculated as follows.

78 Line Pairs per  millimeter = [(3504) / (22.5)] / (2)

Continuing a little...

78 Line Pairs per  millimeter = [(5616) / (36)] / (2) - Canon 5D MkII 22 megapixel full frame sensor
116 Line Pairs per  millimeter = [(5186) / (22.3)] / (2) - Canon 7D 18 megapixel APS-C sensor

102 Line Pairs per  millimeter = [(7360) / (35.9)] / (2) - Nikon D800 36 megapixel full frame sensor

97 Line Pairs per millimeter - [(10380) / ( 53.7)] / (2) - Phase One IQ180 80 megapixel medium format sensor

This information will be useful when we evaluate lens performance against sensor capabilities, and when we look at people's ideas of image quality and the need to buy "better" lenses.


Interesting Properties to be Aware of - part two

Looking at the number of line pairs per millimeter that the best human eyes can resolve (5 line pair per mm), we can calculate the maximum print size we can make while retaining all of the sensor resolution.  The math is, again, quite simple.

Maximum Print Size = [(File Image Information Dimensions) divided by (2 Line Pair per Millimeter)] divided by (Maximum Human Eye Resolution in Line Pair per Millimeter)

Converting for English and Metric centimeters, we see, again using our example cameras, roughly the following.

13 x 9 inches or 35 x 23 centimeters - Canon 30D

22 x 14 inches or 56 x 37 centimeters - Canon 5D MkII

20 x 13 inches or 52 x 34 centimeters - Canon 7D

28 x 19 inches or 73 x 49 centimeters - Nikon D800

41 x 31 inches or 104 x 78 centimeters - Phase One IQ180

This information will be helpful when we evaluate the relative maximum print sizes that each imaging system is capable of, and compare it against the needs of the publishing industry and making fine art images that hang in galleries.


Interesting Properties to be Aware of - part three

The last thing I would like to note here are the effects of changing the light sensitivity of a sensor.  Measured in terms of dynamic range, or the range of light from dark to light that a sensor can capture, something interesting happens.

Take a look at any sensor's ISO chart (here is the Canon 5D MkIII example) that tests for dynamic range and what do you see?  At low ISO, a sensor is capable of capturing a broader range of light than the same sensor set to a high ISO.    The dynamic range delivers 12 EV (or f-stops of light) at ISO 100.  The range of light captured drops to 8 EV at ISO 12800.  The sensor is loosing sensitivity to a broad range of light as the ISO rises.

Now compare a full frame sensor against the smaller physical dimension APS-C sized sensor (in this case, a Canon 70D).  What do we see here?  The 70D's sensor captures a similar 12 EV of light at ISO 100.  But in this case, the sensor's ability to capture light at high ISO drops quicker than the full frame sensor.  The 70D captures less than 7 EV of light at ISO 12800 or 1+ EV less than the full frame sensored Canon 5D MkIII.

This information will be helpful when we evaluate actual sensor development advancements and high ISO performance against marketing hype.


I realize this may be a lot of information to absorb.  Each piece is vital to understanding the current generation of cameras, lenses, and their real world capabilities.  I will try to tie all these sensor numbers together with optical performance, marketing hype, un-enlightened commentary, and Reality in the next blog entry.

Well, perhaps it will take several blog entries...

Tuesday, October 29, 2013

Tools of the Trade ~ Optics, Lenses and their physical properties

If you spend any time over on the message boards and forums around the 'net reading about lenses and cameras while trying to keep up with the volume of "information" regarding the tools of the craft, you might be a little confused.

It appears that people feel they need a "better" lens to make a "better" photo.  There are folks who are convinced that Zeiss or Leica lenses are demonstrably better than, say, something Canon or Nikon or Sony might offer.  Some folks have strong feelings about the selections they have made and will defend them to the ends of the earth.  Many websites offer frankly misleading information about lenses and how to select something that will work well for you.

What I would like to do here is start with a basis for understanding optical properties.  I will begin with a set of definitions and their practical effect.  I would like to do this in a non-scientific language manner so as to keep this accessible to anyone who has an interest in furthering their understanding of what is really going on when we talk about lenses, optics, and imaging systems.  Future blog entries will cover the reality of modern optics and compare them against marketing perception and some people's beliefs.

To begin with, the function of a lens is to take light rays bouncing off or emanating from a subject, pass them through glass elements of various shapes, and to send those rays of light on to a blank surface or light sensitive material.  Traditional materials have include canvas (for artists who worked inside a darkened room - see Vermeer's work as a good example), photographic film (including wet plate collodion and dry plate film - see Kodak's revolutionary work in this area), and the current widely available digital light sensors.

The challenge is how well light rays that pass through glass are "focused" onto the intended medium.  It is this simple, fundamental act of making sure that an image is free from as many "un-desirable" optic artifacts that the entire conversation of "lens quality", product prices, and who makes the "best" optics arises.

Resolution -
When people think of image sharpness, they are thinking of optical resolution.  When a scene has a transition from a light area to a dark one, resolution is how quickly and accurately that transition can be captured by our imaging system.

While I promised not to throw too much science into the discussion, it is important to realize that there is a natural, physics based limit to how sharp a lens can be.  It is called optical diffraction.  Lens designers know these limits and, in some cases, try to build optics that come as close as possible to these limits (given time and cost of materials and manufacturing).

We, the common human, can measure resolution if we so chose.  The classic method is to use a United States Air Force (USAF) Resolution Test chart.  For years I used this one from Edmund Optics in the US.

You may notice from the theoretic limits that it is expected that a lens will more accurately preserve light to dark transitions for lines that radiate away from the center of the field of view than such transitions made perpendicular to those rays of lines.  This is an interesting property of optics and one that is good to keep in mind as we look at the following optical effects.

This approach to measuring optical qualities has fallen from favor as a stand-alone test method.  However, it is used as the basis for the most commonly used current method of describing optical qualities, and this is as follows.

Modulation Transfer Function (MTF) curves -
When you look for lenses from current manufacturers you many times see MTF curves offered as a proof of demonstration of quality.  This test method is useful because the human eye sees "sharpness" in terms of contrast, not resolution.

The MTF test method expresses how much contrast is preserved by an optic as a scene transitions from light to dark areas at various levels of resolution.  These levels of resolution are taken from the resolution test method for radial and tangential lines (see prior section).  The thickness of these lines as well as the focal length of the lens under test and the distance between the lens and test chart are what predetermine those levels of resolution.

Typically you will see two different levels of resolution used in published test results.  If comparing lenses from different manufacturers, it is important to know what resolutions were used.  Different results will be reported for different levels of resolution.  Further, it might make a difference to you to learn which manufacturers publish expected design results (nearly everyone) and which offer actual test samples (Zeiss in some cases and Sigma).

If you would like to better understand MTF, how it works, and how to read MTF curves, Cambridge in Color's tutorial might be a good place to start. They provide a nice overview of the relationship between resolution and contrast, as well as providing a good understanding of various test methods and physics involved.


Chromatic Aberrations -
An optical effect that you might read about in lens tests is Chromatic Aberration (CA).  This is where a lens fails to successfully align colors across the visible spectrum.  This effect is typically more difficult to control near the edges of a scene, which is why that is where testers look for the effect.

Additionally, you will read test reports that measure the amount of CA various lenses have at different apertures.  In practice, you will see CA as color "fringing" of portions of a scene rendered near the edges of a field of view.  The amount of CA can vary with the size of a lens aperture.  Optical designers work to control, if not outright eliminate CA.

Field Flatness -
An important design element in creating a lens is to come close as possible to ensuring that elements in a scene arranged on a flat plane are accurately reproduced.  In other words, objects arranged along a line in a scene are in focus across the scene after passing through a lens.

In many cases, lenses are sharp along some kind of curve.  The practical effect is that if you were to take a photograph of a painting, for instance, the edges of the painting may not be sharp in your photograph, but subjects slightly in front of or slightly behind the painting would be sharp.


Lens Distortions -
Another design element in lens creation is controlling spatial distortions.  Said another way, lens designers work to ensure that straight lines along the edge of a scene are accurately reproduced.  This is why you will read in lens test reports the amount of distortion they were able to measure.

If lines near the edge of a field of view bow out and away from the center of an image, it is called barrel distortion.  If these lines are reproduced in a curve shape leaning toward the center of the field of view, it is called pincushion distortion.  If there is no distortion, the lens must a gift from the gods.


This pretty much sets the stage for future blog entries where I will rant and rave about how people perceive their lenses, the prices they are willing to pay for them, and try to compare these subjective "feelings" about lenses and lens "quality" against physical reality.

If you find this kind of information fascinating and if you would like to delve further into common photographic optical properties, take a look at Zeiss' primer on the subject.

Wednesday, October 16, 2013

Peaks and Valleys (2)

No.  The Muse has not yet returned.  She must be away on extended holiday somewhere.  Not that having spent the last five weeks with family guiding them through their Europe Vacations (including time in Spain) had any impact on... wait... that must be it...

Shapes and Light

I have not had any time to work my art.  Of course the Muse couldn't find me.  I've been up to my ears in distractions!

One thing I've had time to think about is that I can proceed in at least one of two ways.  I can strive to create images that make other people happy by studying and then making images that are culturally "current".  Or I can simply create the art I want, for better of worse.  It was then that I had another, stronger realization; I need to know what I want to create if I take the second approach.  That's the tough part, now isn't it?

Visiting museums in Spain, I had the opportunity to see just how great artists of the 19th and 20th centuries could be.  The real surprise was Picasso.  Up until this visit, I'd viewed him from the position of my own ignorance.  Then, after visiting the Prado in Madrid, I became convinced that Europe's greatest artists deserved their places in history.  Fabulous works all around.

If I studied beautiful works of art, would the Muse would return?

Shapes and Light

Once back in Paris to home and hearth, I couldn't help but notice that the World of Photographic Tools continues to grind out new and interesting toys to ogle and drool over.

Joining Canon's WIFI-only PowerShot N comes Sony's hybrid offerings in two lenses with sensors in their QX series.  These can be strapped on to and controlled by a cell phone or tablet.

If you remember, I wrote a fair bit about how nearly instantaneous art creation could become when combining a WIFI enabled lens/sensor system to social and image sharing networks.  Canon's and Sony's product offerings have yet to take the fully integrated step of combining a lens/senor system with and Android or iPhone operating system that Samsung has.  Still, progress is being made, even if it is in Baby Steps.

Then, yesterday, like a meteor hitting Terra Firma, came Sony's full frame E-mount (NEX-like) product announcements.

I've been thinking about down sizing my image capture systems.  The older I get, the harder it is to hold and manage a full frame Canon DSLR.  Would Sony's new products attract me enough to encourage me to sell my old gear and move into a new system?  The costs would be high and living on a fixed income would force me to seriously study any potential wholesale move such as this.

Shapes and Light

Quick as a bunny, I took a look at the specifications of the new Sony 7R and Vario-Tessar products.

It seems like Sony has done a nice job in creating a new family of products that are WIFI connected while offering the kind of image quality that large sensors can help an artist achieve.  The weight of the 7R body is 407grams without battery.  The weight of the 24-70 f4 Zeiss is reportedly 430grams.  While the lens is a little short on the long end of things, I would minimally need combination to shoot in the studio.

The weights compare with the Canon 5D MkII's 810grams and the 24-105L f4's 670grams.  That's Sony's 837grams, not including battery versus Canon's all up kit weight of 1480grams.  This seems a useful improvement.  It would be really great if a full frame Sony could also replace my current "walk around" NEX5 kits too.  The all up weight of the NEX5 with battery and kit lens is 502grams.

The old NEX5 would be 60 percent of a 7R/Zeiss kit weight.  The new Sony full frame would be 56 percent of the weight of the 5D/240-105L setup.  Hmmm... this is squarely in the middle between my "walk around" and "studio" setups.

Shapes and Light

Obviously, weight is only one dimension to be considered when evaluating imaging systems.  The breadth and depth of optical solutions, 12 versus 14 versus 16 bit A to D's used in the sensors, as well as support by third party suppliers, and long term engineering investment are important too.  In this way, Sony's new products do not contribute anything new nor compelling.

I don't yet see a clear way through this.  At the bottom of it, Sony's newest full frame mirrorless offerings are not really any more capable than my current images makers.  In fact, if I consider long lenses for bird and automobile photography, as well as ultra short optics used in tight situations, my Canon DSLRs remain the Cock of the Roost.

I will continue to watch the industry to see if they can strike the kind of balance between size, weight, and capability that I've been waiting for.  This might change completely should Canon buy a medium format sensor company and start engineering very large sensor solutions.  In which case I might head in a completely different direction with my art, enabled by a radical chance in tools.

Shapes and Light

What I'm really waiting for is the Return of my Muse.  Then all these mental machinations over new toys will subside and I can once again get down to the business of image creation.

Sunday, September 22, 2013

Peaks and Valleys

A friend, who directs the visual arts program in an anglophone community my wife and I belong to mentioned a wonderful photo-show at the Galerie Francois Mansart.  It features Patrick Alphonse's beautiful photogravure to Japanese rice paper images.

Nightshade Sister

I felt the rice paper was distracting in only a few of Patrick's prints.  Which meant, to me, that the balance of the show was very well done indeed.  I was particularly taken by an image of the island isolated Mont Saint Michel monastery sitting under a cloud filled storm gloomy sky.

The overall quality of the show was such that I was moved and inspired.

I asked the gallery keeper about the work.  He told me that M. Alphonse lives in the arrondisement and works quietly and in his own way.  He said it took him three months to convince the artist to hang a show in this gallery.

Miss Stephanie Lee

I left with the feeling that this interesting artist chose to work in relative obscurity.  It was shortly thereafter that something conspired to make me realize just how obscure my own path is.

Being "friends" on Facebook with models and creative people can be a two edged sword.  On the one hand, I can see what people are doing and participate in conversations and plan events and photoshoots.  On the other, I recently understood that I sometimes feel dejected when I see other photographer's and model's work.

It's strange, but after being contacted by models seeking to work with me, only to discover they soon found another photographer to work with, I have felt the odd sensation of being rejected.  How is it that I've become such a sensitive creature?  When did I start worrying about my images being "relevant", and to what or whom, exactly?  How can I let these feelings instill doubt about my own creative abilities?

Baron Samedi

The answer, for me, seems to lay in how I feel about my work.  Having avoided current "main stream" photographic studies in illustration, magazine, fashion, portrait, and commercial work, I realize that I have deliberately marginalized myself.  I choose subjects and themes that only small communities of creative people care about.

The steampunk, dark romanticism, and Gothic communities tend to be insular and small.  In these communities there seems to be a small number of artists willing to work with photographers such as myself.

Therein lies a conundrum.  Do I move my image making "look" and "feel" into the "main stream" and thereby gain access to a larger pool of photographic options?  Or do I try to hold on to ideas and enthusiasm while continuing to search and dig for the kinds of subjects and models I prefer?

Fleur de péché ~ Steampunk Lolita

I'm only guessing, but artists who choose to work in isolation must have the same kinds of questions I do.  For myself, I'd rather not be obscure, but seem presently powerless to move beyond this feeling.  Fortunately, feelings come and go and I know that sometime, hopefully soon, I'll be once again kicked into high creative gear and have all the tools and subjects I need to exit out of my present situation.

What's that quote about the darkest part of the night?

Wednesday, September 04, 2013

Gimp Magazine #4 has landed!

Gimp Magazine number 4 is available online as of today.

Your Humble Servant (thank you, M. Henry Manney) is conspicuously featured throughout the issue.  It's nice to see how good graphic artists can make a person look good.  Steve, the managing editor, even put a short video together.  What fun!

Here is how he promoted the latest release -

After a long career in software engineering and being an active promoter of open source software since RedHat 5.0, Christopher Perez, photographer of the outré, is now retired and living his dream in Paris, France.

I stumbled across Christopher’s work on Flickr.  I was so impressed by the style of his work that I found myself reviewing his entire portfolio, suddenly realizing that he works with GIMP.  Immediately I contacted him and asked if he would be willing to be a part of the magazine.  Graciously he said yes.  He worked with Debi Dalio to create not only the cover story, but three other significant articles in Issue #4 including our Master Class.

In my view Christopher is a very unique individual as he is not only an exceptional photographer, but also a highly talented digital artist.  I find this mix of talent to be rare — most people are either gifted in one area or the other, while Christopher is incredibly gifted in both.  Christopher also has a wide range of photography that we get to explore in Issue #4 from very bold to very beautiful (shown above) and everything in between.  I will caution you that some of his bold work is very dark and may leave you with a haunting feeling — it is that powerful.

This is a real honor to have Christopher Mark Perez featured in our magazine.  The fact that he works with GIMP is proof that GIMP is an incredibly powerful image manipulation package.  Please check out Issue #4 that is launching on September 4th 2013 right here at http://gimpmagazine.org.  I also highly recommend that you not only download the free digital version that we offer here and on http://issuu.com/gimpmagazine but to also purchase the print version at http://gimpmagazine.magcloud.com .  It is the only way to truly experience all of the high-quality, print-resolution images.  We can’t wait to launch this!


Wednesday, August 07, 2013

Incredible Good Fortune!

So... what would you do if... say... you went to a marche de puce... you know the one... the one you regularly haunt... because there are so many interesting things... but no canne de marche (at least, none seen worthy of being taken home)... and... let's say...  it's a beautiful, sunny day... and you have three guests visiting from the States... the best of friends, I should stress... where you want to share with them the wonderful experience of wandering and looking and bartering and giving money in exchange for old, sometimes junky things that you might or might not need... where upon wandering previously aforementioned aisles... peacefully minding one's own business... keeping an eye on things... and helping negotiate prices and conversations...  hoping that something interesting... like many animals in the animal kingdom... watching for bright and shiny objects... casually... um... HAH!  There's something now!!!... let's take a closer look... shall we?... why... it's a table filled with camera goodies... containing lots of film-era Japanese SLR junk... manned by an interesting sort of fellow...  and there's a tingling in me-bones... as if to tell me there might be a treasure just waiting to be uncovered... perhaps an 85mm Tak f/1.9?... like the one I foolishly sold before moving here?... or perhaps an overlooked 50mm f/1.2 Nikkor that like the one I foolishly sold several years ago?... if only I had not been foolish...  if only I have the eyes to... ah!... wot's this then?... with slightly trembling hand... reaching across the gap...  Huh... a small brass-barrel optic... I wonder if all it's elements are there?... it's old... that's for certain... and the optics are dirty... but no scratches... in spite of the jumbled display...  "Quel est le prix, s'il vous plait?"... what's the value of something you know nothing about?...  ah... wot's that?...  Oh...  you just dropped the asking price by half?...  [thinking] c'est pas trop chere...  "un moment, s'il vous plait... je cherche ma femme"... the interesting seller nods his head knowingly... as if I'll never come back... but off I go to find out if my wife has a couple quid on her... and... she does.  Oh happy days.


At lightening speed, money leaves my hands and into them comes a small brass-barrel optic.  I wonder what it really is.  Well, for the price, it's worth taking a chance.

Once home, after a wonderful extended lunch with our State-Side-Friends, and after a short nap, I take a closer look.  No.  There are absolutely no markings on the barrels that might indicate who made this thing.  Yes.  There's the slot to slide the aperture control disks. Only, it did not come with any, which is hardly surprising.  Frankly, if this optic works out, I'll want to shoot it wide open in any event.  Yet it confirms to me that this is a taking lens and not a projector optic.  This is either a portrait or scenic lens, depending on it's design.


I disassemble it to clean the lenses.  Four elements in three groups.  Indeed, they are quite clear.  No scratches.  Nice.  The cemented pair are even in excellent condition.  Shocking, actually.  Canadian balsam seldom lasts this long without falling apart.  Particularly after a lens has led the kind of rough life this little guy has.  Well, semi-difficult life, as the barrels are in perfect condition too.

OK.  Time to take measurements.

Out comes an above standard slightly garish very manly bright orange Castorama issue tape measure.  Project an image onto a handy white envelope and measure, et voila!

Huh.  The focal length is 15cm.  Good.  The lens diameter is... um... interesting... it's 5cm.  That makes this an, what?, an f/3 optic??  Damn!!! that's a fast lens for an old brass barrel.  Quickly now, let's use The Force (the NSA monitored Google) to see what lens designs might make this length and speed possible.


Well then, isn't that interesting?  There's really only one design that fits the focal length, aperture, and element layout from what I can tell.  Yes.  It's close to being an early tessar formula, but the second air-spaced element is all wrong for it to be that particular design.

Until new information arrives, I believe I have a 15cm f/3 Petzval formula optic of indeterminate manufacture and age.  Have you any idea how long I've been looking for one of these???

Now then, how to inexpensively rig this thing so I can stitch a series of images using a FF DSLR?  Yes.  It'll be more money.  I know this.  But.  Something just must be done.  Right?  Maybe a cheap set of Chinese-stone-hammered bellows and extension tube set?  Hmmm... yes, they might just do.

Exciting times, these.  Might help add that little "something" to my Dark Romanticism, Steampunk, Victorian Gothic themed images....


Saturday, July 27, 2013

Gimp Magazine issue #4 is about to launch

Debi Dalio and I teamed up to write a number of things for Gimp Magazine.  It'll all come tumbling out shortly.

Steve, the magazine's editor, says...

  • FEATURE: An Interview with professional photographer and digital artist Christopher Mark Perez.  This is an incredible feature story about Christopher and how he achieves his mind blowing photography and digital art creations.  This is an absolute must read for photographers or digital artists of all skill levels...
  • Did you ever want to know how to create a vignette that doesn’t look photo-shopped?  Learn how to create a proper vignette using GIMP software from the pros Christopher Mark Perez and Debi Dalio.  This is also an essential read for photographers who want their images to stand out.
  • Did you ever take a nice photograph, but it looked boring?  Add some style to it from the pros by creating a vintage look.  Christopher Mark Perez and Debi Dalio have delivered a tutorial on how to colorize in GIMP to give your photos an authentic vintage look....
  • And to wrap up this issue Christopher Mark Perez delivers an outstanding Master Class of how to create a professional looking portraiture.  This is where Christopher’s experienced photography and digital arts excellence collide to provide incredible results.  And Christopher has graciously shared his process with everyone in this feature-length master class.
That's awefully kind of him.

I can't wait to see if our work lives up to those description.  Something about how we Americans tend to be "over the top" in our descriptions of things...  :-)


Saturday, July 06, 2013

Studio Lighting - Day Three

On the third day of our photographic studio lighting workshop we continued working with the classic north light with fill card setup.  We worked with a harsh overhead movie style lighting.  The students seemed to really like the movie style lighting.

Here is the lighting diagram for the classic portrait lighting setup.


Here is the lighting diagram for the overhead movie lighting setup.


The following is an example of how I've used this kind of lighting setup.  I absolutely love it too.  So it wasn't just the students who enjoyed this setup.


The following is the email I sent after our Day Three workshop.


Dear WICE Members,

I enjoyed working with you in our three day workshop on photographic studio lighting.  I hope you had at least half as much fun as I did.  Your work is wonderful and it's good to see you take to the art the way you did.

As a parting shot, here are a few things for your consideration.

Remember Bill Gekas and if you like his work, take the time to reverse engineer the lighting and you too can come away with similar results.

Add Kristy Mitchell to the list of strobist photographers to study as well.  She does a great job with "concept" work and then expressing it photographically.  For studio work, I've found it works best to be begin with and idea and Kristy does just that

For a movie style, "edgy" lighting style, take a look at Joel Grimes work.  With a two light system and a reflector, you can approach the kind of work he does.  This is one area we did not explore in our workshop.  If it's something you're interested in, let the Director or Visual Arts know and maybe WICE could offer a workshop in just this kind of approach.  To be effective, it would include three areas of work: studio and field, as well as post-processing.

One last thing; if you don't own studio flash and, perhaps find it too technical, you can get incredible results from simple day light through a window.  I LOVE this as it proves that all you need is light.  Just about any kind of light will do.

The possibilities are endless, which is why I've tried to concentrate on the simplest, most "classic" art approaches to lighting.

Additional resources include the Strobist blog, the Online Photographer, and, for passing the time with nothing better to do, the Nikon, Canon, and Sony rumor sites.

Have a great summer and, with luck, perhaps we'll see you next fall.  I'll be around all summer, so if you're in town, look me up.

Happy Photography!!!

Kindest Regards - Christopher Mark Perez