Thursday, February 27, 2014

Story Telling ~ in images

Last week I spent a wonderful hour and a quarter on the phone with Brooks Jensen, one of the editors of Lenswork Magazine.  I was being interviewed for Lenswork Extended #111, wherein my Hauntings of Gothic Ghosts will be published.

Somanathapura ~ Karnataka ~ India

I've since thought a bit about our talk and want to take a moment to expand a little on what Brooks and I shared.  It seems easier to come back later and think "I could have said that better."  So this is my chance to do exactly that.

To begin with, I teasingly blamed M. Jensen for starting me down the path using photographic art as a means of telling a story.  His editorials on using portable document format (PDF) to distribute electronic copies of one's work, as well as his thoughts on photography moving in the direction of producing many related images set the tone and direction for my own images.  M. Jensen neatly conveyed the potentials in using modern technologies to express one's creativity cleanly and clearly.

He shared something with me that I think is worth repeating.  He couldn't remember who said it, but the line goes something like this.  In former times, a photographer might be known, after decades of diligent work, for perhaps 12 images.  One of which could be called "famous."

Ansel Adam's "Moonrise over Hernandez", Edward Weston's "Pepper number 30", Robert Capa's "Muerte de un miliciano", as well as Steve McCurry's "Afghan Girl" all come to mind.

Somanathapura ~ Karnataka ~ India

We then talked about how technology is no longer a barrier to image creation and how this allows current artists to explore a broader range of possibilities.  One such possibility is, as I instantly understood it, to create bodies of work.  Each collection of work consists of many images.  While each image can be individually outstanding, in total they can used to tell moving stories.

I foresee a time when a photographic artist can move beyond being known for a small collection of images to becoming known for a small collection of bodies of work.

Later in our conversation I may not have properly expressed to M. Jensen the strength of influence Lenswork Magazine has had on me.  I've read and looked at the magazine for nearly a decade.

Of all the publications, electronic and printed, Lenswork stands out for a number of reasons.  They publish photographic _art_, not just a few possibly interesting photos stuck around a large gathering of camera equipment advertisements.  Their concentration on photography as art has such a laser beam like quality that one can't help be forget about the technology (cameras, lenses, software, printers, etc.) and think long and hard about what makes a wonderful image.  There is no advertising to influence or distract from experiencing fine photography.

Somanathapura ~ Karnataka ~ India

I've been known to rile against the on-line forums which do nothing but cater to the adoration and fetish-izing of camera gear.  This is why I tend to down-play what cameras and lenses I use.  For myself, I've long ago learned these things are probably the least important aspects to image making.

The magazine sent me a collection of works by Kim Kaufman.  I was instantly thrilled and my senses were overwhelmed by the beauty of her prints.  I understand the technology she used to create these fine images, but this knowledge does nothing to over-power my initial response every time I look at them.  In fact, how she made the images means nothing.  Certainly not when you realize how drop dead gorgeous her work is.

Somanathapura ~ Karnataka ~ India

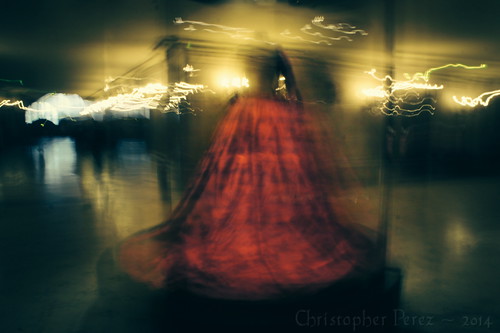
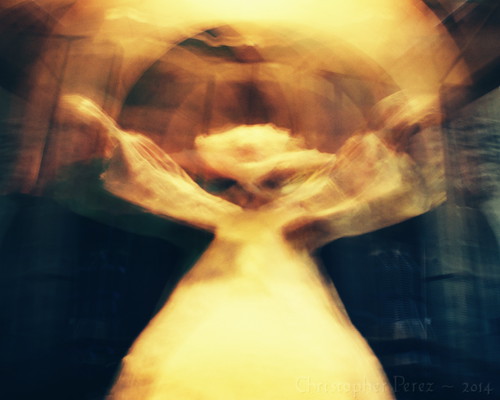
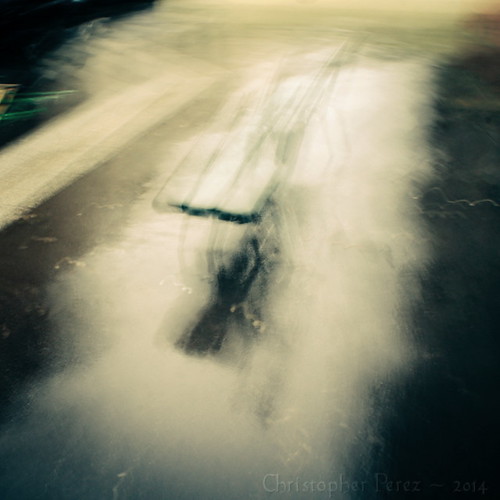
"Hauntings of Gothic Ghosts" is my second publicized collection of images.  My first collection was titled "In the Railyard".  It has been published several different ways, including being featured in Lenswork Magazine (Extended #78) as well as in Volume 3 from the Center for Fine Art Photography.

Waiting in the wings are works telling stories about alchemy and it's relation to the Roman Catholic church, further explorations into the nature and power of steam and locomotion, a new work that takes a look at 12th century Hoysala dynasty south Indian spirituality, as well as a body of work related to death and preservation.

After my talk with M. Jensen I feel more strongly compelled than ever that I'm headed "in the right direction." I can't thank him and his crew at Lenswork Magazing enough for helping hone the focus and direction of my own work.


Somanathapura ~ Karnataka ~ India

Sunday, February 16, 2014

Projects...

I have oft-times said here that I enjoy working with talented, creative people and that I enjoy working with these kinds of people on projects of duration, breadth and depth.  The bodies of work that can result are things that bring me happiness and contentment.

When we lived in the States, working with Eyerish and Nagasita as well as a host of other incredibly talented folks helped me find my style and to tap into that deep strong river of passionate art.

So... when someone in the local creative community suggested a subject and a project, I instantly threw my hat into the ring.  Some might say I begged to be included in the effort.  My insistent begging may have just paid off.  :-)

All I can say for now is that several wonderful avenues of creativity are being discussed.  When the venues are ready for public announcement I'll be happy to share the details.

Until then, here's a sneak preview.


Monday, February 10, 2014

Photography Around Pars ~ Retromobile

Off to the Retrombile!

Retromobile 2014 ~ in Red
 Ferrari
Just the thing for blasting the long straights of Le Mans...

Even though we no longer own one, I enjoy photographing automobiles.  To get around, we walk, take the Metro, RER/Translien, and TGV.  It's amazing to feel free from maintenance, insurance, and gas costs.  This doesn't mean I can't appreciate the art in automobile styling.  Europe seems to have styled their automobiles with grace, charm, and sometimes brute strength.

Auto exhibitions here tend to be packed affairs.  It's hard to move around with all the people crowding the aisles.  I worried about using a tripod at this year's Retromobile.  It couldn't be all that bad, right?  I was inspired when I saw several photographers using them at last year's event, regardless of the crowds.

For camera equipment I had a choice between taking a Sony mirrorless and one of the big Canon DSLRs.

Retromobile 2014 ~ in Red
 Ferrari
Such a pretty little thing, isn't it?

If I took the Sony NEX5 I would have light weight and sufficient detail to make some fun and interesting images.  Things like their HDR function add image creation flexibility that I don't yet have in my Big Canons.  They're cute and, after three years of very heavy use, somewhat battered. 

Cringing, I turning my thoughts to the Canon DSLRs.  They're old, heavy, and... um... why should I cringe?    They have more mpixels than the Sonys.  Not that that matters a bit for the kinds of images I make at these events. Canon lenses are much better built than Sony's low-end optics offerings.  Not that viewing the final results could tell any difference when printed to B+ size 13x19inches.

Retromobile 2014 ~ in Red
 Lamborghini Mura
I can still hear one as it lights up before
heading out into Sunset Blvd traffic...

The decision on what to carry was really an easy one to make.  I love the way Canon's Big Guns feel.  After nearly six years of continual use, I know how to work with them like I was born with one in my hands.  I know where all the buttons and functions and menu selections are.  I can work those cameras like there's No Tomorrow.

All I needed to do was remember to turn the lens' IS off.  You see, I forgot to do that at this year's la traversee and I lost several great shots.  The IS moves the image around as it "settles".  When mounted on a tripod and with a sufficiently long exposure, images are quickly blurred by the IS trying to Work it's Magic.

The kit ended up being this:
  • Canon 5D MkII
  • Canon 24-105L lens
  • Big Manfrotto tripod - legs set somewhat close together so as to not trip the crowds
Retromobile 2014 ~ in Red
 Ferrari 246GTB Dino
Make mine Fly Yellow, please.  It'd be
Just the Thing for touring northern Italy...

The first images I processed were of red cars.  I've been drawn to the color red Italians seem to have used since the Dawn of Time.  Cars and motorcycles look great when draped in it.  Alfa Romeos, Ferraris, Lamborghinis, Ducatis, and Moto Guzzis still turn my head when I see the flash of Italian red.

Pixel-peeping the processed files leaves a huge smile on my face.  They are sharp, sharp, sharp.  And I know that if I wanted to make a 40x60inch print, I could and that they would retain more resolution than the human eye could resolve.

Retromobile 2014 ~ in Red
Ferrari prototype
... be still, my beating heart... 

All of these things are technical details and do nothing to predict how a viewer might respond.

The real challenge is "seeing" something interesting.  That's where I get stuck.  I love the overall views of the show that place a subject in the middle of a swirling crowd.  I like seeing entire cars because I like to take in their lines as complete subjects.  This is what I "saw", right?

Is any of it "art"?  Probably not.  I'll just have to live with things as they are, because I like the results.  That should be sufficient.

-----
[My Flickr set from Retromobile 2104]

Friday, February 07, 2014

The answers...

This blog entry will provide a few answers to the questions posed in two recent contests that I ran, where readers were invited to tell me what lens made which photograph.

Needless to say, no one was able to determine anything about the lenses that made each image.  That is my point. It is impossible to say what lens took what, except in a few, rare exceptions where lens properties are unique.  I'm thinking of portrait lenses like the Petzval, Eastman Kodak, or Wollensak series of very large format film lenses.

I wanted to turn the common question questions of "which lens is best...?" inside out and try to lead people to consider what they really need in a lens by looking at end results.  Common questions asked differently free me to look beyond "tests" which more often than not prove lenses are sharper than current generation digital sensors.

Liquid Light

It comes down to asking two simple, short questions -
  • Does the lens fit my need?
  • Can I afford it?  
It's as simple as that.  Except, most of us don't know what our needs are, do we?

If we want a "sharp" lens, just about any lens will do.  Cheap kit lenses are typically sharper than the sensor.  I've used my NEX5 at 200ISO with an off-center Sony 18-55mm kit lens (yes, Sony seems to have trouble manufacturing lenses) at f/5.6 or f/8 and the results are as sharp from edge to edge as anything I've ever made using "better" equipment.

If we want a lens that separates the foreground from the background, just about any large aperture lens made for 35mm film camera since 1960 will do nicely.  I have a Nikon 50mm f/1.4 pre-Ai that is stunningly sharp from wide open.

If we want to impress strangers with displays of "expensive taste" there are plenty of very expensive cameras and lenses that serve that purpose.

Liquid Light

Some of the on-line camera forums lit up when Sony introduced their A7-series and a rather expensive 35mm f/2.8 Zeiss branded lens.  People went to great lengths to show it is a stunning optic.   Well, it had better be, because I have a Nikon 35mm f/2 Ai where measurable optical performance is every bit the equal of the new Wonder Lens at a tenth the cost.

From the Beer Contest, I asked if people could tell which lens made which image.  Bonus points were to be given to those who determined the apertures of the lenses, with half a bottle of beer offered to anyone who could correctly guess who made the lenses.

I own many old manual focus lenses.  When available inexpensively, they tend to follow me home.  It's from this "collection" that I took two lenses.  One was a 50mm and the other was an 85mm.  The apertures or makers?  I'll leave that for readers to ponder.

Liquid Light

From the second contest, I broadened the number of lenses to include modern as well as truly old optics.  I thought it might be interesting to mix multi-coated zoom AF lenses with old single coated or non-coated manual focus. The only thing I will say is that it should be obvious which lens is the late 1800's Paris flea market dumped in the middle of a table of junk Petzval formula lens.  It's an unmarked 15cm f/3 taking lens that can only be shot wide open.  As you look at the images taken using that lens, remember that it's purpose is to cover a 4x5inch or 5x7inch sheet of film.  At those dimensions images are surprisingly sharp.  On full frame DSLRs it's an interesting lens that gives pronounced "portrait" effects, just like it was designed to do.

You might ask why, in the end, I won't reveal the names, focal lengths, and apertures of the other lenses.  To me these sample comparisons prove that the makers, focal lengths, and apertures don't matter.

What matters is the brain and heart of the person standing behind the camera.

Thursday, February 06, 2014

Sony is in the tank...

CNN Money just posted this article about Sony Corporations on-going weakness in the electronics marketplace.  Here are a few things that struck me.

"Sony sells PC business, cuts 5,000 jobs...

...The Japanese electronics group said it expects to lose 110 billion yen ($1.1 billion) for the year ending March 31. The forecast was a surprise, and a sharp downgrade from its previous estimate of 30 billion yen profit...

... things are now so bad that Moody's has decided that Sony is no longer worthy of an investment-grade credit rating. The agency downgraded Sony to junk last month, warning that profitability would likely remain "weak and volatile." Fitch made the same move in late 2012..."

No mention was made of Sony's imaging businesses.

Sony is a huge manufacturer of digital sensors for imaging applications.  Their sensors appear not only in their own products, but in those of other manufacturers, too.  Nikon reportedly uses Sony's sensor masks, modifies them for Nikon's needs, then uses Sony foundries for production.  Olympus and Ricoh reportedly use Sony built sensors in some of their products.  Pentax and Phase One (who bought Mamiya) use Sony's 50mpixel CMOS medium format sensor.

I like Sony cameras.  I use a pair of their first generation NEX5 and like the bodies (but find their lenses just "OK").  Their recent full frame mirrorless A7 and A7R announcements seem rather interesting (though not interesting enough for me to leave Canon DSLRs behind).  If they can get their AF speed to match the phase lock AF systems of high end DSLRs, I feel they'd have a Market Dominator on their hands.  Leaving the mirror-box behind seems, on paper, to be a very good idea.  Though Canon's shutter assembly reliability will be hard to beat (300,000 clicks for pro-units, and 150,000+ on semi-pro bodies).

While it's hard to imagine that Sony Corps financial woes will cause them to leave the imaging market, it's hard for me to imagine their camera groups not being effected in one way or another by budget cuts and company reorganization.  Until specific announcements are made, what will happen is anyone's guess.

Liquid Light

Tuesday, January 28, 2014

Great news! Lenswork Magazine just picked up some of my work!!

Ce matin, après nous nous sommes levés, après le petit déjeuner, et après j'ai pris une douche, I opened my morning email to find the following.

Christopher,
Congratulations! We've reviewed your PDF submission to LensWork titled Hauntings of Gothic Ghosts and have selected it for publication in issue #111 (Mar-Apr 2014) of LensWork Extended. We are very excited to include your work and know that our readers around the world will find your photographs of interest an inspiration.


This is great news!

It will be the second time Lenswork Magazine has picked up my work to share it with their readers.  The first time I got to share some of my steamlocomotive images.  That was in Lenswork Extended #78.  During the interview I was very nervous and the room I recorded my answers in sounded like a barn.  It was the restart of a growing list of published works.


When I was much younger, my images were published from time to time in motorcycle and automobile magazines.  Southern California was the place to be for photographers and motorsports writers at that time.  While I never participated in that culture to the degree successful artists did, it is fun to look back and consider those early days.  I still have some of the magazines in storage back in the States and may have to dig them out and bring them back to France with me.

Over the past ten years as I have engaged digital photography, my image output has increased dramatically.  I always shot a lot of film, but the new technologies allow me to simultaneously explore numerous veins of creative expression.  Wherever my mind's eye looks, it seems, I'm off and running to see what can be created.

Two years ago my wife and I moved from America to Paris, France.  When we made the move, I knew I would have the chance to spend time in places that tourists usually only get a few moments in.  The great monuments, the wonderful parks, and the lesser known places are all within 20 minutes of our apartment.  It would be a shame to squander such a fabulous opportunity.


When I shot the Hauntings of Gothic Ghosts, I wanted to express how I feel whenever I visit one of Paris' great 1800's cemeteries.  The history, funerary art, and roll-call of who is buried in these sites is to me continually impressive.

Looking at some of the themes I tend to shoot in (heavy textures, modified color spaces, subjects who dress at the edges of culture) I am smiling to think the Hauntings of Gothic Ghosts series is nearly "straight" photography.  "Straight" in the sense of fewer rather than more image manipulations.

Those who know me are probably laughing, shaking their heads, and wondering what I'll be up to next.  "Stay tuned", as we used to say.

Monday, January 27, 2014

Photography around Paris ~ Palais Garnier

I've been cranky lately.


My prior two posts have been rants and challenges about camera equipment, how we think about it, and what we really know about what's important in images.  You see, I made a mistake of looking at an on-line forum and saw that questions regarding what is "best" or what is the "sharpest" lens remain evergreen topics.  I shouldn't have looked.  Really.  I don't like being that worked up for other people's problems of reality.  I need to simply stay away so I can concentrate my energies on image making and the exploration of image art.

Yesterday, Jude suggested we visit the Palais Garnier Opera House.

We'd never been before.  Sure, we'd been to Paris as tourists many times and we moved here two years ago.  Somehow, the Palais Garnier never rose to the top of our list of things to do.  After discussing the possibility of visiting the Little Corporal at Invalids, the opera house won out.  There's always time for death and destruction and so little time for beauty.


Into a driving rain we dove and up to the metro we went.  It was nice and warm in the metro and we knew that would change at metro stop Opera when we re-emerged at ground level.

The good thing about rain, and cold and winter too for that matter, is that it tends to keep the Pesky Tourists to a minimum.  Sure, the Chinese Hoards still show up, but nearly everyone else stays away.  The ticket line was non-existent and we were "in like a cheap suit."

As we approached the staircase I knew I'd chosen the right way to photograph the adventure.  Floating ISO (200 to 1600 on this particular device), set to Program mode, with the image style set to B&W.  Saving files in both RAW and jpg is a great trick when using in-camera "filters", or whatever the marketing guys like to call such things.  If needed, I could always rework the RAW file as it retained all the original information of the scene in color.  Only the jpg was in this case saved in B&W.


I wasn't prepared for how incredible the Palais Garnier is.  I'd read about it, which didn't amount to much.  Reading and experiencing something can be two completely different things.  Such was this opera house.

The light in the Palais is beyond description.  The marble carved balustrades and stairs are lush and rich.  The bronze castings are voluptuous.  Incredible opulence, all of it.  I could see why the Rich and Famous love this place.

As I wandered from space to space, from room to room, I let each scene unfold before me.  When I saw something that I liked, I tried hard not to over-think the composition or the subject.  I simply raised the camera and hit the button.  I let all that modern technology that comes in current digital cameras do what it was meant to do, while freeing my mind and vision to respond on an emotional level.


The curator of the Portland, Oregon gallery that was started by students of Minor White has been following something called "miksang".  Doctor Scott Jones explained it to me as a way of photographing something without engaging it in what has become the traditional photographers way of making images.  Look at his site and perhaps you'll see what I mean.

I can't say I was able to enter the Open Mind state as I photographed the Palais Garnier.  What I can say is that I very much enjoy the fact that I now have over forty images that please me in ways I was unprepared to experience.

Saturday, January 25, 2014

Contest Time!... um... let's take a closer look at this...

Yesterday I posted a contest to win a free beer.

As you think about the two lenses whose images I posted there, I thought I'd throw four more lenses at you.  This time to illustrate several ideas which we will get to in a moment.

As background, I chose similar effective focal lengths so as to retain a common perspective to the scene.  For the first run I shot the lenses all at the same aperture.  For the second run, I let just one of the lenses shoot wide open where it was stopped down during the first run.  Three lenses were shot wide open for both runs.

To start, here was the "test" setup -
  • Canon 5D MkII or Canon 7D
  • ISO50 (5D MkII) and ISO100 (7D)
  • 2 second shutter release delay
  • With manual lenses I Live View focused, otherwise AF was used
  • Stout tripod
  • In-camera sharpness set to 3 in both cases
  • CR2 output converted straight into jpg without any processing
  • Light "curves" adjustments applied to help match the subtle difference between the images after conversion
To start, here was the overall scene shot with four lenses.  As in yesterday's contest, enlarge these images to 100 percent to observe any subtle, or not so subtle differences.


Here is the first run.  These are 100 percent crops of the sharpest area in the scene.  There is one image where I sharpened the output.  It should be fairly obvious.  And if it's obvious to you, think about what kind of lens might make the original image.  Then think about which lenses made the other three selections.


Here are 100 percent crops of an out of focus region.  One of the lenses was stopped down to match the aperture of the other three lenses.  Knowing what you do about lens design, consider what kind of lenses might be used to render the various out of focus areas.  Then consider which you find most pleasing.


Here are 100 percent crops of the same out of focus region as the images we just considered.  This time only three lenses are used.  One lens was shot wide open (instead of stopped down to match the aperture of the other three lenses).  Consider which it is and take another close look at the comparative images.


Can you answer the following questions?
  • What focal lengths do you think these are, remembering that I shot two in APS-C and two in Full-Frame
  • What lens would have made the sharpest images?
  • Can you tell if zoom lenses were used?
  • Conversely, can you tell if fixed focal length lenses were used?
  • If you can tell any of these things, can you tell the apertures these were shot at?
  • If you can tell any of these things, can you name the lenses?
I am being deliberately provocative in presenting these "tests" in this way and asking the previous questions.

Here is a processed image.  While I will give the full set of answers to all the questions asked in this post later in the comments section in a week or two (so as to give people time to consider their answers carefully), I will say that the lens used in the making of the following image is ancient.  It's purpose is more in line with late 1800's Pictorialism than modern ultra-sharp, ultra contrasty image making.  With all this in mind, I like the style and the way the lens behaves.


Think about it.  Ponder it.  Then answer the next set of questions.
  • What are the important factors in making a fine image?  
  • Do you rely on people to inform you what is the "best"?  
  • Do you rely on the latest "advancements" in imaging technologies to give you a "edge" in image creation?
  • Are you handing your creative process and artistic output over to the control of others (private or corporate) who might not have the same goals as you?

For myself I've found that answering all of these questions openly and honestly can provide real insight into what I do, what I have control over, what I expect others to do for me, and what is very much my responsibility to understand and manage.

Which leads me to asking this very provocative question:
  • If you can't tell which lens made which image, what other ways might you have in deciding what makes a fine image?

Artistic liberation is just around the corner.

Friday, January 24, 2014

Contest time! WIN a free beer!!

Here's another in my long running, never yet won, series of "Guess the Lens!" photography contests.

The game is this: Correctly guess one of the two lenses and I'll give you one of the bottles of beer I photographed.  To collect your prize, I will be happy to meet you at the Rugby Bar of my choice in Paris, France.

For this contest I will increase your chances of winning by 100 percent by giving different two lenses, with side by side photos to study.  Make sure you look at the images at 100 percent.  No sense in throwing away resolution by looking at just the small images posted here.  Enlarge them.

To make things even easier, I will eliminate some of the extraneous guesswork by providing a few details.
  • Canon 7D
  • In-camera image sharpening set to 3 (considered by some to be too low for the 7D, but I like it)
  • Tripod mounted
  • ISO set to 100
  • Exposure set to AV
  • Careful manual focusing in Live View
  • Shutter release by 2 second delay
  • CR2 images converted to jpg in DPP
  • Tasty subject worth buying cases of (IMNSHO)
Here is the overall scene.


Looks tasty, just as advertised, right?  :-)

Here are 100 percent crops of the off-lens-center label area.  There might be a clue or two in this by considering how fast each lens drops resolution as you head to the edges of the frame.  Or not.


Here are 100 percent crops of the center of each frame.  This should be where both lenses are at their sharpest.  Right?


Finally, here are 100 percent crops of the top of the liquid in the foremost bottle.  Take particular care in observing the window highlight area found on the right of each image.  The lenses treat this area differently.  There could be a clue in this.  Or perhaps not.  You get to decide.


For extra points and a second bottle of beer, tell me what aperture each lens was set at.  Half marks (as in half a bottle) if you correctly indicate the lens makers.  Are they some combination of Zeiss, Leica, Canon, Pentax, Jupiter (Russian), Sigma, Schneider, or something not yet mentioned?

Good luck.

On your marks.  Get set.  Go!

Wednesday, January 22, 2014

Photography Around Paris ~ Steamlocomotives!

I recently posted a (growing) list of fun photography things to do in and around Paris and started this series of blog entries by talking about how I like to photograph la traversee de Paris (involving 600+ voitures anciennes).  This entry is dedicated to my French Photography Adventure in Steam.

8x10inch Palladium contact print from original film negative

Years ago I worked for a software start-up.  The offices were in an old building that backed up to Union Pacific's freight tracks.

One day an engineer came running into my office and said "Come with me.  You NEED to see this."  Out the back door we dove as he gestured to the railway an said "There!"

Sure enough, "there" it was.  SP4449 was running hard up the tracks.  It was just the steam locomotive and it's tender.  That was it.  But that was enough to get me interested.

SP4449 steamed up and ready for the first run of the day

It took me a year or two to figure out where the locomotive lived.  Once it found her, I spent the following decade making images in and around the roundhouse, getting to know two other engines that lived in the same shed, and enjoying old railroads around the western US.  That is when my adventures in rail photography led to my work being published in Lenswork Magazine Extended #78, and the Center for Fine Art Photography's volume #4.

Moving to France, I was eager to find European steam to continue my love affair with light chasing as it bounced and wriggled it's way off old iron and early steel.

I started my rail photography by working in 8x10, 7x17, and 4x5inch large format film.  I still have several 8x10 Palladium prints that I made.  To me they are still some of the most beautiful images I ever made.


Running gear details differ from their Anglo/American counterparts

The challenge always was how best to control the extreme contrast ranges typically found when trying to photograph black iron against a brightly light background.  The advent of digital photography helped me solve that problem.

I've written a little about high dynamic range (HDR) photography and it's a technique that has it's good uses, particularly when dealing with trains.

Finding steam in France required a rather diligent search.  A little creative googling revealed a privately held rotonde located somewhere east in the vasty fields of Paris.  It's called AJECTA.  Taking the metro to Gare l'Est and jumping a Translien to Longueville is an easy hour and a quarter spent riding modern rail.  A ten minute walk from the modern station led to the early 1900's roundhouse and it's 14 steamlocomotives.

On the day I visited they were firing up one of the three working steam engines to ready it for un tournage that was to take place the next day.  I was thrilled as it had been a very long two years since I witnessed working steam like this.

In the cabin and ready to stoke the fire

For this photo-adventure, I shot my Canon DSLRs at their lowest ISO settings.  This ensured that I captured the maximum dynamic range in each shot as well as making sure the slightest details were revealed.  Keep in mind that the higher the ISO setting, the lower the dynamic range.  This meant that I needed to use a tripod.  Roundhouses tend to be dark, dank places to visit and it's no use trying to handhold a camera when the shutter speed extends beyond 1/60th of a second.

On one of the last shots of the day my tripod broke one of it's cheesy plastic locks.  I didn't feel too bad as it was the very same tripod that'd seen heavy use in India years ago when I took an ultra light weight Anba 4x5inch film camera and Docter Optics Germinar Zeiss lenses, along with several stacks of Kodak TMax100 readyloads.

 Extreme dynamic ranges can be modulated thru the use of HDR techniques

Those days are long gone.  I no longer shoot film.  But, a sturdy tripod is still a requirement, particularly when working at the edges of extreme detail.

When photographing trains in a museum, here is my preferred approach.
To leave no artistic stone unturned, a quick study of O. Winston Link can be helpful too.

Happy French Steam Rail Fanning!

Monday, January 20, 2014

Photography Around Paris ~ la traversee hivernale 2014

I recently posted a list of events that might be of interest to photographers living or visiting Paris, France.  This is the first installment of a series of blog posts devoted to checking off items on that list.

My sister blog, Retiring Out of America, will cover each event or location from the perspective of "alternative" things to do and see.  This photography blog will cover these things from the perspective of cameras, lenses, and image making technologies.


I begin with la traversee de Paris, hivernale, 2014.

Twice a year, once in January and again in July, l'Association Vincennes Anciennes hosts a great photo-op.  Over 600 old cars, motorcycles, and (in winter) bicycles work their way around the streets of Paris.

In winter, they leave the Chateau de Vincennes around 08h00 in the morning, go to Monmartre thru la place de Republique, come down the hill to spend time in conversation while eating a bit of cheese and baguette, and drink a draught or two of le vin.  They then continue on to la place de Concorde, up the Champs Elysees, around the Trocadero, across the river to le tour Eiffel, down the Blvd Saint Germain des Pres, across Pont Sully, and back to the Chateau.

The summer route is different.  It starts at the Chateau de Vincennes, it ends on the west side of the river Seine at the astronomic observatory at Mudon.

Early in the morning, French enthusiast photographers set up their tripods and get to work photographing the early arrivals.  Later, many tourists wielding low-end cameras can be seen wandering around the city snapping images as the cars blast by.


A good approach to photographing the event could be to spend a few hours in a location where everyone has parked their cars.  There are several such locations around town.   The following is what I've watched being put to good use in those situations.
  • Camera on tripod
  • Standard zoom or fixed focal length lens
  • Image stabilization turned OFF
  • Sensor sensitivity set to a very low ISO (ie: ISO50 to ISO200)
  • Lens aperture set to f/8 or f/11 for crisp detailed static display images.
  • Triggered using the two or three second delay

For wandering the crowds as they gather, here is what I've seen put to good use.
  • Camera hand-held
  • Standard zoom
  • Image stabilization turned ON
  • Sensor ISO set to float
  • Aperture set to wide open (to limit depth of field and separate the subject from the background)
  • Shutter speed set to at least 1/150th of a second (to kill blurry images) 
  • Triggered in Single Shot or Continuous mode

If you choose to photograph the cars as they move, you might keep the following in mind.
  • Camera hand-held panning _with_ the chosen vehicle
  • Longer than standard zoom (I like 70-200 on APS-C or 100-400 on Full Frame, but YMWV)
  • Image stabilization turned OFF
  • If you want sharp images of cars (that might not give a sense of speed) - Sensor ISO and lens aperture set to float, and shutter speed set to 1/500th of a second or higher
  • If you want to capture the sense of speed - Sensor ISO set low, lens aperture set to between f/8 and f/16, and shutter speed set to between 1 second and 1/15th of a second (depending on how much background blur you like)
  • Triggered in Single Shot or Continuous mode (depending on your shutter speed)


When you're done, you can post your images to Flickr for all the world to see and enjoy.

Thursday, January 16, 2014

One camera. One lens.

I know.  This has been plastered all over the 'net.  Still, it's great stuff!

It looks like the artist uses a Canon 5D MkII and a Canon 135mm f/2 L.  That's it.  Or at least that's it for the images shared in the link.

While we're wondering over the sparse equipment she used, consider instead her use of light and composition.  Outstanding, isn't it?  Classic.  Artistic.  Gorgeous.

Why don't we all make images this good?

Something to think about.  I know I am.

Wednesday, January 08, 2014

Canon shutter count and Linux...

Canon is well known for not allowing easy access to a camera's total shutter click count.  Apparently other manufacturers are not so guarded.  I use Canon cameras, so what to do?


A quick search using the Force (google) revealed several methods.
  • EOS Count is a for (small) pay website
  • EOSInfo is free, but can't report some DSLR shutter counts (including the 7D)
  • Linux + gPhoto2 is an Open Source Software solution that might drive some people nuts
You can probably guess which approach I took.  Yes, it was the Linux + gPhoto2 approach.

To be completely honest, I tried EOSInfo first.  It gave a correct count when I connected a 5D MkII, but it did nothing for a 7D.  This is why I turned to Linux and gPhoto2.

My recipe for getting at the 7D's shutter count and confirming the 5D MkII's shutter count is as follows -
  • MintOS Linux
  • Installed on a 4 gig USB stick using unetbootin
  • HP Pavilion dv7 booted to Linux
  • gPhoto2 installed from a terminal command line "sudo apt-get install gphoto2"
  • USB connect a camera to the computer
  • Turn on the camera
  • Open a terminal to access a command line interface
  • Type "gphoto2 --get-config /main/status/shuttercounter" to read the shutter count

I experienced two wrinkles, both having to do with being unable to lock the port or finding the port in use by another program.  The 7D required the following to work -
  • Terminal command line "ps aux | grep gphoto2"
  • Read the process(es) ID (PID(s)) of anything that says "gvfs gphoto"
  • "kill -9 " of all processes found in the prior command
  • In my case, the "gphoto2 --get-config /main/status/shuttercounter" command then worked
 In the case of the 5D MkII, I needed to do the following -
  • Connect a USB cable between the computer and camera
  • Turn on the 5D MkII
  • Terminal command line "gphoto2 --get-config /main/status/shuttercounter"
Attempting the 7D approach of finding and then killing PIDs related to gPhoto2 when connecting a 5D MkII did nothing but bump the PID by 2.  Go figure.  I'm sure there is plenty of detailed information in the various bug lists for Debian based Linux releases for what's happening or how to properly operate gPhoto2.  I didn't take the time to read any of it after finding my own work around. 

Brute Force and Ignorance (BF&I) rules!

In the end, the 5D MkII reports just a few ticks over 58,000 shutter actuations after five years of very hard use.  The 7D is much more lightly used, reporting just over 17,000 shutter clicks.  The 7D is still a youngster.  Though I heard from a friend yesterday that he knows of an original 12.8mpixel 5D that has over 800,000 shutter releases after having it's shutter mechanism attended to on a regular basis.  So with that in mind, the 5D mkII is also a youngster.

Saturday, January 04, 2014

Photo-adventures in and around Paris ~ 2014

When we lived in the US, our city played host to all manner of wild and wonderful parades, festivals, and artistic adventures.  Moving to Paris I learned that I would have to dig a little deeper to find a similar level of creativity.


The laundry list of tourist photo-ops is well known.  I quickly am bored by such things.  While there is always a uniquely personal way of expressing and sharing a scene, Paris has got to be the most photographed city in the world.  People don't typically like to have a camera thrust into their face by strangers, which can make street photography challenging here.  So I tend to prefer the side-shows, the creepy or odd, and the less known events or places where seemingly every is carrying some kind of camera.

With this in mind, here is my short list of must do photography "friendly" things for 2014.  It's a list dedicated to serious photo-making opportunities.  Many of the events involve costumed people who are happy to pose for you.  So dust off your camera gear or cell-phone camera and meet me somewhere around l'isle de France.

Year round -
  • La Rotonde de Longueville ~ steam locomotives.  Lots of them.  Some working.  Some not.
  • Catacombs ~ the remains of millions of Parisians.  Take your own flashlight for the darker, creepier areas.
12 January -
5 to 9 February -
  • Retromobile ~ Old cars, motorcycles, and motor memorabilia at la porte de Versailles.
2 March -
30 March -
  • Carnival of Women ~ Men and women dressed up as royalty, queens, and other femininity.
14 to 15 June -
2 to 6 July -
  • Japan Expo 2014 ~ Anime, Manga, Cosplay, Lolita.  It's how France's youth "puts on the dog."
4 to 6 July -

I'll be attending as many of these as I can.

Friday, January 03, 2014

Now what...?

A recent Dear Susan blog entry sparked my following (edited) response to the questions raised concerning the present state of photography.


There are raised a series of questions that many of us have been struggling to answer.

For me, here is the nub of it: We _must_ decide what is important _to each of us as individuals_.

Why do we pursue photography with the level of passion that we do?

Is it the feeling of joy that a "superior" piece of photographic equipment can give?

Is it the prospect of making money from photography?

Is it the art of a final work-product?  That is, is it an image or project of images that fully expresses what you feel, or what you must say?

I dare say that we must be honest with ourselves.

I put it this way because I see many people tend to confuse these three elements into believing in there somewhere some kind of magic will mystically appear.  It won't.  Not even the world's greatest artist ever had a style or approach drop into their laps, unbidden, without fully engaging their art.  Tools, in those cases, become utterly secondary to what's going on in the artist's head and heart.


If you love camera equipment, then love camera equipment.  Realize that you might not make a pleasing image, but let's be honest about your motives, shall we?

If you want to make money from photography, then pursue it in full knowledge of the styles and practices that are currently selling.  This, so you can increase your chances of financial success.

If you want to make art, then it's possible that money and equipment will only be a means to an end.  Your results may successfully reflect what you feel you must say.

Answers to these questions will be vitally important.  Why?  Because what is happening right now is a redefinition of photography.

It's had a great run for the past nearly (but not quite) 200 years.  The technologies that enable image making have evolved to the place where the act of photography has been made commonplace and easy.  Practically no thought, planning, or practice is required.


Someone wrote an article that triggered a cascade of realizations in me about the present state of photography.  In short, there has been a mass movement from the potential for photographic art and reportage to an instantaneous sharing of experience.

Think about that a moment.  Experience.  Not art. Not informative reportage.  Experience.

When we think about what we want to say to each other (in our blogs and social media outlets) we come constantly straight against the question:  Who cares and why?  Why does what I say matter? 

The worst part if it is that even with all the effort it takes, you run the ego-deflating risk that no one will look.  That no one will care.  Then what?  Why are we doing what we do?

It takes a strong person to look boldly into the face of reality, doesn't it?

Wednesday, January 01, 2014

Study image post-processing in Paris, France

Bonne Année!

I am leading a 4 day, once a week, photographic image post-processing class in Paris, France.  There are three slots left.  So if interested, sign up and take part in the fun!

Here is the announcement.

Here are the details (from the announcement) -

Thursdays Jan 9, 16, 23, 30 3pm - 5:30pm
The "taking" of a good photograph is quite often just the start to "making" a wonderful image.  The great photographic masters learned this by studying the great painting masters.  We, in turn, can learn from all of them.

After reviewing how we can organize our photographic workflow, students will learn how to apply film-era print techniques to digital images.  We will be learning from the Masters of the Chemical Darkroom Age.  Students will explore important details of what goes into making a good photograph great.

We will learn how to properly vignette a scene to direct a viewer's eye.  Next, classic techniques of dodging and burning will be studied.  We will then experience the importance of spotting and correcting image defects.  Using our new-found knowledge, we will review and comment on each other's work.

Course Requirements: Students need to bring their own laptop computer with image processing software, as well as their own images to work on during class.

Instructor: Christopher Mark Perez is an internationally published photographer (LensWork, PhotoLife, Gimp, and SilverShotz Magazines, as well as several books of Steampunk creations) and competition winner (including The Strobist, and The Center for Fine Art Photography). Christopher recently moved to Paris to connect with creative people in the pursuit of making fine photographic images.


Wednesday, December 18, 2013

Creating High Dynamic Range Images with Luminance HDR

Realization came as I waited outside the restrooms at the Charles Russel Museum in Great Falls, Montana. Yes, it felt as strange to me then as it likely does to you reading this now. Fortunately, it had more to do with the relationship of art to photography and tonal values than anything else a person might imagine “realization” to mean.
I was looking at a somewhat recent painting of a grand Montana landscape. I saw clear detail of bark in heavily shaded trees growing in a calm and pretty glen in the foreground. I could see that there was detail in the clouds surrounding a mountain in the background. It was then that I realized the challenges of photography in these kinds of situations that are more easily solved in painting. How do we keep detail in the shadows, prevent bright clouds from being “blown out”, and manage the tones of the overall scene in a realistic manner?

In film photography, contrast can be carefully manipulated through the complex use of color filters to create black and white masks. One of my favorite photographers to use this approach is Christopher Burkett. His work is absolutely stunning and clearly illustrates how photography is art in the manner of controlling all of the tones across the entirety of a vast scene.
For those of us who use digital cameras, there are several software tools specifically designed to help us manage High Dynamic Range images. Such software holds the promise of helping a photographer reveal shadow detail, while retaining highlight tones and pleasing tonal values across a scene. A popular application is Photomatix. It's not too expensive, yet, being a strong advocate for Open Source Software, I used something called qtpfsgui.
At some point, the qtpfsgui project was re-energized with new software developers and the name was changed to Luminance HDR. It was then that the application became rather unstable on my computers. The software would crash when using certain tone mapping operations. I was never able to produce a full resolution Canon 5D Mark II file (5616 x 3744 pixels) without the application suddenly disappearing. So I stuck with qtpfsgui version 1.8.x.

Recently, out of curiosity, I wondered how the Luminance HDR project was proceeding. The software was now up to version 2.3.1. After installing it on my old Windows 7 laptop I quickly saw that much had changed. As I tested the latest version, I realized that Luminance HDR has become a solid, stable piece of software. I can now create full resolution 5D Mark II output files and the tone mapping operations behave in a rock-solid, consistent manner.

I am very happy with the progress that has been made. So, here is an overview of how I use Luminance HDR to process my HDR images.
Step 1 – Capturing an Image
My old Canon 5D Mark II provides a method, called exposure bracketing, to capture a scene in three exposure steps. The ability to over- and under-expose, that is, to set the exposure value (EV) range, is limited to plus or minus 2EV. Still, this is useful for most situations I find myself in.

I use a tripod when making these kinds of exposures in order to keep the three images aligned. It makes the image stacking operations (which we will soon encounter) easier. Many current cameras from Canon, Nikon, and Sony provide in-camera HDR processing, which allow handheld HDR photography, thus eliminating the need for a tripod, unless a photographer finds himself in a dimly lit environment.
In any event, the trick is to capture as much detail in the highlight and shadow areas as possible. This is information the software can use to create a tone mapped image.


Step 2 – Launching Luminance HDR
Starting the Luminance HDR application brings you to a large desktop-like layout. Take a moment to familiarize yourself with the location of the rich selection of operations. To keep things simple, and to show a nicely streamlined process flow, we will use only a few of them here.

Step 3 – Invoking the HDR Creation Wizard
Clicking “New HDR Image”, found on the left end of the tools bar, brings you to an information page which you might find interesting the first time you run the program. Click “Next >to continue to the next operation.

Step 4 – Accessing the Images
The Creation Wizard helps you locate and load your images into the program. Find the big green “+” in the center of the window and click it.


Step 5 – Selecting the Input Images
The image selection window allows you to navigate to and choose the images to be processed. In this example, I have selected three images of the same scene with exposure values of +2EV, 0EV, and -2EV.
If your camera provides an HDR-ready image, select just the single file. All the highlight and shadow information will already be integrated for further processing.

Click “Open to continue.


Step 6 – Viewing the Selected Images
You are now returned to the Creation Wizard window. The list under “Currently Loaded Files displays the names and exposure values of the images that were loaded. The “Preview area shows the currently-selected image.
If you used an older camera that created three separate files, and if you handheld your camera, you will want to select the “Autoalign images checkbox found below the preview area.

Click “Next > to continue.


Step 7 – Passing Through the Editing Tools Window
You will now be in the Editing Tools window. For the way I use the software, there is nothing needing to be done here.

Click “Next > to continue.


Step 8 – Choosing Settings for HDR Creation
There is a selection for “Choose one of the predefined profiles”. The default is “Profile 1”. The various profiles blend the image layers in different ways. “Profile 1 is a very good place to start. In fact, you might not ever use anything else.

I sometimes use “Profile 6”. It blends with a bit of Gaussian blur and produces an HDR image with less noise than “Profile 1”. Still, much of the time I stay with the default profile.

Click “Finish to continue.

Step 9 – Choosing Settings for Tone Mapping
The image is finally ready for tone mapping, which is, for me, the entire point of processing HDR images. It is where the tonal values across a scene are manipulated in potentially visually pleasing ways. This is where the magic happens. If an HDR image is not tone mapped, it will likely look flat and unappealing.

Luminance HDR gives the user a rich variety of options for creating wonderful images. These are the “Operator selections found in the upper left portion of the application desktop. Each operator takes the input HDR image and processes it in its own way. Additionally, each operator has its own collection of parameters with sliders that allow you to further modify the actions of the tone mapping. Exploring the possibilities as they apply to your images is time well spent.
In this example, I have selected the “Mantiuk '06 operator and set the “Contrast Factor to 0.60. I set the Result Size to 5616x3744, which is the full resolution file size of a Canon 5D Mark II.

Step 10 – Initiating Tone Mapping
Press the “Tonemap button, which is at the bottom of the controls on the left side of the work area.

When completed, the tone mapped image will appear in a new “Untitled” tab window on the right side of the work area.

Step 11 – Adjusting Levels
The dark areas of the tone mapped image in this example were too gray for my tastes, so I decided to adjust the color levels by selecting “Adjust Levels from the tools bar to open the Levels and Gamma dialog box. Clicking and holding the tiny left-hand triangle under the Input Levels graph, I slid it to the right to the point where the input level information for the image started. Clicking “OK saved the change and returned me to the Luminance HDR work area.


Step 12 – Saving the Tone Mapped Image
It's now time to save the tone mapped image.

Selecting “Save As from the tool bar opens a window where you can navigate to the desired save location and gives you the field to enter an output filename. The output filename is preselected based on the tone map operators and parameters. You can, of course, change the name to anything you like.
When ready, click “Save. You can now safely exit the Luminance HDR application.


Your HDR image is now ready for processing in GIMP. Here is my final image.


Summary
In this example, I took three images of a steam-powered crane with the camera facing into the sun. The three images were underexposed, overexposed, and properly exposed. They were stacked up and tone mapped using the Luminance HDR Open Source Software application.

You can see that the output of the HDR process includes information in the shadows as well as good detail in the clouds surrounding the sun. Compare the Luminance HDR and GIMP-processed file to the original exposures found at the start of this tutorial and you will perhaps see what I mean.
In this way, a photographic artist can create images with as much detail in the highlights and shadows as a painter might paint in extremely high dynamic range lighting situations encountered in the wilds of Montana.

Sunday, December 15, 2013

Tools of the Trade ~ on a Very Inexpensive Means of Making Very High Resolution Images

Exploring the art and craft of image making can lead a person down some rather obscure, but interesting paths.

Roses

Looking through the de Groot Foundation exhibit at le Salon de la Photo here in Paris this past Fall, I came across an amazing image.  It was a large print of a dead European blackbird.  Mrs. de Groot shared a story about the French jurors who were working with their California counter-parts.  She said that the French jurors insisted that the Americans see this print.  It was one of the most beautiful images they'd seen this year.  I had to agree.  The image details were phenomenal.  The bird was perfectly composed off-center with parts not captured and out of the frame.  The tonal range and lighting were spot on perfect.  I knew instantly how the image was created.

I recently wrote about cameras, lenses, and optical properties.  In passing, I remarked that there was a way of making very high resolution photographic images for nearly impossibly cheap.  The approach used by the young English artist came to mind when I wrote my earlier blog entry.

Iris and Shell

The technique is sometimes called "scannography".  The tools are the simple, widely available, and nicely inexpensive flat bed scanners.  The attraction is the 1200 to 9600 dots per inch (DPI) resolution (depending make and model) these tools can give.  Image files can be enormous and the image details incredible, far surpassing the resolution of currently available full frame DLSRs and large sensor medium format cameras.

Subject lighting is limited.  Front and sometimes back are the only available lighting options.  In this way, flatbed scanners don't easily lend themselves to general purpose photography.  Yet I feel that anyone who is interested in making very high resolution, very fine art can find a useful creativity tool in a flatbed scanner.  Just look at the kinds of results that are possible and you, too, might agree.

Study in Leaf

In the USA, a person visiting a Goodwill Store can often find a perfectly usable 8.5 x 11 inch flatbed scanner for as little as $5.  Here in Paris, using leboncoin (France's better laid out equivalent to Craigslist), I found a brand new HP scanner for 25Euro.  Sometimes businesses in the state of collapse give these away for free.  It's unlikely a person will find a great condition Full Frame DSLR with lens in a dumpster dive, but a flatbed scanner is not out of the question.

The trick is to find a scanner with a connection capabilities that match your computer.  In my case it's a USB port.  Truly old scanners are commonly found with the old multi-pin D-connector parallel port printer interface spec, which might make connectivity and device driver availability a problem with current computer systems.  Shop carefully and you'll likely find something you can use.

For myself, I love the way a flatbed scanner renders a scene.  The light in incredible.  It's very difficult to get these kinds of "Dutch Masters" lighting any other way.

In fact, there have been times when the Muse was away on holiday that I've felt I should sell my cameras and lenses and do nothing but flatbed scanning.  That's how appealing this approach to image making has been to me.


Study in Pear