Friday, July 24, 2015

Pausing for just a moment...

I tend to push myself.  Hard.  Seldom do I feel my work is "good enough."  Good enough for what? you might ask.  Well, good enough to please me.


MotoGP Le Mans ~ 2015

The benchmark of excellence are published images in major media journals (of course) as well as, and more importantly, coming from a carefully honed sensibility that I have developed over my 50 years of pushing the little shutter release button.  Er, am I really that old?  I guess so.  Nevertheless, I have what I feel is a very clear idea of what's "good" and what most definitely is not.

So when I stop just a moment a take a look back I'm sometimes surprised.

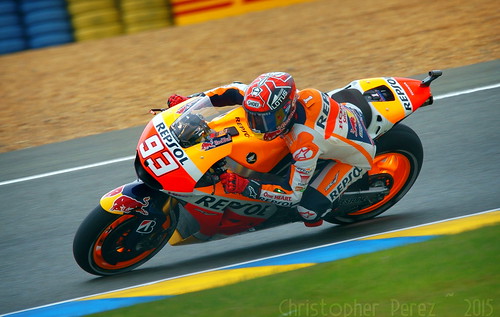
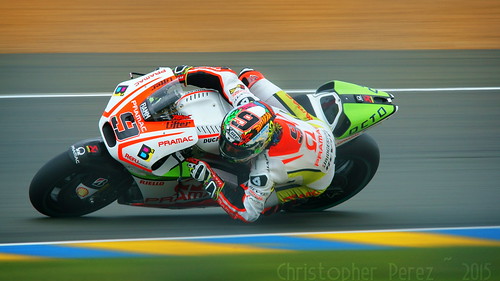
Take, for example, my recent trip au Mans to try taking a few photos of the Grand Prix de France MotoGP.  I went equipped with all the things I felt were needed for successful image making.  My little sweet Sony A6000 shot in RAW on Continuous AF flipping along at 10fps was the foundation.  Add to this a Tamron 150-600mm SP superzoom and a Sony adapter with translucent mirror (which gets the AF speed up to "acceptable") and a very sturdy (good enough for 8x10inch large format film cameras) Manfrotto tripod.

MotoGP Le Mans ~ 2015

My hope/desire was to make the kinds of images I drooled over in Cycle magazine in the decade before they went suddenly and very sadly out of business.  Cycle World took over, if memory serves, but the articles and photos were never ever the same again.  There was a certain panache about Cycle that I dearly miss.  There are certain articles about a Kawasaki 550cc GPz motor'd Bimoto as well as a very lovely Ducait 851 that stand out in my mind, even after all these years, as truly outstanding articles illustrated by equally fine photographs.

I'm not sure where to find these kinds of images these days.  The old magazine publishers have different goals these days.  Instagram, Tumblr, and Flickr don't seem to carry the kinds of reportage images of major sports events I like, either.  The on-line sports outlets offer mainly videos to illustrate and report on events.  The format of those sites isn't suited to the need/desire for high quality stills.  Yet, in my Mind's Eye I can still see and clearly (hopefully) remember how things Used To Be.

MotoGP ~ Grand Prix de France ~ le Mans ~ 2015

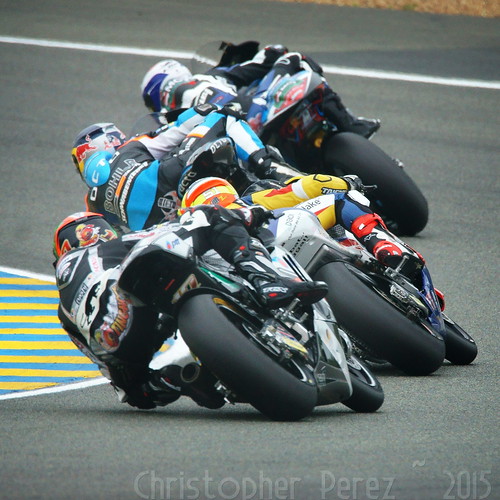
I thought a lot about how to proceed once I was track-side.  I had no special Press Pass, so I needed to shoot from the spectator's areas.  These tend to be a long ways away from the action, which meant the Tamron super-zoom would be pressed hard into use at the long end of it's focal length range.  This would be a challenge as AF speeds tend to slow at smaller (f/6.3-ish) apertures and the bikes would be circulating at a great rate of knots (as Henry Manny was known to write in Road and Track during the 1960's).  I needed to think carefully about aperture, shutter speed, and ISO, too.  I didn't want too much "noise" to show up in the shadow areas and I knew that I'd be working under a thick cloud layer (it even rained for a short time), but there wasn't much I could do about that, other than to rely on careful image processing.

Of the thousands of images I took that day in le Mans only a few are sharp enough to express the kinds of things I wanted to say.  At first I was disappointed at the "hit rate" being so low.  Giving the whole experience time to unfold, however, I've come to realize just how happy I am with the results.

MotoGP ~ Grand Prix de France ~ le Mans ~ 2015

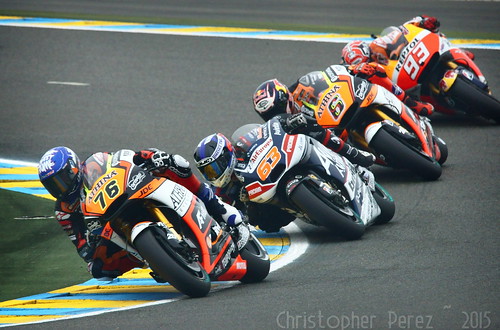
Gods! many of these are critically sharp and would print very easily to 30x40inches.  I'm not sure how much better I could get.  Well, perhaps with a little faster AF capability (PDAF on a future Sony A7000 comes quickly to mind) I could improve my "hit rate."  But as for basic, solid images that give me pleasure and might "stand the test of time", my current setup and the images I now have in hand are just fine.

When I review my work now it's easy for me to remember the sights and sounds of the whole experience of being at le Mans to watch one of my favorite pastimes; motorcycle racing.

This was a dream come true.  I have a few photos that go some ways to sharing this experience with others, too.

MotoGP Le Mans ~ 2015

Saturday, July 11, 2015

Working backwards...

Laying in bed the other nigh musing my typical musings I thought how nice it would be to emulate the old Pictorialist's work.

On our last visit to the Orsay Museum I found a copy of the Taschen published complete series of Camera Work.  In the check-out line there were two people in front of us.  We waited and watched as a tourist had their credit card several times rejected, followed by a long conversation of how the purchase could be completed, with even more tongue wagging, and I could feel my impatience rising like a bonfire.  I put the book back on the shelf and my wife and I walked out leaving the tourist and the vendeuse to work things out.

The images in the Camera Work publications are beautiful.  Well, they are to me, at least.  I may have a copy of the Taschen re-release some day soon.  I've seen it on sale around the city this year.  Until then I can simply "use the Force" (Google) to find examples of the Camera Work photogravures.

Today before lunch that old Wild Hair hit me hard.  We had pears.  We had a little light.  I had my really inexpensive photo-setup (250Euro Sony A5000 + 100Euro Sigma 30mm f/2.8 EX DN E).  So, why not try my hand to something?  Anything.

Here's the image I chose to emulate.


Here's my original straight out of the camera image.


Passing this through the Gimp - Colors - Components - Channel Mixer, I played with the RGB channels to get a set of tones similar to the inspirational photo.


Looking at the target image you can see a texture that looks a lot like paper.  So I opened a photo that I'd taken of a page I found in an old book, put it in a layer over my work in progress, converted it to pure black and white and set the Blend Mode to Grain Merge.  Using the Opacity slider I tried to find a "nice balance" between the texture intensity and my work in progress so as to not hide the details I wanted to retain.


Then I opened the Gimp - Colors - Curves and looked at the target photo's tonal range.  Returning to my image I matched as closely as I could the inspirational photo's curve.  

I worked deliberately in this order so that the textured image tonal range could be made to match the inspirational image in this early step.  As I take further steps I'm able to re-match the inspirational images tonal range by making small Curves adjustments.


I felt my work in progress was still a little to modern and sharp.  So I passed it through the Gimp - FX_Foundary - Light and Shadow - Gothic Glow filter.  I again chose different opacities for the various filter layers so as to not overpower my base work in progress.


I checked the softened image's tonal range against the inspirational photo and made what I'll call minor tweaks to bring it into line one last time with the target result.  Then using the Gimp - Color - Map - Sample Colorize I "borrowed" the inspirational image's tones and put them on my work in progress.

My work (top) and Ed Steichen's inspirational photo (bottom) -


With this I was able to declare victory and look forward to the image next project.  The total project time from image capture through to final product was less than 5 minutes.

Looking critically at the inspirational image and you'll see that my photos' tones contain just a little too much micro-contrast in the shadow areas and the highlights are not quite as muted as the inspiration photo, either.  Still, I'm very happy I was able to get as close as I could to the original.


Wednesday, July 08, 2015

Vividly - II ~ portfolio release

Colors ~ Paris

A month ago I released "Vividly", a portfolio of dramatic color.  Since then I have made additional expeditions around the city and found color waiting for me nearly everywhere I went.  So, I am releasing a second body of work.  It's called, naturally enough, "Vividly - II".

Additionally, the first version of "Vividly" has been very slightly re-worked.  I wanted to bring some of the text forward on the page, so I changed the background images.  I also made minor tweaks here and there and re-released the work (quietly) to Dropbox.

You can find "Vividly" the first (now slightly re-worked) portfolio, here.

While working on "Vividly" I realized that much has changed in my technical approach to image making.  For years after first entering digital photography I used big, heavy image making tools from the then leading manufacturer of such things.  I used their big, heavy, and hugely expensive lenses, too.  I would carry perhaps 10 or more pounds of camera gear.  Yes, I was pleased with the results, but the dent in my shoulder from hauling all that stuff around grew rather deep and tended to ache as I aged.

Times change.

I now find myself using small, very light weight tools.  Shooting "Vividly" consisted of a single camera and a single lens. The kit weighs less than 1 pound and the dent in my shoulder has gone away.  No more aches and pains after a day spent searching for artistic opportunities.  More importantly to my viewers my images are now crisper and sharper.  This improvement in image quality comes as a direct result of continued research, development and application of sensor technologies.

The new tools allow me greater flexibility than my old technique.  This frees me up to concentrate on the final image by more fully experiencing the world around me.  The changes in photo-technique allow me to enjoy the city and to concentrate on life, the universe, and everything (thank you, Douglas Adams).  And to think that back in the Age of Dinosaurs, long before digital photography, I used to pursue my art with very large format film cameras that weighed up to 60 pounds.

Yes, times change.

I enjoyed creating the first "Vividly" portfolio so much that as I discovered more bold colors around here I knew I had to create a second portfolio.

This second work seems to me to be a slightly stronger than the first as there is more consistency between the images, composition, and subject matter.  While some of the colors are not quite as bold as in the first portfolio, the details and tones still seem to nicely fit the overall structure of the work.  To me this second portfolio "flows" better than the first.

As always, I appreciate feedback.

With that, here is a link to my latest 44 image portfolio entitled "Vividly - II".

Wednesday, June 10, 2015

Vividly and Somnathpura ~ two rather different portfolios released

It is a little unusual that I'm able to release two completed bodies of work at the same time.

First is a free teaser to much longer work of platinum tinted images of the temple at Somnathpura, Mysore District, Karnataka, India.

The link to the Somnathpura work is found here.

Somnathpura - Mysore, Karnataka, India

The second is a work of 36 bold color images.  The portfolio contains small scenes of bold color details I found in Paris.  This is distributed for free in it's entirety for personal viewing only.

The link to Vividly is found here.

Both portfolios seem to view well on high resolution tablets.  The works fit the common Android screen aspect ratio, and commonly available viewing software make these equally beautiful to view on iPad tablets, too.

If you have any questions or feedback for me, please feel free to contact me.

Thanks for looking.


Les Frigos ~ Paris

Friday, May 15, 2015

Another thought...

I think looking for the "perfect" camera or lens allows people to engage in the research while never having to lift a finger to make a decent image.  It's like a painter looking for the "perfect" brush and saying that until he finds it, he can't make a great painting.

I'm glad I'm looking for understanding and not perfection.  Now how's THAT for rationalization???   :-)

Tuesday, May 12, 2015

... before we set off on another project...

When we think about "sharpness" in a photographic image, we can look at two things.  The first is "resolution".  The second is "contrast".

Resolution should be by now obvious to readers of this blog.  I've talked long and hard about it.  In short, it's the ability of an imaging system to accurately render a scene to the limits of the sensor. A USAF Resolution Test Chart can be used to measure resolution. Optical effects generally play little part in resolution, except where a lenses spherical aberrations or chromatic aberrations are clearly visible.  Other than this, the image sensor is the limiting factor to image resolution.

Contrast should also by now be obvious to readers of this blog.  It's the transition from light to dark.  The steeper the transition, the more contrast a scene is said to have.  The ability of an imaging system to accurately render the original contrast of a scene can be measured using Modulation Transfer Functions (or MTF).  Many manufacturers publish MTF charts for their various lenses.  But, and this is important, an image's contrast can be modified during processing.

Interestingly enough, the human eye sees both resolution and contrast as "sharpness."

Armed with this information and before I launch off into Yet Another Large Photographic Project Of My Own Insane Design I wanted to see what role image processing might play in creating the illusion or enhancing the reality and perception of "sharpness."

The material -
  • Sony A6000 24mpixel APS-C camera
  • Sigma 30mm f/2.8 EX DN E
  • Nikon 50mm f/1.4 pre-Ai
  • Helios 44M-4 58mm f/2
  • Manfrotto tripod that could support the god Atlas
The comparison -
  • Shoot the Sigma wide open at f/2.8 (just to illustrate how good it is at that setting) and at it's highest resolution aperture at f/5.6.
  • Shoot the Nikon and Helios lenses wide open
  • Find a section of the scene where the old manual focus lenses visibly "fall off", that is to say, where they begin to display large amounts of spherical aberration that reduces the sense of "sharpness"
  • Copy the Sigma f/5.6 image section and place it adjacent to each image sample from the Nikon and Helio so as to enable a direct comparison at each processing step
  • Take three steps with the old lenses.  
  • First, show the image as it appears straight off the sensor.  
  • Second, apply FX Foundary's "Luminosity Sharpen" in the Gimp.  
  • Third, using Luminosity Masks dark dark layer (DD), snug up the black end of "curves", while leaving the highlight regions un-modified (creating a selectively "contrastier" image).  Then apply FX Foundary's "Luminosity Sharpen".
A quick note about FX Foundary's Luminosity Sharpen:  
I found this particular sharpening tool after looking at many of the options available in the Gimp.  I started with "unsharp mask" and worked my way through various G'Mic options and some of FX Foundary's sharpening tools too.  None of the other sharpening tools provided the kind of controls and effects I was looking for.  What I was looking for was a sharpening tool that would not increase noise in the smooth areas of a scene.  However this tool works, it does what I want and I've become rather "addicted" to using it.

A quick note about Luminosity Masks:
I started using Luminosity Masks after reading a post on Google+ by Patrick David about a tool he and another David programmer created.  The tool separates an image into nine masks of various intensity.  They are broadly broken into highlights, mid-range, and shadows with three masks for each range.  I can selectively apply changes to specific tonal ranges to an image by copying the base image, adding a Luminosity Mask, and altering the layered image.


The results -
  • At first blush, the Nikon and Helios lenses look rather awful when shot wide open and compared against a modern multi-aspheric element AF lens.  Both image sections are low contrast and visibly "softer" than the Sigma image sections. The first time I saw these I felt I needed to buy "better" lenses.
  • Applying Luminosity Sharpen does little to increase the sense of resolution in the two old lenses.
  • By selectively applying contrast to the images from the old lenses, _then_ applying the Luminosity Sharpen, I can see where the "sharp" portions of the image are very nearly, but not quite, as good as the native Sigma image.  Thinking about this a moment, the old cheap manual focus lenses weren't the entire answer to my image making question.  Careful processing was just, if not more so, important.  I'm happy with how close I was able to come to the Sigma's performance after taking just two simple, quick image processing steps.
Processing Sharpening Comparison
Click on this image and head over
to the original Flickr page and look
at this file at 100percent resolution
to inspect the image sections

Why all these machinations?  After reading something about old Petzval lenses where I was reminded that the center of a scene would be "sharp" and the edges would fall off into an interesting "swirling" effect, I wanted to see if I could come somewhat close with current digital processes.  This was the first step in understanding how "sharp" I could make the center of a scene.

The next step is to understand how much "swirl" can actually be delivered by various lenses.

Sunday, May 03, 2015

Lens Insanity!

I'm glad I'm not the only person who suffers from the desire to research, check out, and own as many interesting and odd things as possible.


Wednesday, April 22, 2015

Yes. Yes. Yes.

I simply must go to Gloucester.  Really, I must.

Here's why.

The question is when and how.  We have no automobile.  We hear the French are still a little upset at the English over the 100 years war and the impending Waterloo celebrations this summer.  Ugh.

Ok.  I need to plot and plan.  Yes.  Indeed I do.

[I'm teasing, of course, about the Troubles between the English and French.]

Tuesday, April 07, 2015

A little truth...

Here's yet another in a growing list of videos that make the obvious points that can oh so obviously be made.

Thursday, March 19, 2015

A great quote...

A photographer went to a socialite party in New York. As he entered the front door, the host said 'I love your pictures - they're wonderful; you must have a fantastic camera.' He said nothing until dinner was finished, then: 'That was a wonderful dinner; you must have a terrific stove.' 

Sam Haskins

Monday, March 16, 2015

Updating my Big Bird kit...

One of the challenges of selling all my Canon DSLR bodies and lenses to downsize into mirrorless was answering the question: What to do about birds?

Sony A6000 + LA-EA4 adapter + Tamron 150-600mm "Bigron"

I love taking photographs of birds.  When we lived in the States, Jude and I would visit parks and wetlands in search of ducks, small birds, geese, cranes, and large birds of prey.

The setup I had back in the States included a 70-200 f/4L, 100-400 f/4.5-5.6L (deemed the Dust Pump by netizens), and that amazing 300-800mm Sigma EX HSM f/5.6 super zoom.  The 70-200L was for birds very close to the camera.  The 100-400L was for fast movers in flight and the 300-800EX HSM was for, well nearly everything, including birds in flight (BIF).

Coming to France I learned how impossible it was to carry the 13pound Sigmonster anywhere.  I loved the "reach" but there was no way to haul it to where the birds are (Rambouillet, Sceau, etc.).

The 3.5pound 100-400L was nearly perfect, but... it lacked the "reach" I was looking for on the long end.

The 70-200L was simply too short for anything, even photographing sports cars on the streets of Paris during one of the bi-annual Traversee.

Moving everything to Sony mirrorless seemed foolish.  This is why I hung on to my 7D/Dust Pump kit.

Then one day I got sick, lost my mind, and sold the 7D.  The Dust Pump was put up for sale, too.

In my dull daze of illness I found was an article over on Luminous Landscape.  The solution Michael used in Antartica was a Sony A7II, Sony LA-EA4 A to E-mount adapter,  and Tamron 150-600mm f/5-f/6.3 in the Sony A-mount.  His target?  Penguins leaping out of the water.  I couldn't imagine a more challenging scenario.  He didn't know where they were coming from.  He didn't know how far away they'd be.  So he had to be ready and he needed to trust the AF system would be fast enough to capture what he was looking for.  It sounded like what I was facing.

I ordered a lens and adapter from Amazon.  Please remember, I was sick when I made this decision. I had no idea what I was getting.  My new birding solution was based purely on Michael's Antartica experience.

 
The "Bigron" at 150mm

The "Bigron" racked out to 600mm

Today I have everything in hand.  The lens and LA-EA4 are finally here.  We still have a copy of that left-leaning Canard Enchaine so I taped a couple pages to the wall and pointed my lenses at it to see what I could see.

First, a comment about the LA-EA4 adapter.  It comes with a translucent mirror and the AF components built into the body of the adapter.  The AF system does not require "internal" power and is driven off the camera's power source.  There was nothing to do but snap the lens on the front and snap the Sony A6000 onto the other end.  Simple and easy.

A further comment about the LA-EA4 adapter is to note that the in-adapter AF system implements it's own 15 phase-lock AF points.  The camera body recognizes the adapter and provides selections for the in-adapter focus points through the standard menus.  The in-camera AF points are disabled.

The Tamron lens (called the Bigron by some netizens) is just under a pound heavier than the Canon 100-400L.  For BIF a person can remove the tripod collar.  This lightens the rig up a bit, but there's no getting around the fact the Bigron is a slightly bigger beast than the Canon.  Yet the all-up kit weight of the Sony/Adapter/Bigron is less than the Canon 7D/Dust Pump.  

In the hand it all feels very familiar.  The diameter of the Tamron barrels are similar to the Canon L-glass.  The Bigron feels a little heavier up front, and is only marginally heavier over-all than the old Dust Pump.

What's been gained?  I now have a one camera solution for everything I do.  The Sony A6000 camera is very light, very fast (11frames per second at full tilt), and very flexible (I can use it for studio work and birds).  The Tamron has almost 60 percent more reach than the 100-400L Canon (400mm on the lens is actually closer to 380mm).  And the Bigron is a fraction of the weight of the old Sigmonster.

What's been lost?  That incredible Sigmonster.  I LOVED that lens, even if I couldn't take it anywhere.  The Sigmonster was sharp as sharp could be at all focal lengths.

As for image stabilization (IS), well, yes, I do miss that, too.  The Dust Pump had decent IS in the lens where the Sony/Bigron kit presently does not.  The Tamron does not offer IS in their Sony A-mount lens (but it does come with IS in Canon/Nikon mounts).  However, there are rumors of Sony releasing an in-body IS APS-C solution in the A6000-form-factor some day soon.  When that hits the streets I'll have a decent IS solution for all my lenses that I currently work with in mirrorless.


Canon 100-400L
Tamron 150-600
Nikon 300 pre-Ai
(all with NEX adapters of various kinds)

What also been lost is a very slight bit of AF speed to the old 7D/70-200L combo which was very "snappy" and quick.  The AF speed "feels" quite nearly equal to the 7D/Dust Pump combo.  Though in truth the 7D/100-400L sometimes missed the intended AF point.  Compared to the 7D/Sigmonster AF speed, the Sony/Bigron kit "feels" ever so slightly "snappier."  In short, I think I can live with the Sony/Bigron AF speed, though only time and a few live birds will tell me if this continues to hold true.  Bring on the penguins!!!

Having a look at the image quality, I compared the Bigron against an adapted Canon 100-400L and Nikon 300mm f/4.5 pre-Ai.  The test setup was -

  • Sony A6000, ISO100, Aperture Preferred, shutter released using 2 second delay
  • Big beefy Manfrotto tripod (the one I use for birding and an 8x10inch film camera, if I had one)
  • Manually focused at 14x for 150mm and 300mm focal lengths.  It was easy and, besides, the Canon and Nikon lenses were manual focus on the Sony.  AF was used on the Bigron when shot at 600mm.  Manually focusing that focal length was simply too difficult to do accurately, so I threw in the towel and let the adapter/Bigron do what they were designed to do.  Oh, and I ran out of room, so no attempt was made to match the size of the print at 600mm to the shorter focal-lengths.

The results should be pretty obvious.  The Dust Pump and Bigron do a nice job.  They're sharp and contrasty.  If I had to say which images were actually "sharper", I'd lean toward the Bigron at this (very early) point.  

At 600mm it's interesting to confirm what others have seen with the Tamron.  f/6.3 is slightly soft at that long 600mm focal length.  So... Stop the Bigron down to f/8 and call it good.  Good it is, too.  It seems as sharp at 600mm as the old Sigmonster, and that's saying something.

Note: Make sure you look at the comparison results with the file enlarged to 100 percent to see what I see.

Sadly, I think I ever so slightly missed the focus point on the Nikon 300mm f/4.5 pre-Ai as I've seen sharper images out it than these.  Which points out just how important technique is for gaining every last bit of image quality out of system.  It's not just the lens, it's how you use your entire system that counts.

After Jude and I get feeling better (we're still under the weather for the Late Winter flu bug that's been shared by millions) we'll schedule up a trip out to one of our favorite birding spots to have a look at how well the new kit works.

Monday, March 09, 2015

Times? They are a change'n...

As I submitted in the comment section (though it's yet to be cleared for public consumption) over on Mike Johnson's Online Photographer blog, it doesn't take being Nostradamus to accurately predict the End Days of "traditional" photography.  iOS and Android have won the hearts and minds of casual and "serious" photographers alike and there's no going back.

A friend sent a link to an interesting article on this very topic.  One of my favorite quotes is...

Technology has transformed photos from treasured keepsakes to personal propaganda

This goes some ways to supporting a thought I shared in an early post on the topic.  Cultural narcissism is a driving force behind photography these days.  Anyone can, so anyone does.  To the tune of uploading 1.8BILLION images a day to the internet.  Much the uploads are "selfies" and photos of cats, or so it seems.

In a little more serious article, Vincent Laforet predicts the end of the still camera for everyone but the "pros."

Professional photographers (if they still exist then… and I think many, or to be honest some will) will continue to make photographs with DSLR/ Medium format and perhaps mirrorless still cameras – but the vast majority of photographers will continue the exodus towards smartphones...

The software that is installed on those smartphones and iPhones and what you can do with it supersedes the advantage that any one camera system alone gives you for most of us – professionals will continue to need specialty lenses, lights, and larger megapixels to differentiate themselves from the masses...

I don't think Vincent went far enough.  I believe how we consume images has forever altered the very need for a "pro" to create something for us.  So while specialty lenses might make some of us happy, and sports, nature, and wedding photographers can manage their images "look" and "reach" by carefully choosing a lens, none of this is really, actually desired nor required by our "Look At ME!" culture.

Further, Sony seems to already have this covered.  You can have a fully networked imaging system with Big Pixels _and_ your Favorite Lenses at the same time.  Take a look at the QX1 and see if you don't agree.

It's interesting to see for the vast vast majority of button pushers mobile phones are more than sufficient to create wonderful images.  iOS and Android have become the Canon/Nikon/Fuji/Olympus imaging platforms of olden days.

Honestly?  The "need" for someone hire someone else who can monkey a hugely complex camera to record an event or to advertise a product is going away.  What made "professionals" unique is evaporating right before our eyes.

My prediction is that within 4 years pro photographers who make their livings through image making will be as rare as hens teeth.  Either that or they'll have a cell phone to help do the work.

If you don't believe me, take a look at these images.

[UPDATE: Mike's blog just posted further comments on the topic]

Wine Store Window

Saturday, March 07, 2015

Anatomy of a Phishing Scam

I've been looking for a super zoom for my Sony A6000 and have found an optic that could replace my old Canon 70-200L, 100-400L, and 300-800 Sigmonster.

Last night on Amazon.fr I thought I'd found a good deal.

Tamron Objectif SP xxxx


Prix conseillé : EUR 1 399,00
Prix : EUR 600

First clue there was a problem?  The price.  If it seems too good to be true, then it is too good to be true.

When I tried to put the item into my Panier, this is the message I received.

Message important
Un problème s'est produit en rapport avec les articles de votre commande (voir ci-dessous pour plus d'informations) : Tamron Objectif SP xxxx...
Désolés, cet article ne peut pas être expédié à l'adresse que vous avez sélectionnée. Plus d'informations. Vous pouvez modifier l'adresse de livraison ou supprimer l'article de votre commande. Vous pouvez également voir si l'article est disponible à l'expédition sur votre adresse auprès d'un autre vendeur.

Then there was the request to contact the seller directly, and that was the second problem.

Hello,
The Tamron Objectif SP xxxx is in new condition ( it just had to be listed as 'Used - Like New' ), comes with all manufacturer  supplied accessories, Europe model,comes with 2 Years Europe warranty. It has not been used. The price is €600.00 - free Europe delivery. The shipping will take 1 - 3 days .My return policy is full money back in 30 days.If you really want to buy, send me your phone number, full name, shipping address and I will contact Amazon asap to process your order.
If you have any questions regarding the product,returning or any questions feel free to ask us.

Thanks


Is it any surprise that I then received a request to transfer money directly to the seller?

Thanks for your order. We want you to buy with confidence anytime you purchase products on Amazon.fr.That is why we guarantee purchases from Amazon Marketplace, Auctions, zShops, and Merchant sellers when you use Amazon Payments. The condition of the item you buy and its timely delivery are guaranteed under the Amazon.fr A-to-z Guarantee...


Payment Details:

Amazon requires the payment for this transaction to be done through Bank Transfer.
You must make the payment via Bank Transfer directly to your seller.
Here is the payment info's:

... The Engraving Gallery
PL02109025900000000129733484
WBKPPLPP
WBK Bank
ul. Rynek 9/11, 50-950,Poland...

To confirm your transfer to Amazon, send us the scanned paper from the Bank: Confirm Payment
  • The Amazon protection programs offer a set of services that build protection into every step of the item buying process. Some of the elements are automatically included when you buy an item covered by the program element (not all elements are available for all products) while some of the elements are available for a small fee. 
  • The funds will not be released under any circumstances! We will keep the payment until you send us your confirmation that you are satisfied to keep the item. As soon as we receive your confirmation we will transfer the funds to the Seller. Until then the Seller won't be able to access the money you sent and in any case you decide not to continue with the deal you will receive a full refund.
  • Note: Amazon.fr is fully responsible for the money once they will be transferred and take the responsibility to refund the full amount if there will be any problems during the deal.
Thanks again for shopping with us.
We hope to see you again soon.

Can you spot the typos?  I thought you could.  Amazon holds funds in escrow and direct transfers between buyer and seller are strongly discouraged.  I hereby declare this a phishing expedition!  This thru Amazon no less.

Postscript - this morning I received the following message.

Hi again,
I was informed by Amazon that they send you all the payment and delivery informations. Search your inbox carefully and also check your bulk/spam/junk folder because it might have arrived there.
Please let me know asap.

Thank you!


Nothing in my spam nor in my inbox?  Color me shocked.  The bastards.

Upon closer inspection, there is a website that is hosted in Germany called media.364.  While the prices look incredible, at least one person has been taken for a ride by those folks.  Here's what I found about them. When I asked them what was going on, I was told

If you really want to buy please acces our website : www.media364.com

Again, you can spot the typos.  No, I really do not want to buy from them.  Would you?


Wine Store Window

Wednesday, February 25, 2015

Loosely related things ~ the Death of Photography as we knew it

These must be the End Times of photography.  How else can one explain what's going on these days?

Hasselblad used to make world class 2 1/4inch square format film cameras.  They were good enough that NASA contracted the company to make 70mm film-backed cameras that went to the moon as part of the American Space program (the Apollo missions).

To celebrate their heritage Hasselblad recently introduced a camera call the "Lunar."  The sad thing is the model name is for photographic purposes utterly meaningless.  It can't go into outer space and is nothing more than a very very expensive warm-over of Sony's old model NEX7.

What a joke!

Leica, like Hasselblad, used to make world class cameras.  Leica's image shape was the classic 35mm.  In fact, the company "invented" the 35mm format.  Today's 36mm x 24mm "full frame" sensors are the direct legacy of Leica's early creations.

So it's with more than a little interest that Leica recently announced their latest product offerings.  It's called the M-P "Correspondent."   It's claim to fame?  It comes brand new pre-brassed.  That's right.  You get a brand new camera and lens that have been made to look like they've lived 30 hard years in a press-pool working photographer's kit.

According to my calendar, it is not yet April 1st.  No fool'n!  What a joke!

My wife and I recently visited the Magnum Photo exhibition at the Hotel de Ville.  The show was devoted to images made of Paris from Magnum's inception through to the present.

Indeed many of the photographs from the late-1940's up through the 1960's had been made using Hasselblad and Leica camera systems.  The black and white photos are properly and fabulously printed.  The show was very well curated and shared enough information that a visitor could easily follow the evolution of photography in this city.

I was struck by something.  By the 1970's color prints revealed that a massive upheaval in imaging had taken place.  To explain the shift I need to go back and talk a little about the impact of photography on painting.

For hundreds of years painters depicted reality.  They recorded how people looked and scenes of historical importance.  When photography advanced to the point images could accurately record people's likenesses and capture time slices of significant events painters had to find something else to depict.

It's no coincidence that the "impressionists" advanced painting into the door-steps of the abstract.  Subsequent artists took painting further and further into abstraction to the point most casual observers need an explanation of what they are looking at to understand a work.

In the 1970's television had taken it's place in many first world living rooms.  Just as photography had done to painting in the late 1800's, the impact of television was to push photography into abstraction.

The Magnum show filled the years from the 1970's to the present with images of broad colors, simple large shapes, and into the realm of abstract ideas and concepts.  Without an explanation of what I was looking at, I had no idea what the photographer was attempting to say or share.

This begs the question of what is the present purpose of photography?  From what I can tell, photography has moved from accurately recording to sharing experiences and self-portraits (selfies).

Can the displacement of photography help explain the many forums populated with camera equipment junkies who, rather than attempt to make a fine image, spend their spare hours arguing over which piece of gear is better than another?  Is it, then, any wonder that Hasselblad and Leica, the old vanguards of tradition photography, struggle to remain tools of valid creative expression? 

Carnaval de Paris ~ 2015

Wednesday, February 11, 2015

Loosely related things...

Late last year I had six photoshoots with models lined up and, or so I thought, ready to go.  On the day of the shoots four models backed out an hour or two before we were to work together.  These events sent me into something of a tail-spin and I started to revisit the topic of why I do what I do.

While living in the states I enjoyed working with models.  It felt very much like we were working together.  The people I worked with had "as much skin in the game" as I did.  Now that my wife and I live in Europe I've come to see that things are not the same here.

As I try to find a way out of the tail-spin that I find myself in I've come across a few things that help me understand what is taking place around me.

I feel that "photography" is dead.  It is dead in the sense we knew it as recently as just a few years ago. The death of "photography" seems to be related to what an images purpose is and how they are consumed.  I use the word consumed deliberately.  I would rather use the word appreciated, but can't bring myself to do that.

Who is going to make the great images that people used to enjoy looking at in Sports Illustrated?  Who is so talented in their image making that they can replace professional artists with decades of experience under their belt?

It seems to me that photography has moved from recording time to sharing experiences.  Where is the of-the-age defining Hindenberg on fire image from the Fukushima disaster?  Where is the iconic photo that helps us understand what happened in that disaster?  There isn't one.  It was all "live feeds" of images and videos that shared the experience of the place.  That's how much things have changed.

I despair the lack of appreciation for how lighting can be used to define, describe, and illustrate a scene.  Amongst photographers certain people are, yes, still appreciated.  I'm thinking of Bill Gekas as I write this. Certainly there remains a (shrinking?) place for workers who know how to gather people together and pose them for weddings. Beyond this what "need" is there for someone to record an event or to make a lasting picture of someone?

This sea of images to consider and review is so vast that finding works which contain the qualities I have come to appreciate is very difficult.  Hashtags and sorting engines bring torrents of mediocre work which have little or no value (to me).  Flickr's "Explore" engine shares hundreds of photos and I'm many times left wondering what the hell is this?  The human curated sites like 500px.com and 1x.com seem to share the same collection of images day in and day out.

The sharing of talents between photographer/model/stylist/couture is no longer "needed" as anyone with an image maker or cell-phone can perform the tasks required to get a picture out of a box and onto a website or into print.  It takes no technical knowledge nor talent to make a wonderful image.  Imaging systems have, by and large, sorted all that out for the button pusher.  Anyone can "look good" as an "artist."

Now more than ever before I need to find, to fully appreciate. and to completely embrace the reasons I make images.  My work will likely be from this day forward for my own and only my own pleasure, contentment, and intellectual-emotional pursuits.

I cannot expect to work as I used to.  Things have dramatically changed.  Perhaps this is an opportunity for me to change as well.  The question is which path, if any, may I best forge?

Retromobile ~ 2015

Monday, February 02, 2015

Sony A6000 - a seven lens comparison

It seems that I'm still on a roll.

Since I already had the test setup in place, why not compare some more of my manual focus lenses against the modern Sigma EX DN E autofocus using the Sony A6000?  Why not look at the center of the scene as well as an extreme edge?  I'm retired and have nothing better to do, right?

Scene setup ~ Sigma f/2.8 30mm at f/4

The comparison setup didn't change.
  • Sony A6000 camera, ISO100, "A" mode, "standard" image style settings, shot in RAW format
  • Big sturdy Manfrotto tripod
  • RAW images converted to jpg at 100percent quality using Sony's software - no image adjustments were made at the time of conversion
  • 600x600pixel segments were taken out of each file - no adjustments to the image were made during the cut/paste process
The following two comparison files are quite large.  So click on them and they'll take you to Flickr where you can download and view the full-rez images.

Sony6000-  Seven Lens scene center Comparison


Sony6000-  Big Lens scene edge Comparison


My comments on these comparisons should be obvious.  The new Sigma 19mm, 30mm, and 60mm (not shown here) f/2.8 EX DN E/Art lenses are incredible from wide open all the way across the field to the very edges of the frame.  These are "keepers".

I think I can see where the old Nikkors have a few challenges, even on the smaller than full frame APS-C sized sensors.  I'm not sure why the edges fall off as badly as they do when the lenses are shot wide open, but they're pretty obviously bad.  My conjecture is that either the lenses were designed for speed and resolution at the center (which is common for designs of that period), and/or there is a fair amount of field curvature that is throwing the edges of the frame out of focus in these 2D scene comparisons.

Sunday, February 01, 2015

Sony A6000 - Sony 16mm f/2.8 E, Sigma 19mm f/2.8 EX DN E comparison

I'm on a roll.

Since I had a comparison setup in place, I thought I'd take a look at the recently acquried Sigma 19mm f/2.8 EX DN E and see how it compared against a Sony 16mm f/2.8 E-mount lens.  The two lenses share a somewhat fast aperture, are nearly the same focal length, and sell for similar prices.  Could the performance be similar too?

Scene setup ~ Sigma f/2.8 19mm ED DN E at f8

The comparison setup didn't change.
  • Sony A6000 camera, ISO100, "A" mode, "standard" image style settings, shot in RAW format
  • Big sturdy Manfrotto tripod
  • Sigma 19mm f/2.8 EX DN E shot at f/2.8, f/4, f/5.6, and f/8
  • Sony 16mm f/2.8 E-mount shot at f/2.8, f/4, f/5.6, and f/8
  • RAW images converted to jpg at 100percent quality using Sony's software - no image adjustments were made at the time of conversion
  • 600x600pixel segments were taken out of each file - no adjustments to the image were made during the cut/paste process 
The image is linked to my Flickr page.  View the image a full resolution to more clearly see the differences between the two lenses.

Sony A6000 - Sony 16mm - Sigma 19mm EX DN E comparision study

My observations include the obvious.  Either the 16mm Sony  is really awful or the Sigma 19mm is absolutely brilliant.  Differences between the two lenses should be clear.  To me, the Sigma is the superior optic from wide open and across the entire field.

Saturday, January 31, 2015

Sony A6000/Nikon 300mm f/4.5 H pre-Ai to Canon 100-400mm L f/4.5-5.6 comparison ~ le deuxieme part

When I took a look at the Sony A6000 - Nikon 300mm f/4.5 H pre-Ai and tried to compare it against the Canon 7D - 100-400mm f/4.5-5.6 L combination, I relied on the Canon's contrast detect AF system.  I also relied on the 7D's smaller sensor and stronger anti-aliasing filter.

I realized later that the comparison likely proved nothing.  If I was interested in seeing how the ancient (c.1972-ish) Nikkor really compared against the much more modern-flourite-element Canon100-400L, then I'd have to normalize my comparison conditions.  For this, I would use the Sony A6000 and the appropriate lens adapters.  I would also need to carefully manually focus both lenses, which would be my only option on the A6000 for the adapters and lenses I have.

Scene setup ~ Nikon 300mm f/4.5 H at f/8

With these things in mind, here is another look at the Nikon 300mm f/4.5 H pre-Ai and the Canon 100-400mm f/4.5-5.6 L.
  • Sony A6000 camera, ISO100, "A" mode, "standard" image style settings, shot in RAW format
  • Big sturdy Manfrotto tripod
  • Nikon 300mm f/4.5 H shot at f/4.5, f/5.6, and f/8
  • Canon 100-400mm f/4.5-5.6L shot at f/5.6 and 400mm (to match the scene dimensions of the Nikkor)
  • RAW images converted to jpg at 100percent quality using Sony's software - no image adjustments were made at the time of conversion
  • 600x600pixel segments were taken out of each file - no adjustments to the image were made during the cut/paste process
This image will take you to the Flickr host site.  Look at "All Sizes" and select the largest file size to view at 100 percent.

Sony A6000 - Nikon 300mm H f/4.5 vs Canon 100-400L

My observations remain similar to the ones I made in the previous post.

One thing that I've noticed about internal focusing lenses is that the image magnification is much less than the old rack-focus optics.  In this comparison the Canon needed to be set to 400mm to match the scene size of the Nikon 300mm focused to around 14feet.  I encountered a similar situation when I using a Canon 24-105L and Nikon 85mm on a near-distance subject.

The Nikon 300mm delivers a little less contrast to the sensor than the Canon 100-400L.  This can be easily accounted for during image processing.  As for resolution, it's very difficult for me to find any meaningful difference between the two lenses.  The Nikon might be slightly softer in the corners at f/4.5 (because of spherical aberrations?) than the Canon at f/5.6.  A light smart sharpening would bring the Nikkor image resolution right in line with the Canon's.

I find this interesting in light of the fact the Nikkor is 4 decades old and more than 1500USD cheaper than the Canon.

Sony A6000/Nikon 300mm f/4.5 H vs Canon 7D/100-400L

Sunday, January 25, 2015

Sony A6000/Nikon 300mm f/4.5 H pre-Ai to Canon 7D/100-400mm L f/4.5-5.6 comparison

The Madness has set firmly on the brain as the Camera Flu continues un-abated.

I was curious how a Nikon Nikkor 300mm f/4.5 H might compare against the much more recent and optically sophisticated Canon 100-400mm L f/4.5-5.6 super zoom.

Sony A6000/Nikon 300mm f/4.5 H vs Canon 7D/100-400L
 Comparison scene setup
[shot with Sony NEX5, Nikon 50mm f/1.4, Lens Turbo II]

Why the curiosity?  Well, because, on a whim I picked up one of the aforementioned Nikon 300mm non-ED lenses for 100Euro.  It's in tres bon etat and came with the proper caps for both ends and the original carrying case.  I'm a sucker and an easy mark for old manual focus lenses in excellent condition.

Checking the serial number of the lens I see that I was made during the early 1970's.  The H model optic preceded Nikon's introduction of their extra low dispersion glass example by at least 3 years.  Commenters across the 'net seem to rave about the 300mm ED, but not much enthusiasm is expended over the H.  Well, as I said, I'm a sucker for a good looking lens.

The old Nikkor is nearly as heavy as the Canon L, though this is nicely offset by the smaller diameter lens barrels.  I've found that a smaller lens size makes a lens easier for me to work with, even if the weight is similar to something with a large diameter barrel.

Being a fixed focal length lens, the Nikon is of course not as flexible the Canon zoom.   But, since the Sony A6000 is APS-C and since I have a Lens Turbo II focal length reducer and a standard straight-thru Nikon to E-mount adapter I have two focal lengths to choose from when using the Nikkor - 300mm f/4 and 216mm f/3.2.

Sony A6000/Nikon 300mm f/4.5 H vs Canon 7D/100-400L
Size comparison
The Nikkor lens was set to it's closest focus point,
making the lens barrels extend to it's longest.
 [shot with Sony NEX5, Sigma 30mm EX DN E]

Assuming for a moment that Sony introduces an in-body IS APS-C camera that solves the no-IS problem in using old lenses, the biggest thing I in the Sony/Nikkor kit give up is AF.  I've come to love AF as it's most of the time more accurate than I am.  The question is how accurate can I be at focusing the Nikkor?  Would I be happy with the results?

The comparison setup was as follows -
  • A very stout tripod (a Manfrotto somethingorother)
  • Sony A6000 at 100ISO in "A" mode (aperture preferred)
  • Nikon Nikkor 300mm f/4.5 H c.1972-ish
  • Lens manually focused at 14x
  • Nikon shot in two ways - with a straight-thru adapter and with a Lens Turbo II focal length reducer
  • Canon 7D 18mpixel camera at 100ISO in "A" mode (aperture preferred)
  • Canon 100-400mm f/4.5-5.6 L super zoom set to a field of view that nearly matched those of the Nikkor/Sony setup
  • Canon contrast AF focusing in Live View
  • Both lenses shot wide open and at f/8 (to see if the IQ improved by stopping down)
  • 600x600pixel 100percent resolution image sections taken from the original scene (though I did not account for the file resolution differences between the 7D and A6000).
As we will see, Canon's AF wasn't as accurate as manual focusing at a high magnification.

The results are...

[The following image links to my Flickr page.  Look at this a full resolution to properly compare the various image sections.]

Sony A6000/Nikon 300mm H f/4.5 vs Canon 7D/100-400L

My observations include -

Nikon single-coated lens images are slightly lower contrast than the Canon zoom.  However, it was very easy to match the contrast of the Canon lens in processing.

Canon's Live View AF system was a rather hit-or-miss affair.  This is easily seen in the image comparisons.  To think I've trusted the Canon AF system in the over 5 years I've owned the 7D. Having said that, using a (mostly) accurate very high speed AF system tied to image stabilization and focal-length flexibility makes for a very powerful kit. 

If I can accurately focus my manual focus lenses the Sony A6000 offers 11fps burst rate whereas the 7D waltzes along at 8fps.  Am I good enough to track and accurately focus moving targets?  Time will tell.

The higher resolution Sony sensor (24mpixel vs Canon's 18mpixel) gives me a to be expected increase in the amount of information that can be used in the image file.  The Sony file details are gorgeous and easy to work with.  The sensor is the resolution limiting fact.  Lenses typically out-resolve a sensor from wide open down through f/11.

From wide open, the Nikon 300mm f/4.5 H pre-Ai single-coated ancient as the hills ray-trace designed and mathematically calculated by hand lens is every bit the resolution match of the computer designed fluorite element Canon super-zoom. 


Sony A6000/Nikon 300mm f/4.5 H vs Canon 7D/100-400L

Size comparison
The Nikkor lens was set to it's closest focus point,
making the lens barrels extend to it's longest.
 [shot with Sony NEX5, Sigma 30mm EX DN E]

Friday, January 23, 2015

Helios 44M-4 and Zhongyi Lens Turbo II comparisons

I recently caught a Camera Flu and acquired a couple new pieces of equipment.  To justify the acquisitions (guilty as charged) I wanted to see how things looked.

The first new piece of gear is a Helios 44M-4 that I traded a Takumar 50mm macro for.  I'd read where someone thought that altering the space between the first element and second lens group in a Gauss design lens could lead to more pronounced Petzval portrait lens-like effects.
[Read Jim Galli's comment here.]

The second new piece of gear is a new Zhongyi Lens Turbo II.  This takes full frame SLR lenses and acts as a reverse tele-converter.  It takes a full 35mm frame field and resizes it to fit APS-C or micro 4/3rd's, depending on the adapter.  Mine takes Nikon F-mount lenses and adapts them to the APS-C sensor'd Sony mirrorless series cameras.

This isn't really a test.  Nothing is being measured and any results are purely subjective.

Here is the image comparison setup.  It was made using a Sony A6000, Zhongyi Lens Turbo II, and a Nikon Nikkor 50mm f/1.4 pre-Ai shot wide open.

Sony A6000 Nikon Lens Turbo test setup

The first image comparison is of the Helios 58mm f/2 in various stages of lens element positions.  Starting with the lens properly and fully assembled, I then moved the entire front element group forward by unscrewing the group to the extent of the thread range (without the group falling out of the barrel body).  Next I moved the front element forward in the front group with the forward cell mount fully seated.  Finally, I tried moving both the front and rear elements in the front lens group apart and moved the cell mount to the front of the threaded range.

If you click on the image, it'll take you to my Flickr hosted image.  From there select full image size to look at this at 100% resolution.  Any differences between the various segments can be easily reviewed.

All comparison images were made with the Helios shot wide open at f/2. 


Sony A6000 Helios Disassembly Bokeh Test

My subjective observations are that there are indeed differences in how the image is rendered as the various elements are moved.  Interestingly, the out of focus rendition becomes smoother as the front element groups are separated and the front group mount is moved forward in their threads.  But, and this is to be expected, resolution suffers to varying degrees.

It appears a "dreamy" 1800's portrait lens effect is possible, though I'm not sure it's worth the effort.

Which led me to a second set of image comparisons.  I'd read that the Zhongyi Lens Turbo II full frame to APS-C field reducer rendered the out of focus regions more softly than the native lens used with a straight-thru adapter.  Here's my look at the question.

If you click on the image, it'll take you to my Flickr hosted image.  From there select full image size to look at this at 100% resolution.  Any differences between the various segments can be easily reviewed.

All comparison lenses were shot wide open.  

Sony A6000 Nikon Sigma Lens Turbo Bokeh Test

I did my best to keep the primary scene composition similar between the various lenses and focal lengths.  The Lens Turbo II knocks 0.72x off the focal length and increases the aperture by the same amount.  More on this in a moment.

Considering resolution it appears the Lens Turbo adapter does not degrade image quality in the in focus areas for the lenses I used.  I once again see how difficult it is to get something in focus with wide aperture lenses.  This is partly due to the amount of spherical aberration I see in many old 35mm film-era lenses.  I'm not always certain where the best focus is.

The Sigma 60mm DN Art f/2.8 is obviously sharp.  It's a modern design.  Manually locating the focus point was easy and simple.  But it's maximum aperture is a stop or two under most of the lenses I tried.  How the old Nikkors would perform at f/2.8 against the Sigma has been left to a future comparison.

Looking at the out of focus regions I have to agree with whomever noted the smoother image areas when using the Lens Turbo II focal length reducer.  In every case I feel the out of focus rendition is "creamier" and "smoother" when compared with a native lens used without an adapter.  I rather like what it does to the 50mm and 85mm lenses.

So how does the Zhongyi Lens Turbo II work?  It's pretty simple, actually.  It optically reduces the image size from full frame 35mm to APS-C or micro 4/3rd's dimension.  Interestingly it seems to do this at no cost to resolution.

The Lens Turbo also _increases_ the effective aperture by approximately one stop.  In the case of the Nikon 50mm f/1.4, when used with the adapter it becomes a 35mm f/1.0 lens.

How is this possible?  Remembering optical physics, a lens' focal length divided by the front element diameter will give you the aperture.  When you take a 50mm lens and reduce it's field of view to, say, 35mm _without_ changing the front element diameter, you effectively increase the aperture.  In the case of the Lens Turbo II the aperture is increased by 0.72.

If you don't follow me, tell me and I'll have another "go" at explaining what's going on here.

What's important to note is that a 50mm f/1.4 lens on a full frame 35mm system as a 35mm f/1.0 does on APS-C and there is no change in the effective depth of field.

Again, if you don't follow me on this, let me know and I'll try to explain things a little better.

So... where does this leave me?

I see it's possible to carry a two lens, two adapter kit and cover four focal lengths.  For instance, I could carry a 24mm f/2 and a 50mm f/1.4 Nikkor.  Used on the APS-C Sony A6000 I would have the effective full frame focal lengths of 24mm f/1.4 (focal length reduced 24mm f/2), 35mm f/2 (effective focal length of a 24mm lens on APS-C), 50mm f/1.0 (focal length reduced 50mm f/1.4), and 85mm f/1.4 (effective focal length of a 50mm lens on APS-C) at my disposal.

The combinations and capabilities are now seemingly endless.