Realization came as I waited outside
the restrooms at the Charles
Russel Museum in Great Falls, Montana. Yes, it felt as strange to
me then as it likely does to you reading this now. Fortunately, it
had more to do with the relationship of art to photography and tonal
values than anything else a person might imagine “realization” to
mean.
I was looking at a somewhat recent
painting of a grand Montana landscape. I saw clear detail of bark in
heavily shaded trees growing in a calm and pretty glen in the
foreground. I could see that there was detail in the clouds
surrounding a mountain in the background. It was then that I realized
the challenges of photography in these kinds of situations that are
more easily solved in painting. How do we keep detail in the shadows,
prevent bright clouds from being “blown out”, and manage the
tones of the overall scene in a realistic manner?
In film photography, contrast can be
carefully manipulated through the complex use of color filters to
create black and white masks. One of my favorite photographers to use
this approach is Christopher
Burkett. His work is absolutely stunning and clearly illustrates
how photography is art in the manner of controlling all of the tones
across the entirety of a vast scene.
For those of us who use digital
cameras, there are several software tools specifically designed to
help us manage High
Dynamic Range images. Such software holds the promise of helping
a photographer reveal shadow detail, while retaining highlight tones
and pleasing tonal values across a scene. A popular application is
Photomatix.
It's not too expensive, yet, being a strong advocate for Open Source
Software, I used something called qtpfsgui.
At some point, the qtpfsgui project was
re-energized with new software developers and the name was changed to
Luminance
HDR. It was then that the application became rather unstable on
my computers. The software would crash when using certain tone
mapping operations. I was never able to produce a full resolution
Canon 5D Mark II file (5616 x 3744 pixels) without the application
suddenly disappearing. So I stuck with qtpfsgui version
1.8.x.
Recently, out of curiosity, I wondered how the Luminance HDR project was proceeding. The software was now up to version 2.3.1. After installing it on my old Windows 7 laptop I quickly saw that much had changed. As I tested the latest version, I realized that Luminance HDR has become a solid, stable piece of software. I can now create full resolution 5D Mark II output files and the tone mapping operations behave in a rock-solid, consistent manner.
Recently, out of curiosity, I wondered how the Luminance HDR project was proceeding. The software was now up to version 2.3.1. After installing it on my old Windows 7 laptop I quickly saw that much had changed. As I tested the latest version, I realized that Luminance HDR has become a solid, stable piece of software. I can now create full resolution 5D Mark II output files and the tone mapping operations behave in a rock-solid, consistent manner.
I am very happy with the progress
that has been made. So, here is an overview of how I use Luminance
HDR to process my HDR images.
Step 1 – Capturing an Image
My old Canon
5D Mark
II provides a method, called exposure bracketing, to capture a
scene in three exposure steps. The ability to over- and under-expose,
that is, to set the exposure value (EV) range, is limited to plus or
minus 2EV. Still, this is useful for most situations I find myself
in.
I use a tripod when making these kinds of exposures in order to keep the three images aligned. It makes the image stacking operations (which we will soon encounter) easier. Many current cameras from Canon, Nikon, and Sony provide in-camera HDR processing, which allow handheld HDR photography, thus eliminating the need for a tripod, unless a photographer finds himself in a dimly lit environment.
I use a tripod when making these kinds of exposures in order to keep the three images aligned. It makes the image stacking operations (which we will soon encounter) easier. Many current cameras from Canon, Nikon, and Sony provide in-camera HDR processing, which allow handheld HDR photography, thus eliminating the need for a tripod, unless a photographer finds himself in a dimly lit environment.
In any event, the trick is to capture
as much detail in the highlight and shadow areas as possible. This is
information the software can use to create a tone mapped image.
Step 2 – Launching Luminance HDR
Starting the Luminance HDR
application brings you to a large desktop-like layout. Take a moment
to familiarize yourself with the location of the rich selection of
operations. To keep things simple, and to show a nicely streamlined
process flow, we will use only a few of them here.
Step 3 – Invoking the HDR
Creation Wizard
Clicking “New HDR Image”,
found on the left end of the tools bar, brings you to an information
page which you might find interesting the first time you run the
program. Click “Next >”
to continue to the next operation.
Step 4 – Accessing the Images
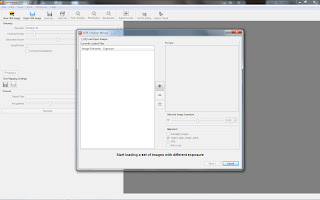
The Creation
Wizard helps you locate and load your images into the program.
Find the big green “+”
in the center of the window and click it.
Step 5 – Selecting the Input Images
The image selection window allows you
to navigate to and choose the images to be processed. In this
example, I have selected three images of the same scene with exposure
values of +2EV, 0EV, and -2EV.
If your camera provides an HDR-ready image, select just the single file. All the highlight and shadow information will already be integrated for further processing.
Click “Open” to continue.
If your camera provides an HDR-ready image, select just the single file. All the highlight and shadow information will already be integrated for further processing.
Click “Open” to continue.
Step 6 – Viewing the Selected Images
You are now returned to the Creation
Wizard window. The list under “Currently Loaded Files”
displays the names and exposure values of the images that were
loaded. The “Preview”
area shows the currently-selected image.
If you used an older camera that
created three separate files, and if you handheld your camera, you
will want to select the “Autoalign images”
checkbox found below the preview area.
Click “Next >” to continue.
Click “Next >” to continue.
Step 7 – Passing Through the
Editing Tools Window
You will now be in the
Editing Tools window. For the way I use the software, there is
nothing needing to be done here.
Click “Next >” to continue.
Click “Next >” to continue.
Step 8 – Choosing Settings for HDR Creation
There is a selection for “Choose
one of the predefined profiles”. The default is “Profile
1”. The various profiles blend the image layers in different
ways. “Profile 1”
is a very good place to start. In fact, you might not ever use
anything else.
I sometimes use “Profile 6”.
It blends with a bit of Gaussian blur and produces an HDR image with
less noise than “Profile 1”. Still, much of the time I
stay with the default profile.
Click “Finish” to continue.
Click “Finish” to continue.
Step 9 – Choosing Settings for
Tone Mapping
The image is finally ready for tone
mapping, which is, for me, the entire point of processing HDR images.
It is where the tonal values across a scene are manipulated in
potentially visually pleasing ways. This is where the magic happens.
If an HDR image is not tone mapped, it will likely look flat and
unappealing.
Luminance HDR gives the user a rich variety of options for creating wonderful images. These are the “Operator” selections found in the upper left portion of the application desktop. Each operator takes the input HDR image and processes it in its own way. Additionally, each operator has its own collection of parameters with sliders that allow you to further modify the actions of the tone mapping. Exploring the possibilities as they apply to your images is time well spent.
Luminance HDR gives the user a rich variety of options for creating wonderful images. These are the “Operator” selections found in the upper left portion of the application desktop. Each operator takes the input HDR image and processes it in its own way. Additionally, each operator has its own collection of parameters with sliders that allow you to further modify the actions of the tone mapping. Exploring the possibilities as they apply to your images is time well spent.
In this example, I have selected the
“Mantiuk '06”
operator and set the “Contrast Factor”
to 0.60. I set the “Result
Size” to 5616x3744,
which is the full resolution file size of a Canon 5D Mark II.
Step 10 – Initiating Tone
Mapping
Press the “Tonemap”
button, which is at the bottom of the controls on the left side of
the work area.
When completed, the tone mapped image
will appear in a new “Untitled” tab window on the right side of
the work area.
Step 11 – Adjusting Levels
The dark areas of the tone mapped
image in this example were too gray for my tastes, so I decided to
adjust the color levels by selecting “Adjust Levels”
from the tools bar to open the Levels and Gamma dialog box. Clicking
and holding the tiny left-hand triangle under the Input Levels graph,
I slid it to the right to the point where the input level information
for the image started. Clicking “OK”
saved the change and returned me to the Luminance HDR work area.
Step 12 – Saving the Tone Mapped Image
It's now time to save the tone mapped
image.
Selecting “Save As” from the tool bar opens a window where you can navigate to the desired save location and gives you the field to enter an output filename. The output filename is preselected based on the tone map operators and parameters. You can, of course, change the name to anything you like.
Selecting “Save As” from the tool bar opens a window where you can navigate to the desired save location and gives you the field to enter an output filename. The output filename is preselected based on the tone map operators and parameters. You can, of course, change the name to anything you like.
When ready, click “Save”.
You can now safely exit the Luminance HDR application.
Your HDR image is now ready for
processing in GIMP. Here is my final image.
Summary
In this example, I took three images
of a steam-powered crane with the camera facing into the sun. The
three images were underexposed, overexposed, and properly exposed.
They were stacked up and tone mapped using the Luminance HDR Open
Source Software application.
You can see that the output of the HDR process includes information in the shadows as well as good detail in the clouds surrounding the sun. Compare the Luminance HDR and GIMP-processed file to the original exposures found at the start of this tutorial and you will perhaps see what I mean.
You can see that the output of the HDR process includes information in the shadows as well as good detail in the clouds surrounding the sun. Compare the Luminance HDR and GIMP-processed file to the original exposures found at the start of this tutorial and you will perhaps see what I mean.
In this way, a photographic artist can
create images with as much detail in the highlights and shadows as a
painter might paint in extremely high dynamic range lighting
situations encountered in the wilds of Montana.


