I guess I could explain myself so that you can understand, from a certain perspective, what This Is All About.
I've always been a little bit odd.
In the chess club in school I met other geeks and dorks and social
stumblers. We used to be amazed at how easily the "In Crowd" seemed
to fit "In" and "Be Someone" (important). Not us. None of us were gifted in
that way.
My family still talks about the mold I'd grow on bread so that I could look at the growth under a microscope. They talk about the pond scum I'd bring home in a jar where I'd hope to find (again under a microscope) various bacteria swimming around and behaving in interesting ways. And they still laugh about the time I went to a pier down in the harbor to collect sea squirts. There are certain varieties that are bio-luminescent and I wanted to learn what spectrum of light they emitted. This and much much more before I was 19 years old.

The bike I learned about desmodromic
valve actuation on. It's a very pretty
little 500cc Ducati Pantah.
Friend's parents who worked at JPL designed, built, then shot the first deep space research vehicles into the sky. Many of these early spacecraft are still communicating with their command centers here on Earth. Others parents filmed the first successful mass circulation surfing and motorcycle movies and who ended up with a rather impressive collection of Humber automobiles. My father helped build the LEM that brought men home from the moon. My friends from that time still talk about how it was. Everyone was "doing big stuff."
Later and on a smaller scale, the colleagues I got along with best at work were the ones who "did stuff."
One guy in manufacturing repaired mechanical wrist watches. Another in the machining department built motorcycle parts from scratch. Someone else in Q&A raised horses. A researcher and his wife collected Alfa Romeos and Ferraris and worked to maintain them together. Late in my career I worked with a guy in service who'd written an important paper on vacuum tube two and three pole characteristics. The music he quietly played on a monaural vinyl record player-based system he'd built was better than any CD stereo I'd ever listened to.
Me? Well, I had my cheap yet somewhat exotic cars (by American standards). I used to run them up and down Sunset Blvd when I lived and worked in LA. Later, I had motorcycles and took the opportunity to appreciate needle/roller bearing bottom end crankshafts and desmodromic valve trains. Fiats, Jaguars, and Ducatis were part of this "slightly odd and out of place" world I lived in. And here I was thinking it was just "cool stuff."

The 1964 Jaguar E-type FHC that I
learned how to tune 2inch SU's on.
Need a new timing belt on your little X1/9? Easy peasy. Want to replace an 860GT crank with the 900SS version? I can help. Want to tune Del Orto carbs on either desmo or spring-valve Ducatis? Ring me up. Want to properly tune early Jag E-type triple 2 inch SU's (3.8 litre or 4.2, your choice)? You know where to find me.
When it comes to photography, I do all this wacky, crazy, weird, dorky, geeky, bizarre stuff simply because I'm interested in it. If I have a question, I try to find ways of finding an answer.
The only person any of this matters to is me. I share this stuff just in case there's someone interested in this, too. It's simply that. I'm a geek. I'm a dork. I'm a retired engineer. I don't always get it "right", but I try.
So... onward... with one more blog entry... likely to be followed by a few more in the near future... and so on...
This Geeky Dork (me) fell into one Waskuwy Wabbit hole labeled "Fat Pixels", kept going and fell into another Waskuwy Wabbit hole labeled "Enhanced Image Quality" and *thud* now find myself sitting on the ground in another Wonderland of Wacky Nerd Heavenly Dorkiness.
To briefly review how This Nerd got here, I started by wondering if the 12mpixel 9micron sensor site "Fat Pixel" Sony A7S had better image quality than my current puny 5micron sensor site 24mpixel A7. Finding the answer is "no" (the A7 has better color depth and dynamic range), I turned to seeing just how good I could make a basic single scene A7 image.
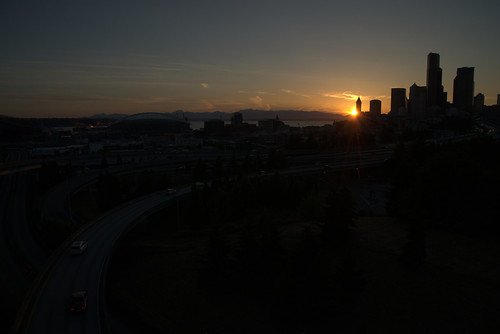
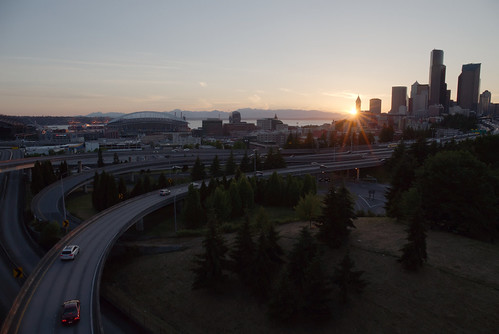
My chosen approach was to reduce noise and increase color accuracy by stacking 3 correctly registered images. Stacking 3 images eliminates low level often difficult to see color variations in smooth areas of a scene. Not that many people would notice it, that's how difficult it is to see, but I did see it and find that the image stack exercise does work. Do photographers "need" to do this for image in general use? Certainly not! and absolutely not! The Sony A7 produces gorgeous images as is. No need to Tinker Around.
Random image made up of three
images, stacked, to reduce noise to
practically zero.
... but... now that I've arrived at an even more gorgeous stacked zero noise image, what's next? Continued nerdiness/dorkiness/geekiness, of course.
Looking closely at the Capture Sharpened, noise
reduced, 3 image stacked composite got me to thinking. If there really _is_ more usable
information in this file than, say, in a base single shot low ISO Sony
A7 image like I think there is, maybe we can do something really "cool" with it by using Human Intelligence (as opposed to the new over-used marketing phrase "Artificial Intelligence") and upsize it?
I've got time on my hands, so why not find out?
Setup ~
Using Human Intelligence (HI!!!) to capture three images to stack as a noise reduction and file upsize exercise -
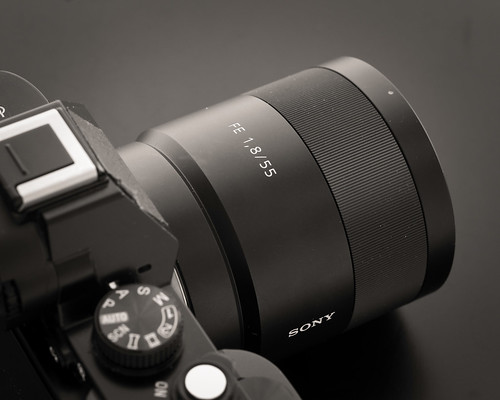
- Sony A7
- ISO100
- 2second timer
- Back-button focus (to maintain image alignment - focus once, shoot three)
- Sigma 24mm f/3.5 DG DN
- Manfrotto tripod
- Rawtherapee
- Curves setting
- Capture Sharpen
- Noise Reduction
- Kodak film emulation
- Gimp
- 3 image stacking in layers
- Opacity setting of layers
- Scale Image NoHalo image upsize operator - sample size 1200DPI (this is important)
- Additional sharpening application (various G'Mic integrated operators)
The file upsize filter set to either 600DPI or in my case 1200DPI is important because it sets the number of "slices" of information per inch that the upsize will take during the operation. I'm sorry. I know that's difficult to read. Um...
Let's try a more practical approach. Using any image processing software that has an Image Size operator, set the DPI to 300 or less and see that the final output image looks distinctly "blocky." The edges of things are pixelated. The smooth areas aren't. It looks like a low-rez monitor display from the 1980's.
Now set the filter DPI to 600 or 1200 and observe how much smoother the image is.
Some software that I've used (here's to looking at you, Capture One and Adobe) lets you set a filter slice frequency, and then completely ignore it. What I've gotten out of those softwares is low-rez blockyness. In short, a mess. So it's worth trying to sort things out, particularly if the upsized image quality isn't what you feel it should be. I'm sure I made a mistake somewhere in all that, but I can't find where. Which is why Gimp is my image up-size software of choice. The various image manipulation parameters are properly implemented in the Gimp.
I've previously written about the NoHalo algorithm. I won't cover that again here, except to note it's much better than anything else I've ever tried.
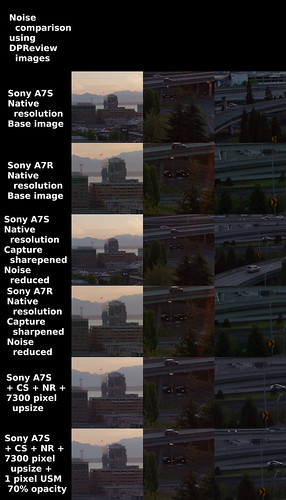
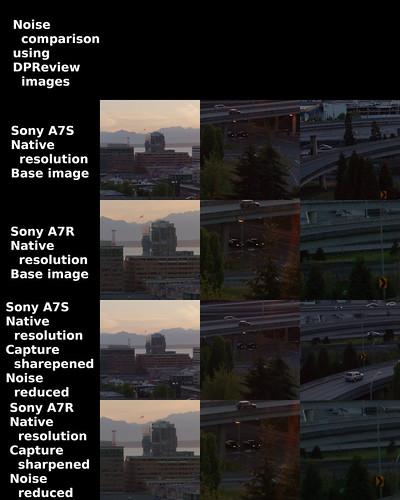
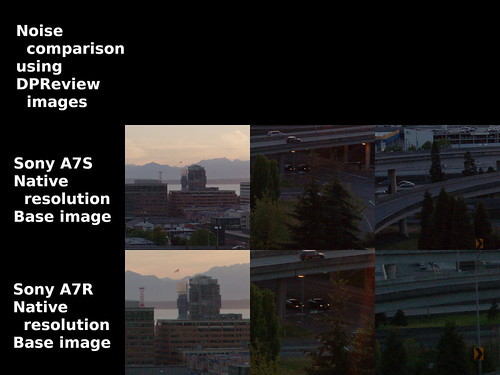
Comparison
[As always, click on the following image and inspect it at 100percent to see whatever there might be to see]
For this exercise I will consider the second set of 4 rows in the following image. They are the ones upsized to 9000 pixels on the long dimension.

Comments ~
Keep in mind that I'm taking a 24mpixel image and upsizing it to 54mpixel. I'm not adding any information that's not already in the original base image. I'm simply spackeling the empty spaces in what I feel is the best manner possible to make things appear nice and sharp. It's what recent "AI" upsize software applications attempt to do. Using "HI" (Human Intelligence") I feel I can understand, and therefore hopefully control what's going on.
From the fourth row down, the Rawtherapee Capture Sharpened, noise reduced, Gimp NoHalo upsize to 9000 pixels on the long dimension looks pretty darned nice. It's perhaps a little "soft" in terms of contrast compared with the original 6000 pixel long base image. This seems like a good place to start.
Row five is the stacked image with G'Mic Diffusion Sharpening. We can see a little pixelation along certain high contrast edges of the image. While I'm sure that it'll print nicely, I wanted to see if I could do a little bit better than this.
Row six shows my 1pixel wide Unsharp Mask attempt to make things a little less pixelated. Et voila! we have a not 1/2 bad result. There's a little "ringing" from using this filter (halos) in certain places, but these might be difficult to see in a final print. I like it.
Then, on a lark, and knowing that humans respond more positively to local contrast than they do to absolute resolution, I took a harsh G'Mic sharpening operator, put this Richardson Lucy output to an upper layer, and set the opacity to 70percent. At 100percent opacity the Richardson sharpening is, to my eyes, ridiculously harsh. So I backed the opacity off a bit on the sharpened layer and that's what we see here.
What does all this add up to? Well, if we read one of
Thom's articles on print sizes and DPI, it's easy to see that a 9000pixel image would print perfectly to 30inches at 300DPI. If you use his lower end of 188DPI (I can't find the original article, but he mentions somewhere else that 188DPI is very printable on Epson), we get a nicely viewable 48inch long print.
Big enough? Job done, then.
In part Four I will attempt to do Something Ridiculous and try and max-out my poor 'ol Linux image processing computer.