When we think about "sharpness" in a photographic image, we can look at two things. The first is "resolution". The second is "contrast".
Resolution should be by now obvious to readers of this blog. I've talked long and hard about it. In short, it's the ability of an imaging system to accurately render a scene to the limits of the sensor. A USAF Resolution Test Chart can be used to measure resolution. Optical effects generally play little part in resolution, except where a lenses spherical aberrations or chromatic aberrations are clearly visible. Other than this, the image sensor is the limiting factor to image resolution.
Contrast should also by now be obvious to readers of this blog. It's the transition from light to dark. The steeper the transition, the more contrast a scene is said to have. The ability of an imaging system to accurately render the original contrast of a scene can be measured using Modulation Transfer Functions (or MTF). Many manufacturers publish MTF charts for their various lenses. But, and this is important, an image's contrast can be modified during processing.
Interestingly enough, the human eye sees both resolution and contrast as "sharpness."
Armed with this information and before I launch off into Yet Another Large Photographic Project Of My Own Insane Design I wanted to see what role image processing might play in creating the illusion or enhancing the reality and perception of "sharpness."
The material -
- Sony A6000 24mpixel APS-C camera
- Sigma 30mm f/2.8 EX DN E
- Nikon 50mm f/1.4 pre-Ai
- Helios 44M-4 58mm f/2
- Manfrotto tripod that could support the god Atlas
The comparison -
- Shoot the Sigma wide open at f/2.8 (just to illustrate how good it is at that setting) and at it's highest resolution aperture at f/5.6.
- Shoot the Nikon and Helios lenses wide open
- Find a section of the scene where the old manual focus lenses visibly "fall off", that is to say, where they begin to display large amounts of spherical aberration that reduces the sense of "sharpness"
- Copy the Sigma f/5.6 image section and place it adjacent to each image sample from the Nikon and Helio so as to enable a direct comparison at each processing step
- Take three steps with the old lenses.
- First, show the image as it appears straight off the sensor.
- Second, apply FX Foundary's "Luminosity Sharpen" in the Gimp.
- Third, using Luminosity Masks dark dark layer (DD), snug up the black end of "curves", while leaving the highlight regions un-modified (creating a selectively "contrastier" image). Then apply FX Foundary's "Luminosity Sharpen".
A quick note about FX Foundary's Luminosity Sharpen:
I found this particular sharpening tool after looking at many of the options available in the Gimp. I started with "unsharp mask" and worked my way through various G'Mic options and some of FX Foundary's sharpening tools too. None of the other sharpening tools provided the kind of controls and effects I was looking for. What I was looking for was a sharpening tool that would not increase noise in the smooth areas of a scene. However this tool works, it does what I want and I've become rather "addicted" to using it.
A quick note about Luminosity Masks:
I started using Luminosity Masks after reading a post on Google+ by Patrick David about a tool he and another David programmer created. The tool separates an image into nine masks of various intensity. They are broadly broken into highlights, mid-range, and shadows with three masks for each range. I can selectively apply changes to specific tonal ranges to an image by copying the base image, adding a Luminosity Mask, and altering the layered image.
The results -
- At first blush, the Nikon and Helios lenses look rather awful when shot wide open and compared against a modern multi-aspheric element AF lens. Both image sections are low contrast and visibly "softer" than the Sigma image sections. The first time I saw these I felt I needed to buy "better" lenses.
- Applying Luminosity Sharpen does little to increase the sense of resolution in the two old lenses.
- By selectively applying contrast to the images from the old lenses, _then_ applying the Luminosity Sharpen, I can see where the "sharp" portions of the image are very nearly, but not quite, as good as the native Sigma image. Thinking about this a moment, the old cheap manual focus lenses weren't the entire answer to my image making question. Careful processing was just, if not more so, important. I'm happy with how close I was able to come to the Sigma's performance after taking just two simple, quick image processing steps.
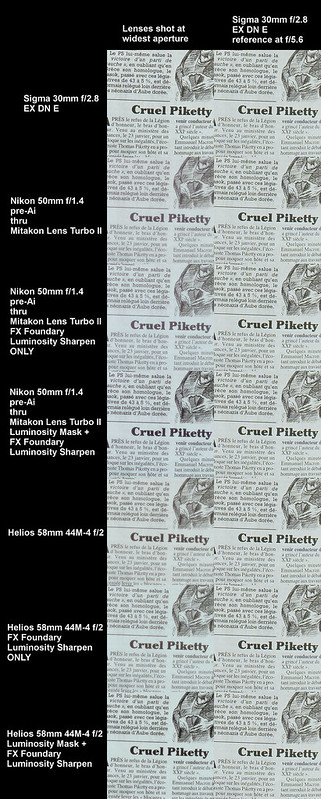
Click on this image and head over
to the original Flickr page and look
at this file at 100percent resolution
to inspect the image sections
Why all these machinations? After reading something about old Petzval lenses where I was reminded that the center of a scene would be "sharp" and the edges would fall off into an interesting "swirling" effect, I wanted to see if I could come somewhat close with current digital processes. This was the first step in understanding how "sharp" I could make the center of a scene.
The next step is to understand how much "swirl" can actually be delivered by various lenses.