Thursday, December 28, 2023

-2EV shadow noise ~ further comments

After I posted something on Push-Processing from -2EV yesterday I realized I hadn't even said the most obvious and potentially most important things.

Ugh.  I'm getting old.

To review, here's the image I comment from.

[As always, click and view at 100% to see whatever there is to see]


-2EV Image Stacking Comparison ~ shadow area noise reduction?


Obvious/More-Better Comments -

Here's what I _should_ have said yesterday, and didn't:

The ISO100 -2EV 5 image stack looks nearly as good as the single shot ISO100 properly exposed image.  Image information recovery in the Push-Processed -2EV  5image stack looks good to my eyes.

The single image ISO400 properly exposed image noise looks very nearly as good as the properly exposed single ISO100 output.  Taking just this observation alone, the Sony A6300 has a very nice, clean, quiet sensor between ISO100 and ISO400.  Have a look at the A6300 and A7 Sony cameras on Photons to Photos. [Update: The APS-C A6300 sensor actually does better than the original A7 over ISO400.]

Now here is the "Doh!" part.  The -2EV Push-Processed 5 image ISO100 image noise looks nearly as clean as the single properly exposed ISO400.  There.  That is what I was looking to see.  This is what I wanted to experience.  Image stacking can "work."

One more tidbit of yesterday's missed opportunities are the ISO3200 noise reduced comparisons.  The single properly exposed noise reduced ISO3200 image looks better than the Capture Sharpened 5 image stacked -2EV Push-Processed ISO400 and the Capture Sharpened single shot ISO400 images.  

Lastly, the -2EV Push-Processed noise reduced Capture Sharpen turned off 5 image stack ISO3200 output looks better than any of the -2EV Push-Processed noise reduced Capture Sharpen turned _on_ ISO400 images.

So why bother doing such things?  It seems like a lot of Monkey Motion, and for what?  Well, think about a situation where you want to protect the highlights in very high contrast situations.  Here's a way to guard overall image quality under extreme image processing situations.  It's a way of potentially expanding the dynamic range of a scene.

Wednesday, December 27, 2023

-2EV shadow noise ~ a look

A friend asked me if I'd tried under-exposing an image, push-process and then stack images to reduce shadow noise?  I have, but I'd not really shared anything on this blog.  Until now.

As always, please keep in mind that what I do is anything that someone with more than a passing interest might be able to duplicate.  I try to keep things as simple as absolutely possible.

There are testers who measure things from a more serious engineering, test and measurement perspective.  Turn to them if you really want to dig into these kinds of topics.  There's a lot to be thought about and pondered that can related directly to carefully managed image making.

Setup -

  • Sony A6300
  • Sigma 30mm f/2.8 EX DN
  • Manfrotto tripod
  • 1 normally exposed image to set as a comparison
  • -2EV images to stack using 
    • Camera 2 second delay timer
    • Camera then quickly fired off 5 images
  • Processed RAW in RawTherapee
    • Capture Sharpened (most series)
    • One pass at no Capture Sharpen, but with Noise Reduction (one 3200ISO series)
       
  • Image stacked in the Gimp 16bit color space

Comparison -

[As always, click and view at 100% to see whatever there is to see]


-2EV Image Stacking Comparison ~ shadow area noise reduction?


Comments -

It can be seen that I shot three different ISOs, 100, 400, and 3200.  I deliberately shot this way as ISO400 is Base ISO 2 on the Sony A6300, and ISO3200 is the last ISO before Sony starts some rather heavy signal conditioning. A person can review Jim Kasson's measurements and comments starting here.

Working with the -2EV under-exposed images, I show a single shot properly exposed, single -2EV Push-Processed image, 3 -2EV image stack, and 5 -2EV image stack results.  At ISO100 I see the shadows clean up nicely, even using Capture Sharpen and push processing (using curves in this case) to ISO400.

Images shot at ISO400 aren't quite as clean.  Noise is clearly visible in all images.  The stacked images seem to try and clean up the -2EV Push-Processed shadows.  But I'm not helping myself by having Capture Sharpen turned on.  Through, frankly, I'd convinced myself that there might be less noise at Base ISO 2 (400 on this camera) than I actually see.

Working on the ISO3200 files I see that Capture Sharpen is definitely not the appropriate image processing choice to make here.  I learned something in having proceeded this way.  By comparison, I can see where Capture Sharpen turned off and Noise Reduction turned on is a much better way to go.

The single properly exposed ISO3200 image with Noise Reduction doesn't look too terrible.  I went purposefully light on the NR to see if random noise in the stacked image would better average out.  In some ways it does exactly this.  The ISO12800 Push-Processed 5 image stack is starting to clean up and is almost usable.

With this small APS-C sensor I'm not surprised with the strong analog gain at ISO3200.  Anything over ISO3200 becomes very salt and peppery.  If you know what I mean.

The underlying lesson for me is that, yes, I can Push-Process images, stack them, and reduce deep shadow noise.  But I have to be careful and intelligently select operators that do what I want. And one good way to achieve that is through careful study, image inspection and comparison.  Which is what I re-started here.

Sunday, December 10, 2023

SuperResolution ~ FINALLY got it to work!

Gawds!  Will it ever end?  I have a seemingly bottomless well of curiosity that I dip into when photo-opportunities are slim.  

When I revisited something I'd read some time back, it triggered another round of trying to come to grips with SuperResolution.  I was curious to see if I could get the kind of results people have for years talked about.

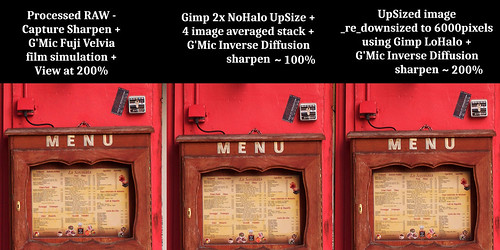
Carefully re-reading the DPReview page I realized I could have a closer look at the up-size operators in the Gimp.  Early on I'd used the "cubic" upsize method and found it gave slightly "fuzzy" results in both 2x and 4x area image upsizing.  

Then I found a newer method called "nohalo".  It seemed to work fairly well in 2x area image upsizing, but lacked a bit of "crispness" in 4x area stacked images.  The DPReview article talked of using a "linear" method.  It turns out that the Gimp has that, too.

So, I grabbed an old Sony NEX-7 24mpixel camera that a friend very kindly gave me, put on the sharpest APS-C lens I own (a Sigma 30mm f/2.8 EX DN), set the shutter to "splatter" mode (ie: 10fps), and wandered the streets looking for an "interesting" subject.  A local pizza restaurant seemed to have enough detail of the kind that might lend itself to SuperResolution.

Here is the process/method I used.

Camera -

  • Sony NEX-7
  • Sigma 30mm f/2.8 EX DN
  • Set to "Program" mode
  • Set the ISO to 100
  • Set the shutter to 10fps (focus once, shoot many)

Processing 1 - RawTherapee

  • Select four individual images from the "splatter-fest"
  • Process using the exact same parameters
    • Color Management set to "Automatic"
    • Color Management "curves" selected
    • Lens distortion set to "Automatic"
    • Lens distortion "vignetting" de-selected
    • Capture Sharpen selected
    • Set contrast and Saturation to taste

Processing 2 - Gimp

  • Import four images as layers
  • Upsize using either "linear" or "nohalo" methods
  • Hand align layers *see Note
  • Set Opacity of each layer to blend
    • Base layer - 100%
    • Layer 1 just above the Base - 50%
    • Layer 2 just above Layer 1 - 33%
    • Layer 3 just above layer 2 - 27%
       
  • Flatten image
  • Duplicate image as another layer and sharpen
  • Viewed at 100 or 200percent, set Opacity of sharpening layer to remove possible "over-sharpening" effects

*Note:  Hand aligning layers in the Gimp is somewhat easy.  Using the Base Layer as the reference "registration" layer...

  • Keep the Base Layer Opacity at 100%
  • Making visible one layer at a time...
  • Set layer Opacity to 50% on the layer being aligned so as to see how two images align compared to the base layer
  • Viewed at 400% and in one corner find an image detail, select the move operator and align the layer over the base exactly using the detail reference point
  • Select the rotation operation for the layer being worked on
  • Set the rotation point directly over the newly aligned reference detail
  • In the opposite corner of the image...
    • View at 400%
    • Click and rotate the Layer to align another reference detail over the Base Layer
  • Deselect the Layer just worked on and repeat this process on another Layer 

Results -

Here is the base scene followed by the results

Scene for SuperResolution Studies

[Best viewed at 100%

UpSize SuperResolution Comparison


Comments

The SuperResolution process does, in fact, work.  In the past I simply wasn't working carefully enough.  I'd either relied too heavily on the Hugin align image operator, or I wasn't zooming in far enough to see how details were aligning.

I am reminded that this SuperResolution technique does more than add resolution.  It does something that I find to be just as important.  The process averages out noise.  Aligned images are clean and smooth.  Here is what I mean.


Noise Redcution Effects UpSize/DownSize SuperResolution Comparison


For this little study I deliberately used the early Sony NEX-7 24mpixel camera because it has stronger base ISO noise than the A6000 and A6300.  So I was pleasantly surprised to re-learn the potential usefulness of eliminating noise by stacking and blending images.

One interesting thing about re-working this process is that I think I found the "Linear" ups-size function is ever so very slightly "sharper" after stacking/blending images than "NoHalo."  But I think I have to stand on one toe while the full moon shines and sing three choruses of "Hair" before I'd fully swear by that.  All things being equal, at this point I feel either up-size operator can do the required work and yield pleasing results.

I'm not ready to downsize from 24mpixel sensors just yet.  Though I had thought seriously about picking up a Sony A7S, just for grins.  Northlight has an interesting article about processing an old 11mpixel Canon image that "had me going" for a moment or two.  And that image wasn't stacked/blended, either.  Pretty incredible work, that.

No, I think 24mpixel is kind of a "sweet spot" for me and the kind of work I do and for the kinds of things I enjoy.  It's not too heavy on the computer and RAW files don't take up an enormous amount of space.  And if I wanted to make a huge print of, say, a classic automobile and if I had the luxury of planning ahead, it might be interesting to try image stacking/blending and maybe even use this SuperResolution technique.