Saturday, December 31, 2022

Roto Till Time ~ mid-Till ~ part Four

After finding the Sony 35mm f/2.8 FE ZA to be a very fine optic, I wondered how a little software function called "Capture Sharpen" might look with the 35mm Sony on an A7 full frame body and a Sigma 19mm f/2.8 EX DN on an APS-C A6000.

Short refresher course: 
"Capture Sharpen" is a software function that was seen some years back in Adobe's Photoshop application, Capture One, and somewhat more recently introduced in the Open Source Software RAW image processor called RawTherapee.

What "Capture Sharpen" does is offset the effects of Anti-Aliasing filters that some cameras have over the sensor.  AA filters combat moire color aberrations.  The filter softens images and the software tries to reverse the AA filter softening effect.

Sony A7 and A6000 have AA filters.  So I felt it would be interesting to see how the software changed a basic image.


Sony A7 ~ Sony 35mm f/2.8 ZA vs Nikon Nikkor-O 35mm f/2


I like using le Canard as my comparison subject.  The typeset print gives a nice crisp transition from light to dark.

Setup ~ 

  • Setup one - 
    • Sony A7, ISO100, 2second delay, AWB
    • Lens - Sony 35mm f/2.8 FE ZA
  • Setup two - 
    • Sony A6000, ISO100, 2second delay, AWB
    • Lens - Sigma 19mm f/2.8 EX DN
  • Bogen tripod
  • RawTherapee to snug up the curves, without and _with_ "Capture Sharpen"

Comparison ~

I compare the 35mm Sony on 24 mpixel Full Frame against a 19mm Sigma f/2.8 EX DN on 24 mpixel APS-C.  There are two sets of images from the lenses, the first set are without "Capture Sharpen" and the second pair of lines are with the software function applied.

As always, click on the image and enlarge to 100percent to see whatever there is to be seen.

Sony 35mm f/2.8 ZA vs Sigma 19mm f/2.8 EX DN with RawTherapee Capture Sharpen


Comments ~

The software does, indeed, work some serious magic.  Comparing the before and after "Capture Sharpen" images shows what this function is supposed to do.

Looking more critically, the Sigma 19mm f/2.8 EX DN corner images clean up nicely, but they don't quite match the Sony 35mm f/2.8 ZA until f/5.6.  I've used this particular 19mm lens for years and have always been satisfied with the image quality.

With this in mind, it'll be interesting to see if I can tell any "improvement" in image quality as I start using the 35mm ZA.  I suspect I won't be able to tell much, if anything, but I'll keep an open mind.  
 
The new (to me) Sony looks absolutely brilliant.
 

Novembre 2018 Rassemblement ~ Association Vincennes en Anciennes

Sony A5000 with Sigma 19mm f/2.8 EX DN
Can't imagine getting anything
sharper than this.

Tuesday, December 27, 2022

Roto Till Time ~ mid-Till ~ part Three

Roto-Tilling my old Nikon Nikkor lenses into new and shiny AF optics for the Full Frame Sony A7 cameras I own is fun.  There it is.  I have to admit it.  A friend rightly pointed out that it's in my nature to buy and sell.  The latest justification is that my eyes are getting flaky with age and that I can benefit from the automation.

One of the things that I feel when using Sony A7 Full Frame mirrorless cameras is that the image quality "feels" a whole lot like the image qualities of 4x5 and 8x10inch film cameras.  There is a lot of wonderful detail and subtle renditions possible with these A7 cameras.  I've thought a lot about how I used to shoot and to see if I could apply those approaches and lens selections to current digital imaging.

As with my experience of years ago working with a 210mm lens in 4x5 inch film, I remember the second most used focal length was 135mm/150mm.  Using a DOF calculator I found the equivalent Full Frame digital focal length is 35mm/40mm.

Since 40mm (150mm 4x5 film equivalent) lenses are a little steeply priced for this retired Way Way Behind the Curve kind of Cheapskate, I opted to look for as good a 35mm (135mm 4x5 film equivalent) as I could afford.

One of the Wild Out of Reach things I considered was finding a 482gram Sony RX1R to fill the 35mm focal length "need."  After reading a few reviews I learned the AF performance in low light might be a little dodgy and that the overall size/weight wasn't as small/low as perhaps I would've hoped.

On the other hand, a little 122gram 35mm f/2.8 FE ZA is as good as the camera body's AF can drive it at all light levels. Coupled to a 474gram Sony A7, the all up weight comes in at 596grams, or 110grams over the fixed mount lens with no dedicated EVF Sony RX1R.  And the 35mm lens would be a 1/4 the cheapest used price of an RX1R I could find.

So... I Hunted and Gathered a sweet little 35mm f/2.8 FE ZA Sony, brought it home, and took a look at how it compared with a known stellar optic.


Sony A7 ~ Sony 35mm f/2.8 ZA vs Nikon Nikkor-O 35mm f/2


Again, using le Canard as my subject, I took my by now mundane standard approach to comparing various lenses.

Setup ~ 

  • Setup one - 
    • Sony A7, ISO100, 2second delay, AWB
    • Lens - Sony 35mm f/2.8 FE ZA
  • Setup two - 
    • Sony A6000, ISO100, 2second delay, AWB
    • Lens - Sigma 19mm f/2.8 EX DN
  • Bogen tripod
  • RawTherapee to snug up the curves, with _no_ Capture Sharpen, just the lens and the sensor
     

Comparison ~

I compare the 35mm Sony on 24 mpixel Full Frame against a 19mm Sigma f/2.8 EX DN on 24 mpixel APS-C.  The reason is that I've seen that this Sigma is one of the sharpest/crispest/cleanest rendering lenses in the Closet of Goodies.

As always, click on the image and enlarge to 100percent to see whatever there is to be seen.

Sony 35mm f/2.8 ZA vs Sigma 19mm f/2.8 EX DN


Comments ~

The Sony 35mm f/2.8 FE ZA looks great across the field straight from wide open.  Of course people wrote about this 10 years ago when this model first hit the market.  Yes.  I'm 10 years Out of Date with the State of Things.

By comparison, the stellar little Sigma 19mm f/2.8 EX DN is just ever so slightly soft wide open in the center of the frame.  The edges never seem to catch up with the Sony, either.

As with all the new toys, er, sorry, new tools, I will need to give the Sony time to "settle in" and to become part of my workflow.  The resolution sure looks promising.  The size and weight make it a "no brainer" for carrying around.  This could be a lot of fun.

Monday, December 26, 2022

Roto Till Time ~ mid-Till ~ part Two

After successfully hunting and gathering, that is to say, after lassoing and dragging home a pretty little Sony 55mm f/1.8 FE ZA, it was time to compare it to two lenses it is intended to replace.  These being a beautiful Nikon Nikkor 50mm f/1.4 AiS and a good condition Nikon Nikkor-S Auto 50mm f/1.4 pre-Ai.

Sony A7 55mm 1.8 ZA vs Nikon Nikkor-S 50mm f/1.4 with adapter


Using le Canard as my subject, I took my by now mundane standard approach to comparing various lenses.

Setup ~ 

  • Sony A7, ISO100, 2second delay, AWB
  • Bogen tripod
  • Lenses -
    • Sony 55mm f/1.8 FE ZA
    • Nikon Nikkor 50mm f/1.4 AiS
    • Nikon Nikkor-S Auto f/1.4 pre-Ai
  • RawTherapee to snug up the curves, with _no_ Capture Sharpen, just the lens and the sensor
     

Comparison ~

To confirm the AF system of the Sony A7 was doing it's "thing" properly, I included a manually focused pass with the 55mm lens.

As always, click on the image and enlarge to 100percent to see whatever there is to be seen.

Sony 55mm f/1.8 vs Nikon Auto-S and AiS 50mm f/1.4 lenses


Comments ~

It appears the A7 AF system is indeed doing it's "thing" properly.  I really can't do any better by manually focusing.  

This is a Good Thing(tm) as the whole reason for Roto Tilling my lens collection is to gain automation as a way to help my aging eyes and to speed up the process of image taking.  It was getting to be a PIA having to slow way down to manually focus the Nikkors.  Increasingly I am not able to "nail" the focus, even with me taking my time.

Looking at the center of the field we can see where the Sony 55mm f/1.8 is sharp from wide open.  The Nikkor lenses show under-corrected spherical aberration at wide open.  This, I'm thoroughly convinced, is a deliberate design choice.  I think the Japanese appreciate the subtle "sfumato"-like rendition under-corrected spherical aberration can give. I'm keeping the Nikkor-S Auto just in case I can figure out how to use the shumato effect in Europe.

Stopping down, by f/2.8, the Nikkors and Sony lenses all look the same in the center of the frame.  The Nikkor Pixie Magic at f/1.4 and f/2 is now gone.  Said conversly, if I didn't want the focus automation, there is absolutely nothing wrong in terms of resolution with the old Nikkors.

At edges there are more obvious differences between the three optics.  The surprise is the Nikkor-S Auto at f/4 and f/5.6 which is clearly quite sharp at the edge.  

Perhaps unsurprisingly, the Sony is very sharp at the edges across the field.  I have say that current lens design appears to have meaningfully improved the species at the edges at wide apertures.

One of the reasons for selecting 55mm on Full Frame Sony A7 mirrorless is that it is the equivalent to my old and much loved 210mm Schneider Symmar-S MC f/5.6 that I used when I shot 4x5 film.  I shot the 210mm for decades and it served me well.  I think it will take a year of use to see if that's how it turns out in practice with the Sony 55mm.


Saturday, December 24, 2022

Roto Till Time ~ mid-Till ~ Part One

It was so frustrating trying to manually focus my Nikkor lenses under some conditions that I decided I was beating my head against an intellectual and historical wall.  

Sony A7 55mm 1.8 ZA vs Nikon Nikkor-S 50mm f/1.4 with adapter

Sony A7 + adapter + Nikon Nikkor-S Auto 50mm f/1.4

The source of the frustration was I was missing the focus, even focus magnification in the EVF.  I'm getting old and my eyes aren't what they used to be.  After 50 years better/improved technologies exist.  Perhaps I should free my frustrated self and learn to trust the automation?

I know where the Magic Pixies are in old Nikkors, but they don't seem to enhance my photography, nor do they thrill me in the way I thought intellectually they should.  Historically, I wanted to own these lenses simply because they were the "thing to own" when I was young and I couldn't afford them then.  It'd come down to a "been there done that" situation.

Sony A7 55mm 1.8 ZA vs Nikon Nikkor-S 50mm f/1.4 with adapter

 Length comparison
Sony A7 + adapter + Nikkor-S Auto 50mm f/1.4
Sony A7 + Sony 55mm f/1.8 ZA "Zeiss"

Six out of twelve Nikon Nikkor manual focus lenses were very quickly sold and have found new and hopefully better homes.

In counting the proceeds of early sales it was easy to see there were sufficient funds to pick up two AF FE for Sony lenses. I would, of course, have to shop very carefully. Zeiss labeled Sony manufactured lenses are not cheap.

Crazily enough, I didn't have to search very hard.  I educated myself to learn what "good" prices are these days.  Wouldn't you know it, but several lenses showed up for the "right" prices from several sellers straight away.  

Sony A7 55mm 1.8 ZA vs Nikon Nikkor-S 50mm f/1.4 with adapter

 Sony A7 + adapter + Nikkor-S Auto 50mm f/1.4
Sony A7 + Sony 55mm f/1.8 ZA "Zeiss"

Perhaps it was the winter holiday season and folks were looking for a little extra change?  After making contact I selected the most responsive sellers and picked both up two lenses on the same day. Color me impatient.

The first lens is a Sony 35mm f/2.8 ZA FE.  It had been purchased new and then seldom used.  The previous owner is a fashion videographer/photographer.  He found he preferred other lenses.  Checking the lens over I found the AF to be lightening quick.  I'd have to check the resolution later after I got home.

The second lens is a Sony 55mm f/1.8 ZA FE.  It too had been purchased new.  This one was bought about two years ago.  It was now being replaced by a Sony 50mm f/1.2 FE.  The lucky b*sard!  Like the 35mm f/2.8 the 55mm's AF is lightening quick, so I this one followed me home, too, where I could more fully explore its optical performance.

Sony A7 ~ Sony 35mm f/2.8 ZA vs Nikon Nikkor-O 35mm f/2

Sony A7 + Sony 35mm f/2.8 ZA "Zeiss"
Sony A7 + adapter + Nikkor-0 35mm f/2

The reason I started with 55mm and 35mm lenses on Full Frame Sony mirrorless is that when I shot 4x5 film, my favorite focal lengths were 210mm and 135/150mm.  The new Zeiss labeled Sony's are the large format equivalent focal lengths in the smaller format.

Comparing the overall sizes of these to my old Nikkors with adapters is an interesting exercise.

The 55mm f/1.8 isn't that much shorter than an adapted Nikkor-S Auto 50mm f/1.4.  The AF of the 55mm being the first obvious advantage over the Nikkor-S Auto.

The adapted 35mm Nikkor-O f/2 pre-Ai, however, looks like a telephoto compared with the Sony 35mm f/2.8 ZA.  In fact, the little Sony is so small that it is approximately the same size and weight as the lovely (and very unfortunately discontinued) Sigma 30mm f/2.8 EX DN.  Obviously the Sony covers Full Frame, where the Sigma only covers APS-C.

After I got home I compared the optical performance of the new tools against a couple old Nikkors that I still have and a pair of the Sigma EX DN that sit on my little APS-C cameras.  This will be the subject of Parts Two and Three of "mid-Till".


Sony A7 ~ Sony 35mm f/2.8 ZA vs Nikon Nikkor-O 35mm f/2

Sony A7 + Sony 35mm f/2.8 ZA "Zeiss"
Sony A7 + adapter + Nikkor-0 35mm f/2


Tuesday, December 13, 2022

... a funny thing happened on the way to the Coloseum...

Decision made and things suddenly move quite quickly.

After realizing the pixie-level magic that's hidden in old manual focus Nikkors did not suit my photographic style, and after deciding which of my vast hord of Nikon lenses are less loved than they should be, I started posting items for sale.

In similar time I've been wrangling over which AF lenses to purchase.  I'm thinking of three lenses at most.  One each super-wide, wide, and normal lenses.  Out go 12 Nikkors (I'll be keeping 4 "just in case this doesn't work out the way I think it will" kind of lenses) and in come three new tools.

Old Work ~ Hillsboro, Oregon

Sinar F, 90mm Schneider Super-Angulon f/5.6
My garage with a dismantled Jaguar XK150FHC.
Check out that old Mobile florescent light on the wall.
Now that I live in an apartment in France I find
I miss having a workspace like a garage.  Just
to do things in, you know what I mean?

Sony A7 images "feel" a lot like 4x5 view film camera work to me.  The image quality of the digital cameras have a clarity to them that I couldn't get with any film format smaller than 4x5 inches.

If my A7's are modern large format film camera equivalents, then perhaps I could think of which lenses I used most when I shot film? Back in the day I used various 90mm super wide angle, 135mm wide angle, and one 210mm slightly longer than "normal" lenses.

On a giggle and a lark, well, no, more seriously than that basic research, I went to a site where one can compare depth of field between lenses and formats.  When I typed in 90mm and 4x5 inch format I saw that the full frame digital equivalent is 24mm.  Huh.  Isn't that interesting.  I _love_ that focal length in FF digital, just as I did 90mm in LF work.

When I typed in 135mm when selecting 4x5inch film format the FF digital equivalent is 35mm.  Well.  Well.  Well.  That too is very useful.

"Sophia" ~ 1981 Ducati 500SL Pantah

Sinar F, 135mm Tessar formula f/5.6
I loved this bike.  It was only 500cc, but
oh how she was a sweet ride.  I got her
from David Dicks who was in the mid-west
at the time.  I had her several years before
passing her on to a friend, who then, in turn
passed her along to another/mutual friend.

Then I typed in 65mm and selected 1x full frame digital.  Why this switch in using the tool?  Well, I'd found a sweet looking little (or perhaps not so little) Sigma 65mm f/2 I lens for Sony and I hoped that it would turn out to be 210mm equivalent large format film.  I wanted to justify buying the Sigma. Except, it wasn't the equivalent focal length I thought it was.

65mm FF digital works out to be 240mm on 4x5.  Nope.  That's a deal breaker for me.  I never ever was in all my years of shooting film able to warm up to 30mm's difference on 4x5.  OK, sure, 240mm was wonderful on 5x7, but the reason should be obvious as to why that would be.

Old Work ~ Hillsboro, Oregon

Speed Graphic, 210mm Schneider Symmar-S/MC f/5.6
Hillsboro airshow and SU27 aircraft.  It was the
first time Russian material was allowed/escorted
into US airspace.  I can't believe I still have
the negatives from this event.  Gads! that was
a long time ago...

So which FF digital focal length matched my much loved 210mm Schneider Symmar S/MC f/5.6 that I used for nearly three decades?  Tappity tap tap tap... and the answer is - 55mm.

Well, would you look at that, will you?  Doesn't Sony make a 55mm f/1.8 FE that comes with a cute little Zeiss badge on it?

Wheels are turning.  I tell you.  Wheels are turning.

Sunday, December 11, 2022

Roto Till Time...

It has been a very tumultuous Fall.

Florence, Italy - 2022

We've been on the road traveling for three months.  We've seen sights.  We've been places.  Apartment door locks broke.  Washing machines self-destructed. Attempted picks were thwarted mid-pick... but.. Passports were later successfully picked.  Passports were miraculously returned through the US Embassy.  Covid was caught.  Covid was survived.  Yes, we were vaxx'd and boosted, so the effects were likely less than if we were stoopid enough to try and do it all on our own.

This is just the half of it.

Florence, Italy - 2022

Photographically it has been a tumultuous time as well.

To keep my travel kit as light as possible I carried a Sony A6000 with a Sony Zeiss ZA 16-70mm f/4 SEL OSS.  It did the trick.  Three months of photography.  Thousands of images to paw through.

During the quiet moments (yes, there were a few of those, too) I looked closely at Pictorialist images from the Sessionist Movement and for myself discovered something interesting.  "Soft Focus" lenses appear to work best on subjects in or about nature.  City and village images from the time tend to be sharp.  I've been interested in "soft focus" lenses to try and understand and then apply that understanding to make images that could be uniquely mine.

Rome - 2022

This kind of photography has been long contentious.  It is easy to remember that Group 64 hated William Mortensen, in part, because of his use of "soft focus" lenses.  This ignores the fact that after M.Mortensen left Hollywood I'm not aware of a single "soft focus" image that he ever made.  Maybe I'm wrong, but I can't find any.  He even talks a length about the importance of working with a clear, clean, sharp image.  

Makes me wonder what the Group 64 was going on about.  Pictorialism could be just as sharp as any other photographic style of the time.  So what was the difference between Group 64's approach and the Sessionists?  Maybe it had to do with the spirit with which photographers approached their craft?

It seems like Sessionists were experimenting with all manner of processing.  Clarence White, Karl Struss, Leonard Missone all worked on various techniques.  Later William Mortensen continued that tradition after the Sessionist movement had died.  Group 64 seemed to use whatever materials manufacturers sold them.

Rome - 2022

Some of the Pictorialist experimenting was indeed around optics.  Karl Struss tried different things and even had someone manufacture and sell lenses to his specification.

Yet, if I look at the vast majority of images from many different Pictorlist practitioners, they tend to be sharp and try to take advantage of various processes.  Platinum/palladium, gum bi-chromate, paper negative retouching and much more.  They also used special papers to try and add to the overall effect they were working toward.

In this light when I look closely at my preferred subjects they tend to be urban and not nature.  Process beyond posting to the internet and personal works tend to not rely on anything more than a camera and lens with a little software thrown in.

Rome - 2022

For the past four years I've tried to understand soft focus optics.  I've been considering Nikon Nikkor manual focus lenses.  There is pixie level magic in them and I think I finally understand why Nikon designed lenses the way they did.  They often give a subtle rendering when shot wide open.  Read through Nikon's Thousand and One Nights and perhaps you'll see what I mean.

Now that my curiosity has been satisfied and armed with the additional understanding that my preferred subjects do not respond well to "soft focus" rendering, I think it's time to let my old Nikkors go. 

Rome - 2022

Monday, November 28, 2022

Black and White using Snapseed...

[adapted from the description section of my Flickr images from Rome]

We were recently away in Brittany for a week and Italy for five weeks.  I didn't take the laptop and so I was rather constrained in image processing options.  But I thought a 10inch Android Tablet with Snapseed should be just fine.  Well, it should have been.

I shoot RAW and my images from this trip look "meh" after WiFi'ing them from the camera to the tablet and working them in Snapsee..  After 4 weeks it finally occurred to me to look at the file size.  Lo and behold, thumbnail jpgs were what were being transferred.  Ugh.  I felt stoopid.

Rome - 2022

Explored on Flickr
29 November, 2022

This easily explained why my cellphone images looked sharp on Flickr and the A6000 images do not.

Thinking about it a bit I tested shooting RAW + JPG.  Good, full Rez JPG were suddenly transfering.  Lesson learned, but only as we were reaching the end of or Roman Covid Holiday.  Have I mentioned how giving Romans are?  They were so kind they shared some damnable version of the Dreaded Lurgy with us.  I know, this has nothing to do with JPGs, except is does.  I lost 10 days of good full rez images due to the require downtime to recover.

Rome - 2022


While we were trying to recover, an interesting image processing approach came back to me.

I read about how Norman Seeff used to print high contrast images with a twist.  He used a black stocking between the enlarger lens and paper to give a interesting softness to some of his images.  He wasn't by any means the only one to do this.

When I worked at Samy Cameras photo lab on Sunset Blvd in Hollyweird we used to do this at client request.  It was really no big deal, but the effect was good for some subjects.

Rome - 2022


What was a bigger deal was our use of Agfa Portriga Rapid 111 Glossy paper.  It gave a gorgeous deep walnut brown tone.  We used this for may of the gallery shows we printed for various then famous photographers.

Taking the black stocking idea and borrowing tones from Portriga Rapid, it turns out, expresses pretty well how I feel about Rome.  So I created a series of images done in this old, outdated, likely not very hip manner.

Rome - 2022

The Snapseed process was straightforward.  

  • Import an image
  • Convert to monochrome using the Black and White "high contrast" option
  • Adjust the contrast as needed
  • Add a border
  • Dive into "Glamour Glow" and set "Glow" to around 35 or 40
  • Slide the color to +50 to add warm tones
  • Export the image

If I set the in-camera "Style" to Black and White with appropriate constrast, I can side-step the monochrome conversion in Snapseed.

Rome - 2022

The "Glamour Glow" color slider seems to be tied to the "Glow" setting.  The higher the "Glow" the more warm tone color is added.  Not sure why this is, but I think that's what I'm seeing.

Now that I'm home and using RawTherapee, I see just how smooth I can get my Black and White images.  Snapseed feels "gritty" in how it outputs images.  This isn't a bad thing, mind you.  It's just different.

Rome - 2022

Friday, September 09, 2022

Four Nikon Nikkor wide angle lenses...

Recently I was having a bit of a think.

The think I thought was about ditching old manual focus wide angle lenses and replacing them with auto-focus optics.  It wouldn't be for "improving" image quality.  I know there is nothing to be gained in terms of "sharpness" by going with modern lenses.

No.  My think I thought had to do with ease of use.  Hit a button and the lens focuses itself.  Just like with my APS-C Sony mirrorless cameras and lenses.  Only this time it would be for my Full Frame Sony mirrorless bodies.

That's where I stopped.

Why duplicate what I already have in the smaller, equally capable format?

So, instead of selling my old Nikkors to make way for new Sony/Tamron/Sigma, I brought out the lenses I was thinking of kicking to the curb and took their picture.  Silly, I know.


Nikon Nikkor wide angle collection

From left to right -
Nikon Nikkor UD 20mm f/3.5
Nikon Nikkor 24mm f/2.8 Ai
Nikon Nikkor-N 28mm f/2 (Ai adapted)
Nikon Nikkor-O 35mm f/2


One of the Games I've played over the past four or five years is to find the best lenses I can for less then 50Euro/50USD.  I've hit upon some wonderful "finds" in playing this game.

The single coated Nikon Nikkor 20mm f/3.5 UD came to me by way of a friend.  He gifted it to me and I don't count this toward my Game Play.  It's a wonderfully sharp lens, but it's also a little heavy.  There's loads of glass and metal in it.  This has stalled me from reaching for it when heading out.  Though I've promised myself that I _will_ use it for the next automobile event I attend.  I really shouldn't leave it at home as much as I do.

On the other hand, the lens I've used quite often is the Nikon Nikkor 24mm f/2.8 Ai.  It's small, light, and supremely sharp from wide open with gentle out of focus rendering in the rare cases where the depth of field narrows.  I picked this up for more than my Game Limit.  To my credit, however, this was purchased well before I started playing this silly Game.

Coming to the Nikon Nikkor-N 28mm f/2, this lens busted my Game Limit quite handily.  For some reason I just had to have it.  I couldn't get the thought of owning a 28mm f/2 out of my head.  As all too often happens when I start thinking this way, a nice little example showed up on my favorite auction site. The price I paid was ultimately less than what they typically go for.  So there is that.

The last lens in the lineup is a pretty little Nikon Nikkor-O 35mm f/2.  I'd foolishly sold a mint Ai version some years back.  I can't remember why it left the Toy Box, but it did and the sale was quickly regretted.  There were a few images I'd made with it where I felt the rendering was second to none.  So when I scored this early single-coated pre-AI version coming in well below my Game Limit there was nothing but joy Throughout the Land, or something similar.

Which leaves me with this - the tools I use must make me happy or out the door they go.  For some reason old Nikon manual focus lenses still, after all these years, make me happy to own, to think about, and, best of all, use.

Wednesday, August 17, 2022

Into the Daylight ~ Flash Photography and Old Cars

With a big car event coming up, I was excited to try my hand at lighting up one of my favorite subjects.  Nothing serious, of course.  I'm retired and don't need nor want to impress anyone.  No, this is just for the pleasure of pursuing a topic, understanding as much as I can, and to make an image or two that please me and only me.

I've been reading too many articles by David Hobby and Joe McNally.  I seem to have caught the bug to shoot small flash.  Here was yet Another Itch that needed to be Scratched.  Photographically speaking.

To add another Itchy Spot to the Whole Plot, just the other day I read a very short article on how to photograph HotRods.  The difference between what this article talked about (shooting in open shade) and what I would be doing is that I'd be working under partly cloudy to full sun conditions

I have three Cheap Chinese Flash units that I've picked up over the years.  My calculations indicated I might _just_ be able to augment the power of the sun and make my subjects standout a bit from a slightly under-exposed background.  That would be the goal.

My camera setups would be as follows -

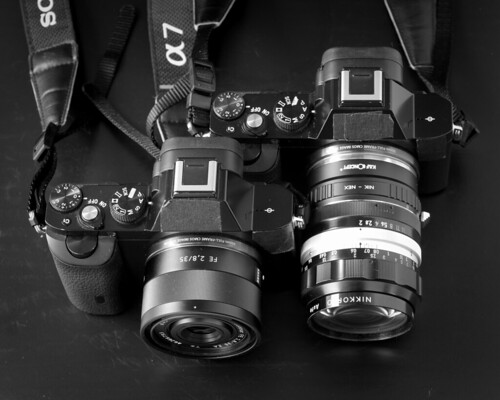
  • Sony A7 - set to full manual mode (stored settings as M1)
  • Nikon Nikkor 24mm f/2.8 Ai
  • Polarizing filter

My second camera would be -

  • Sony A6000 - also set to full manual mode (again stored settings as M1)
  • Nikon Micro-Nikkor 55mm f/3.5
  • Lens Turbo II focal reducer
  • Polarizing filter

It all seems a silly thing to in this Day and Age use manual focus Nikkors.  Working with AF lenses and meter-coupled apertures would certainly be a faster, more accurate way to proceed, right?  Well...

There were several competing ideas that swirled around my (sometimes empty) brain.  One, as I've already said, was to use flash to brighten the subject relative to the background.  Another idea was to see how wide I could get the aperture so as to blur the background.  And the third swirling idea was to use a Polarizing filter to try and control reflections off shiny, painted, waxed surfaces.

In short, I would be trying to manage complexities in a discrete, one thing at a time, manner.  It's sometimes important to keep an Aging Mind well exercised.  Or so I'm told, but I can't remember who said it.  I made a joke there.  Did you get it?

I love the "idea" of my Nikkor lenses.  Manual focus.  Beautiful out of focus rendition when shot wide open.  Manual aperture settings so I know exactly where I'm at.  Of course, shooting in broad daylight would mean stopping lenses down and potentially sharpening up the entire scene with good depth of field.

Fortunately the (old hand calculated designs based on history and practical knowledge) Nikkors are by current standards (of computer ray traced designs solving for 11th order effects) brilliantly sharp stopped down.  

I have modern AF Top Drawer lenses as well as many old Nikkors, and, frankly, from one click down on the aperture it's awfully difficult to tell any difference between them.  So, with a few mental gymnastics I was able to convince myself to use the old Nikkors.

For the Cheap Chinese Flash setup, here's what would be used - 

  • Three Yongnuo YN560 flash units
  • A cheap three flash mount bracket
  • A cheap flash stand
  • A RF/FM remote trigger system consisting of
    • On-camera trigger
    • Two remote flash hot-shoe'd receivers

All I needed to do when switching cameras from 24mm to 55mm and back again would be to slip the on-camera RF/FM trigger from one body to the other.

To make a complex situation more complex, I packed a 2-stop ND filter.  This would allow me to open up the aperture, well, by 2 stops.  If I did this right, I would be able to explore what happens to a scene when both sun-enhancing flash and narrower depth of fields are used in tandem.  The effect might be interesting.

So how did my little experiment of shooting the all manual, maybe needlessly complex setup end up?  Not 1/2 bad, actually.  Let's have a look, shall we?

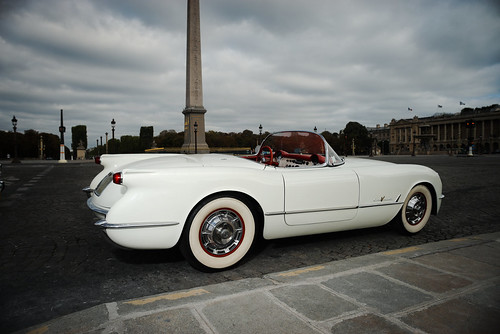
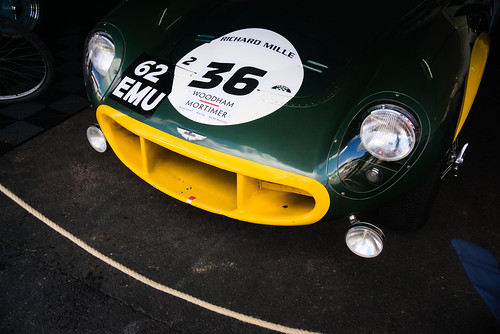
This was done under full sun (to my right).  I put the flash units to the right as well, set their power to 1/4 and under-exposed the overall scene by 1/2 a stop.  The depth of field is a little too good and the background is a bit distracting to my eyes.  Though, the scene is well placed with the view of the large buildings in the background.  I like the way the flashes did their jobs to bring the bike out of the mess.  Even if it's just a little.

le traversee de Paris estivale ~ 2022


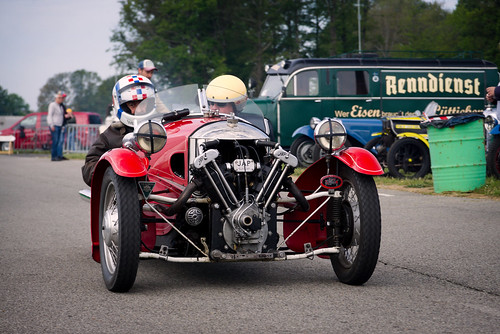
Shooting against the sun, setting the flash to my left, and putting the power at 1/4 or 1/2 on all three units I was able to blast the Holy Heck out of the Buick.  The overall scene was under-exposed by, again, 1/2 stop.  I like the effect.  The people and the trees in the background at back-lit.  So would the car be if I hadn't painted the car in light the way I did.

la traversee de Paris ~ 2022


Three young ladies were being photographed by a local photographer.  They were using the cars as backdrops.  All three were "Miss" somethingorother.  This lady was Miss Montmartre. 

Had I not used fill-flash the scene would've been a lighting mess.  The sun was throwing very strong shadows off everything and the Jaguar XK-SS would've disappeared into an inky black hole where no light could escape.  I needed to flatten the contrast a little and to "open up" the Miss' far-side face if I could.

If you know me, you know I've owned several Jags in my life.  They were my childhood pinnacle of automobilisme.  They all had sexy lines and could push a gentleman smartly down the motorway at impressive speeds.

I'd read where the D-type race car had been lightly re-designed to take normal road-gear (bumpers, passenger seat, that kind of thing).  Very few were made, though, before that portion of the Jaguars factory burnt.  So it came as a huge surprise to see this car.  Sure, the young lady is pretty.  There's no doubt about that.  But that Jag?  Oh All Things That Are Holy this was glorious!!

I'm not sure if it's an original or a "continuation" version.  Somehow I just can't see someone driving a many-millions of Euros car around Paris just for the hell of it.  The insurance alone would cost a fortune.  So I'm thinking this must be a very accurate reproduction (perhaps even done up by the factory?).

la traversee de Paris ~ 2022


Early on in my little photo-session I balanced the overall scene exposure with the flash and let the flash simply fill the shadows.  Looking at the cameras LCD convinced me I liked the gentle effect that simple flash-fill might bring.

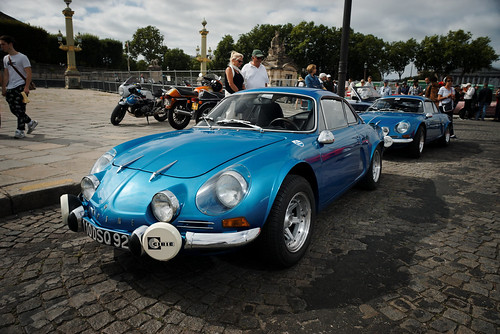
For this Renault Alpine the sun was was over to my left (almost, but not quite shooting against it) and it cast a strong shadow to the right.  So I placed the three flash setup to my right, set the power to 1/16 or 1/8 (rather low, whichever it was) and this is the image I came away with.

It's almost as if you can't see the effect of the flash.  If I wasn't talking about it, would a viewer even notice?  It's kind of interesting to think about in this way.

One more thing, look at the quality of the light.  Having worked with flash for decades I might've guessed that a large light modifier had been used to "soften" up the light.  But that's not the case at all.  The three flash units were all bare and no light modifiers were used at all.  This is just straight flash fill.

Renault Alpine ~ la traversee de Paris estivale ~ 2022


Lastly, we come to Coluche.  How the great French humorist comes to be associated with this Ford Fairlane is beyond me.  But there you have it.  Coluche's name is attached to this car.

Ford made this line of Fairlanes back in the 1950's.  By the late '50's Ford sold the factory, designs, tools, and everything to Simca. Simca continued to produce these cars for several years after.  I have to look at the badges to know which side of the Ford Sale any particular car comes from.

For this image the full sun was over left shoulder.  You can see the flash-filled shadow from the sun on the ground to the right of the car.  The overall exposure was set to -1/2EV to knock down the sky a bit and to make the people darker.  

I set the three flashes power to full *pop* and set the stand to my right.  If you look at the cars fin in the center of the frame, you can just make out the shadow that the flash threw off the fin and onto the rear trunk.

To me this image really "pops."  It's filled with colors and shapes.  It "feels" interesting.  It fully expresses what I wanted to capture about these old cars that participate in le traversee de Paris.  All it took was three RF/FM controlled flash mounted on a cheap flash stand.

la traversee de Paris ~ 2022

Thursday, August 11, 2022

Another Up-Sizing look ~ automobiles in the wild and out on the streets of Paris

Years ago (as in 14 at this point) The Online Photographer had an article about how a photographer took a 4 megapixel sensor'd image and made glorious 13x19 inch prints.

 Here's what was said about the image - "This rider was going about 75 mph when the photo was taken, and you can see every stitch, vent perforation, and the pebble texture of the leather with excellent detail and clarity."

This has stuck with me over the years.  I've written several times about trying to simulate a similar up-sizing process using the Gimp.  My first attempt involved UnSharp Mask sharpening the basic file, up-sizing using the Cubic operation, and then USM sharpening again.  It was an interesting process, but there was always something slightly soft about my final results.

Two years ago I saw that RawTherapee came out with a "Capture Sharpen" function.  I didn't think about it too much at first about how it might related to up-sizing an image.  All I knew was that my images took on a sudden and happy increase in "sharpness" in their native sizes.

I guess I could step back and say that my early Canon DSLR images, at the time, felt "sharp" enough to me.  Then I experienced Sony's APS-C sensors and realized I my Canon gear was lacking.  More recently I've added a couple Sony full frame sensor'd A7 cameras to the Box of Toys.  These take to "Capture Sharpen" like ducks to water and are far sharper than any of my old Canon files that are also "Capture Sharpened".  If there is anything sharper, please, please show it to me.  I'd like to see it.

In 10 years I've moved from Canon "acceptable", "ya, that's pretty OK" sharpness to Sony "oh my ever loving gawd!" levels of sharpness.

When is "enough" enough?  I've been wrangling over the added cost of moving up the Food Chain a bit to acquire a 42mpixel Sony A7R2.  The additional pixels could make life better, right?  More, better, happiness.  Stay with the "in crowd" to maximize flexibility and overall image quality.  Perhaps rather shallow justifications for buying more camera equipment.

In similar time, or should I say "just in time", I stumbled across an interesting video where a guy makes rather large pleasing prints from an old 10mpixel Leica M8.  It immediately reminded me that perhaps I hadn't fully explored careful up-sizing processes.  

Between Stephen Sharf's process notes and seeing this video I then felt I might even save a few Louis d'Or or Pistoles by staying with a lower cost but still (hopefully) viable 24mpixel sensor'd solution.  For the price of one used Sony A7R2 (around 1100USD) I could have three used Sony A7 (around 400USD each).

Borrowing from 14 years ago to consider the idea of making 42mpixel sized prints by careful up-sizing 24mpixel image might prove "interesting."  Stephen Sharf  started with a 4mpixel (2464 x 1648 pixels) Canon 1D image and ended up with a 6840pixel x 4680pixel print file that looked, by all accounts, to be wonderful at 13x19 inches.

"...

1. Each image is sharpened upon import into Photoshop using the Photokit Sharpener "Capture Sharpen" macro to recover detail lost by the sensor (effectively infinite number of photons, finite number of pixels).

2. Each image is then upressed using Bicubic Smoother in PS to give the pixel dimensions at 360 ppi.

3. The image is then sharpened for printing using Photokit Sharpener using the Inkjet, 360 dpi, Glossy sharpening macro.

4. The image is then exported to ImagePrint, a RIP, and printed on Stephen's old warhorse Epson 2400 using the appropriate color profile and ImagePrint to drive the printer.

5. The photo is then printed on InkJet Art Microceramic Lustre..."

Looking at my up-sizing process I thought about improvements I might make.  For the first sharpening step I could use RawTherapee's "Capture Sharpen" in place of the Gimp's various "smart sharpen" operators.

Second, I could use the Gimp's "NoHalo" up-sizing operator.  This would replace the "Cubic" operator that I had been using, and recently found to be soft compared with "NoHalo".  

Third, I could try various Gimp G'Mic sharpening operators to see if there was something demonstrably better than "UnSharp Mask."  To this end I find I like the G'Mic "Inverse Diffusion" sharpening operator.  I think it's really nice, particularly if I put a sharpened copy of the image in a layer and lower the opacity while observing the effect at 100 to 200 percent viewing sizes.

To test all this I took an image from a recent la traversee de Paris that I'd made using flash fill (three flash units, in fact, to try and keep up with the sun), a Sony A7, and a pretty little Nikon Nikkor 24mm f/2.8 Ai lens.


Renault Alpine ~ la traversee de Paris estivale ~ 2022


Here is what I found.

Rawtherapee Capture Sharen Comparison


Keep in mind, I'm well aware of the fact I'm not adding ANY information to an up-sized file.  All I'm doing is smoothing ("spackeling", if you prefer) the transitions between expanded pixels.  This is, afterall, what Stephen did all those years ago, and he came away with good looking prints.

The comparison begins with the base 6000x4000pixel image unsharpened, followed by "Capture Sharpen" version.  I see a useful improvement in "sharpness."  The effect is rather dramatic, actually.  

The out of focus rendition wasn't much effected, though I did note higher contrast when using "Capture Sharpen" and perhaps a "grainier" feel to the out of focus region when pixel peeping. This would hold true for subsequent process variations, too.

Using the Gimp's "NoHalo" 9000x6000pixel up-sizing operation on an un-"Capture Sharpen"ed image I see overall smoothness in the image.  There is little to no objectionable noise and pixelation seems to be well under control.

Applying G'Mic "sharp" function called "Inverse Diffusion" to the base un-sharpened, up-sized image I see that things still look pretty nice.  Though I don't show it here, this result is "sharper" than using the Gimp's "Cubic" up-sizing operator and the Gimp's USM sharpener that I used in my earlier studies.

Considering the "NoHalo" up-sized "Capture Sharpen"ed image, I do have to say, that looks eminently printable straight away.  Artifacts introduced by up-sizing a "Capture Sharpen"ed image seem fairly well controlled, even though they are more evident than in the un-Capture Sharpened images.  We can see these artifact when "pixel-peeping", but they will be slightly masked in a final print.

The "Inverse Diffusion" sharpen operation applied to a "Capture Sharpen"ed image is simply too much.  Well, to my eyes, at least.  So to tame the overall effect down a bit, I put the "Inverse Diffusion" sharpened image in a layer and set the opacity to 40 percent.  This seemed to be a pretty good balance between too much noise with too many artifacts, and further increases in "sharpness."  Balanced in this way the image really "pops."

To this point in my investigations I feel the un-sharpened/NoHalo up-sized/Inverse Diffusion sharpened image is very nice and is probably quite printable as is.  

However, for the ultimate "pop" without the feeling of being "oversharpened", the Capture Sharpen/NoHalo up-size/Inverse Diffusion at 40percent opacity really rocks my boat.

I didn't stop there.

How it occurred to me I will never know, but I thought about having RawTherapee add just a hint of noise reduction early in the process to see if it had any effect on the intensity of the artifacts introduced by "Capture Sharpen" in an up-sized image.  

I'd recently come to understand the RawTherapee "Noise Reduction" operation can be very subtle when I want it to be.  It can also act like a heavy hammer when the ISO's are through the roof and the noise is so great I can't sleep at night.  No, I'd try to take a very soft hand to the low-ISO image noise to see if I could "knock off the edges" just a tiny, nearly un-noticable bit. 

I implemented the following process -

  • Import image to RawTherapee
  • "Capture Sharpen" image
  • "Noise Reduction" applied with minimal action on the sliders
  • Pass the "tif" image into the Gimp
  • Up-Size using "NoHalo"
  • G'Mic "Inverse Diffusion" sharpen image in a layer
  • Set sharpened image layer to 40percent opacity

Take a close look at the last two image sets and compare them with images further up the chart.  What do you see?  Not half bad, eh?

To encapsulate my current feelings of which would be "best" -

  • Quite "adequate" - RawTherapee un-sharpen base image/Gimp NoHalo upsize/G'Mic Inverse Diffusion sharpen

  • Amazing "pop" - Rawtherapee Capture Sharpen base image/Gimp NoHalo upsize/G'Mic Inverse Diffusion sharpen layer with opacity set to 40 percent

  • Pleasingly "luscious" - Rawtherapee Capture Sharpen + very subtle Noise Reduction of a base image/Gimp NoHalo up-sizing/G'Mic Inverse Diffusion sharpen layer with opacity set to 40 percent

After all is said and done... should I be able to take a 6000x4000 Sony sensor'd image, apply any of these three process versions, and come away with a beautifully printable image that is 48 inches long? ... maybe ... maybe yes...  quite possibly ...

Friday, August 05, 2022

Into the Daylight ~ a Cheap Chinese Flash Adventure

This is the ninth year I've shown up to photograph la traversee de Paris.  The event is run twice a year, once in early January and once in late July/early August.  Each time I go I try to find a different way to photograph the event, and each year I've tried to improve my "seeing" of the very common subject that is the automobile.

la traversee de Paris estivale ~ 2022


For this years summer event (the "estivale") I decided to try to separate automobiles from a darker background by using flash fill.  You've probably rightly guessed that I've read a bit too much Joe McNally and David Hobby.

Flash setup -

  • Three Yongnuo YN560 flash units
  • Mounted on a cold shoe bracket that takes the three flashes
  • Triggered by a cheap wireless FM RC setup -
    • Trigger on camera
    • Two receivers mounted to two of the three remote units
      • These two flash units to "M" - manual 
    • One of the flash units to "S1" - slave1

This allows all three flashes to trigger simultaneously.  

The whole plot was put on top of a cheap flash stand.  The off-camera stand allowed me good flexibility on where to place the lighting rig.  It can be far from the camera.  It can be lowered and put close to the subject.  I can move the lighting rig to the shadow side of the scene.  Or I could place the rig right up over the camera. In other words, in running cable-free RF triggered flash units I can arrange the rig as I feel the scene demands.

la traversee de Paris estivale ~ 2022

My biggest concern about this setup centered around Real World flash output.  I'd measured the output of these cheap Chinese flashes and the Guide Number is truly 22.  The published GN of 58 is wrong under the conditions I find myself in.  I feared that it would be a real challenge to get three flashes to balance and ultimately overpower the sun.

Camera setup

  • Sony A7 with stored setup in mode "M1" 
  • ISO100
  • 1/200th sec shutter speed (which I'd tested before leaving home to confirm the shutter wouldn't cut the upper portion of the frame)
  • White Balance set to "Daylight" (which in Sony World is 5025Kelvin - about 500Kelvin lower than I like as the flash is too blue, so I had to adjust in processing, and will need to set the WB manually to 5500 in the future and save it as part of my "M1" selection)
  • Nikon Nikkor 24mm f/2.8 Ai manual focus lens adapted to the A7
  • Find the desired aperture setting by watching the exposure needles while turning the aperture ring

My original goal was to lightly over-drive the flash output to the background exposure.   I had intended to drop the metered exposure -1EV to -2EV.  

Yet once I was on scene and working I realized I kind of preferred setting the overall exposure as the multi-zone exposure system reported it at 0EV adjustment.  In the end this was a lucky choice.  It kept the sky from blowing out.  The non-sky portion of the scene was between -0.5EV, or perhaps -1.5EV, depending on where the sun was relative to the subject and the direction I pointed the lens in.  For the most part this was what I was looking for.

la traversee de Paris estivale ~ 2022


The day started out cloudy.  With overcast skies I could set the flash power on all three units between 1/8 and 1/4 power.  I breathed a sigh of relief.  The flash units could recycle quickly and I wasn't burning the batteries to the ground by having to use 1/2 or 1 Power all the time.

This would become my process.  Meter the scene by watching the needles move with respect to the aperture.  Take a shot.  Look at the result.  Adjust the flash  power output up or down depending on what I saw.

After the sun came out, I found I could put the three flash units between 1/2 to 1 (Full Pop) Power.  This rig could augment the sun and I could actually under-expose the overall scene by 1EV.  Since the flashes were doing their "thing" by blasting as much light as they could give, the subject was brought back into proper exposure.

la traversee de Paris estivale ~ 2022

The overall experience made me wish for a couple of things.  First, I wished for accurate GN's.  While GN22 got the job done, to not make the flashes work so hard I think I'll need to add one or two more units to the rig.

Certainly Sony, Nikon, and Canon all make accurate Guide Number claims.  To have three SB800, for instance, would add overall flexibility to my setup, but those are expensive.  Just one SB800 used on the open market would be more than I paid for the three Yongnuo's new.  Obviously you _do_ sometimes get what you pay for.

On the other hand, with a little DIY I should be able to add two more cold shoes if/when the time comes and I feel the need for more Cheap Chinese Light. 

la traversee de Paris estivale ~ 2022

 Image "Explore"'d on Flickr
7 August, 2022

The second thing I wished for is really a minor thing in the overall scheme of things.  For 30 percent of the photos I wish I'd dropped the metered exposure 1/2 stop further.  Some of my images, while looking pretty decent, could've benefited from a slightly darker background as a way to help make the primary subject "pop" a bit more.  The white Porsche 356 is a good example of that.  Compare this image to the Corvette above it and you'll perhaps understand my wish.

Thursday, July 28, 2022

Cheap Chinese Flash Units ~ Marketing vs Reality

In the process of preparing for a project I discovered something about the three Yongnuo YN560 flash units I own.  

The published Guide Number (GN58 at 105mm) does not match my experience.  This makes it difficult to accurately expose a scene using the manufacturer supplied information.

As you already know, this model of flash is completely manual.  There is no TTL capability, nor is there any built-in RF triggering (at least in the series one and two versions I own).

Someone measured the output of a more recent model Yongnuo flash and shared their results.  They concluded that their measurements proved the factory Guide Numbers were accurate.  

Who am I to doubt? So I followed carefully what was measured, set the camera and flash to the appropriate settings, and the image was... *sad clown sounds*...  two stops under-exposed.  

Huh.  What had I done wrong?

If you've followed me over the years, you already know the importance I place on sorting things out "in the real world."  Forget the marketing lies.  Forget what someone claims to have measured, particularly if things aren't adding up correctly.  Somethings they can be wrong.  Or I should say, in the earlier days of Chinese manufacturing and sales, mostly wrong.  And sometimes there are significant differences in systems of measurement and/or understanding.

So what would the real Guide Number of my flash units be?

To sort it all out I took a Sony A7 and A6000, mounted up a couple old manual focus Nikkor lenses, grabbed a tape measure and set out to find the answer.

Here is the simple formula for determining Guide Numbers -

    Guide Number = Distance (meters or feet) X Aperture

Test Setup -

  •  Sony A7 (following values set to M1 on the mode dial for future use in the field)
    • ISO 100
    • 1/125th sec shutter speed
    • Daylight white balance
  • Nikon Nikkor 24mm f/2.8
  • Nikon Micro-Nikkor 55mm f/3.5
  • Subject exactly 1 meter from the sensor plane

As you will see I made things as easy as possible to calculate GN's at various flash power settings by setting the distance to 1 meter. 1 times anything is still just anything. In this case the Guide Number is simply the Aperture (anything).

    Guide Number = 1 meter Distance X Aperture

At each aperture setting (f/2 through f/22) I carefully noted the flash power output that gave the best range of tones from highlight down through and into deep shadows by looking at the image histogram.

Using 1/125th of a second and 100ISO, mapping flash power (FP) settings to Guide Number to distance, here is the matrix I came up with.  As you can see, at 1 meter, the Guide Number in my case is the same as the aperture.

In my system of Sony cameras, camera settings, Nikon manual focus lenses, and Yongnuo flash I found that the Full Power Guide Number is 22 at all flash zoom settings except 100mm where the Guide Number is a whopping 24.  I found these  GN's are valid for all three of my Yongnuo YN560 units.  There is no variation between them.

  • Distance = 1 meter
    • GN2, f/2, FP 1/128
    • GN3, f/2.8, FP 1/64
    • GN4, f/4, FP 1/32
    • GN6, f/5.6, FP 1/16
    • GN8, f/8, FP 1/8
    • GN11, f/11, FP 1/4
    • GN16, f/16, FP 1/2
    • GN22, f22, FP 1 (full pop)
  • Distance = 2 meters
    • GN4, f/2, FP 1/32
    • GN6, f/2.8, FP 1/16
    • GN8, f/4, FP 1/8
    • GN11, f/5.6, FP 1/4
    • GN16, f/8, FP 1/2
    • GN22, f/11, FP 1 (full pop)
  • Distance = 3 meters 
    • GN6, f/2, FP 1/16
    • GN8, f/2.8, FP 1/8
    • GN11, f/4, FP 1/4
    • GN16, f/5.6, FP 1/2
    • GN22, f/8, FP 1 (full pop)

To see how this works, let's say I have a subject 3 meters away and I would like to hit it with the correct amount of flash power with a lens aperture of f/4.  Looking at the matrix I see I need to set the flash (FP) to 1/4.  This is exactly how it reads on the back of the flash, so I don't have to think any further about it.  Hit the shutter release et voila, a perfect exposure.

Now let's say I have a subject that is 2 meters away and I am using a polarizing filter (to knock reflections off certain subject surfaces).  Let's say I would like to use an aperture of f/2.  Looking at the table I see the flash power setting would be 1/32.  Then taking into consideration that polarizing filters grab approximately two stops of light I see that I need to go from the GN of 4 to a GN of 8, where the flash is now set to 1/8 power.  Hit the shutter release et voila, a perfect exposure.

Let's do one more calculation, shall we.  Let's say we have a subject three meters away, want to use f/5.6 _and_ we have a polarizing filter.  We start with a GN of 16.  Then we need to account for the polarizing filter which is another two stops.  A GN of 22 won't cut it as it's only good for one more stop.  So, we need two flash units at 3 meters set to a GN of 22 (full pop) to give the subject enough light.  Hit the shutter release et voila, a perfect exposure.

You might question why go through all the trouble?  After-all, for a mere 500Euro/USD you can get a camera manufacturers own fully integrated flash system.  Valid question, right? 

A valid response is I'm a Cheap Old Slob.  Being retired and living on a fixed income can do that to a guy.  Further, I come from a time where these kinds of mental gymnastics were required and not optional.  Balancing ISO (ASA back in the day) against shutter speed, flash output, and lens aperture was simply part of the act of making a photograph.

Here's what I paid (approximately) -

  • 50Euro each for two new Yongnuo YN560II flash units 
  • 40Euro used for a third series 1 flash
  • 30Euro on a pair of cheap flash stands
  • 15Euro for a pair of shoot-thru umbrellas
  • 8Euro for a silver bounce umbrella
  • 15Euro for a three flash cold bracket
  • 20Euro for an RF (FM band) trigger with two remote receivers.

For less than 230Euro/USD I now have a fairly flexible fully GN verified three light system.  This, where just one Sony/Nikon/Canon flash would cost over twice that much.

I hope to be able to share results from an upcoming project.  It would be fun show what's possible while on a fixed Cheap Old Slob income.

Saturday, July 23, 2022

Photo Ops ~ July 2022

2022 isle de France Photo-opportunities - So, this is it for the updates on the Paris region photo-ops for awhile.  I have a lot to do over the summer and we'll be very busy through the Fall and Winter.  Bretagne and Italy will be in the cards.  These two places are always outstanding photo-ops.

[I've redone this sequence and put the completed events in reverse order putting the most recently finished events at the top.]


le Mans Classic - 30 June - 3 July DONE Photos Here


Aston Martin DB3S - 1955 ~ le Mans Classic 2022


Cafe Racer Montlhery - 18-19 June *NOPE* We were in the midst of a heatwave

Paris - Rambouillet avec les Teuf-Teuf - 28 rassemblement a Paris 7eme, 29 May a Rambouillet *NOPE* I went to the WRONG location!!!  Oh, man.  This isn't good.  I feel like such an idiot.

Rallye des Princesses - 14-19 May *DONE* Photos Here!

Rallye des Princesses ~ Paris 2022 

Vintage Revival Montlhery - 7-8 May - the Beast will be there (the only surviving Fiat S76) *DONE* Photos Here!


Vintage Revival Montlhery ~ 2022


Tour Auto - 25-30 April *Did not attend*

la traversee de Paris - 27 March *CANCELLED at the last moment! Argghhhh*  but it was rescheduled - yea!!! la traversee de Paris - 17 April *DONE* Photos Here!

la traversee de Paris ~ 2022


Foire Photo - Chelles - 20 March *Did not attend* 


Retromobile - 16-20 March *DONE*  Photos here!


Retromobile, Paris ~ 2022


Salon International de l'Agriculture *DONE*  Photos here!

Salon International de l'Agriculture, Paris ~ 2022


That's all for now.


Bugatti Brescia Type 13 1923 ~ Vintage Revival Montlhery ~ 2022


Sunday, June 12, 2022

Specialty Lenses ~ a more personal history

Specialty "soft focus" lenses can be a real kick in the pants, but most of the time they are difficult to control.

I've owned many "soft focus" lenses.

It all started with a 12inch Portland lens that I dearly wish I'd kept.  I didn't use it much and I now very much regret selling that lens.  I paid next to nothing for it and got next to nothing selling it on.

I also owned a Wollensak Verito, but it never was mounted nor used.  Stupid, stupid, silly me.  What I'd give to have that lens back.  Like the Portland soft focus lens, I paid next to nothing for the Verito and got very little when I sold it.

There were three other large format soft focus lenses that passed through my toy box.  Two came from Fuji and were the 180mm and 250mm SF lenses.  Like the Verito and Portland optics I never came to grip with the Fujinon SF, even though I tried them many times.  Something simply did not "click" (ahem) for me.  Same for a gorgeous Rodenstock 300mm Imagon lens that came with a complete set of sieves.

The "soft focus" lens I had the most luck with was a Mamiya 150mm SF for RB67 that came with the sieve set.  I picked it up for cheap from KEH and used it on a workman-like Mamiya RZ.  I photographed some of my wife's roses and peonies with it.  I still have several palladium contact prints that I made from digital inter-negatives that I scanned from the original 120 6x7cm.  The prints "sing" to me.  The flowers "glow" so magnificently.   These prints remain something quite special.

I have a Pentax 85mm f/2.2 Soft that was originally in Pentax K mount, but came to me in Nikon F mount.  Talk about under-corrected spherical aberration behind the point of focus!  Eowza!! that thing is over the top.  

Even stopping the Pentax down it fails to sharpen up in any meaningful way.  It's simply too much for me and I'd prefer a bit more softness control.  It's probably too much for other people, too.  I've had this lens forsale on a local website for months and no one appears the least bit interested.  Can't say I blame them.

After trading emails with a scientist photographer who received his PhD in the topic of "pictorialist" lenses I learned something interesting.  Of course, now I'd like to find the lens he says modern day "pictorialists" swear by.  It's the Minolta Varisoft 85mm lens and hey cost the moon.  I doubt I'll ever find one for a reasonable living on a fixed income price.  Though I do keep my eyes open.

A couple years ago I picked up a box of lenses for 7Euro each.  One of them was a Nikon Nikkor 50mm f/2 Ai.  It was disassembled, cleaned up, and as it was being put back together, a thought occurred to me that maybe using the rear element set all by itself could be "interesting."  I found I needed to put a couple extension tubes in line to get the setup to focus from infinity down to something pretty close.  It did the trick.  Some of the photos I made with it weren't half bad.

Paris ~ Fall 2020

Paris ~ Fall 2020

Since hunting and gathering is a full time obsession for me, the 50mm f/2 Nikkor was sold.  In the process of moving to Nikkor 50mm f/1.4 manual focus lenses, I stumbled across a 20Euro beater Nikkor-S.C.  I got the parts off it I needed for another Nikkor-S.C. project and quickly realized I had a similar setup to my old Soft Focus Special.

Using an 11mm extension tube I found the Nikkor-S.C. 50mm f/1.4 rear element set Soft Focus Special could focus from infinity to about a foot.  This was a much shorter lens adaptation than the f/2 was.


Nikon Nikkor-S.C. 50mm f/1.4 without front element set

Nikon Nikkor-S.C. 50mm f/1.4 without front element set


Looking at how it renders I feel that it behaves rather similarly to the old Wollensak Varito.  There's swirl around the edges of the frame.  There's loads of barrel distortion (which I didn't find in this quantity in the converated 50mm H f2).  The under-corrected spherical aberration is controllable using the aperture.  To help protect the lens internals I mounted up an old UV filter.  In short, not a bad "find" out of a cheap ready for the recycler lens.


Nikon Nikkor-S.C. 50mm f1.4 without front element set

Nikon Nikkor-S.C. 50mm f1.4 without front element set

Nikon Nikkor-S.C. 50mm f1.4 without front element set

Nikon Nikkor-S.C. 50mm f1.4 without front element set


Nikon Nikkor-S.C. 50mm f/1.4 without front element set

Nikon Nikkor-S.C. 50mm f/1.4 without front element set


How does the rear element set of a classic old manual focus double Gauss design give a soft focus rendition?  Nikon's "Thousand and One Nights" history series may have the answer.  When designing wide aperture SLR lenses they would "fight fire with fire" by letting under-corrected spherical aberration dominate both element sets of deeply ground element curves.  The trick appears to be to balance that under-correction.  The first element set gives under-correction and the second element set inverts the effect and re-corrects it back out.

With this in mind, you can use either the front or aft element set from a double Gauss lens to achieve a similar effect.  In the case of my thrashed 50mm S.C. the fore element group has deep scratchs and boatloads of fungus, but the rear element set remains clear.  This, it turns out, matches the configuration of the old Portland soft focus lens that I dearly miss.  The aperture is in from the element(s) and controls the level of softness.

One thing I notice is the out of focus transition behind the point of focus is very very smooth from the "get-go."  Where most old under-corrected 50mm lenses transition through the out of focus disk having a bright center _and_ a somewhat bright outter ring, this Nikkor SF Special transitions straight to beautiful under-corrected spherical aberration behind the point of focus.  No outter ring around the out of focus disk.  It's glorious.

I don't like this kind of rendering for automobiles (though things look slightly better in Black and White than they do in color) or many of the man-made subjects around town. The effect, however, looks pretty good on vegetation and in portraiture.  It's a matter of finding a subject that, to one's eyes, is enhanced by the softness.