Laying in bed the other nigh musing my typical musings I thought how nice it would be to emulate the old Pictorialist's work.
On our last visit to the Orsay Museum I found a copy of the Taschen published complete series of Camera Work. In the check-out line there were two people in front of us. We waited and watched as a tourist had their credit card several times rejected, followed by a long conversation of how the purchase could be completed, with even more tongue wagging, and I could feel my impatience rising like a bonfire. I put the book back on the shelf and my wife and I walked out leaving the tourist and the vendeuse to work things out.
The images in the Camera Work publications are beautiful. Well, they are to me, at least. I may have a copy of the Taschen re-release some day soon. I've seen it on sale around the city this year. Until then I can simply "use the Force" (Google) to find examples of the Camera Work photogravures.
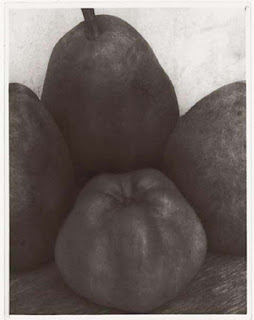
Today before lunch that old Wild Hair hit me hard. We had pears. We had a little light. I had my really inexpensive photo-setup (250Euro Sony A5000 + 100Euro Sigma 30mm f/2.8 EX DN E). So, why not try my hand to something? Anything.
Here's the image I chose to emulate.

Here's my original straight out of the camera image.


My work (top) and Ed Steichen's inspirational photo (bottom) -

On our last visit to the Orsay Museum I found a copy of the Taschen published complete series of Camera Work. In the check-out line there were two people in front of us. We waited and watched as a tourist had their credit card several times rejected, followed by a long conversation of how the purchase could be completed, with even more tongue wagging, and I could feel my impatience rising like a bonfire. I put the book back on the shelf and my wife and I walked out leaving the tourist and the vendeuse to work things out.
The images in the Camera Work publications are beautiful. Well, they are to me, at least. I may have a copy of the Taschen re-release some day soon. I've seen it on sale around the city this year. Until then I can simply "use the Force" (Google) to find examples of the Camera Work photogravures.
Today before lunch that old Wild Hair hit me hard. We had pears. We had a little light. I had my really inexpensive photo-setup (250Euro Sony A5000 + 100Euro Sigma 30mm f/2.8 EX DN E). So, why not try my hand to something? Anything.
Here's the image I chose to emulate.

Here's my original straight out of the camera image.

Passing this through the Gimp - Colors - Components - Channel Mixer, I played with the RGB channels to get a set of tones similar to the inspirational photo.

Looking at the target image you can see a texture that looks a lot like paper. So I opened a photo that I'd taken of a page I found in an old book, put it in a layer over my work in progress, converted it to pure black and white and set the Blend Mode to Grain Merge. Using the Opacity slider I tried to find a "nice balance" between the texture intensity and my work in progress so as to not hide the details I wanted to retain.

Then I opened the Gimp - Colors - Curves and looked at the target photo's tonal range. Returning to my image I matched as closely as I could the inspirational photo's curve.
I worked deliberately in this order so that the textured image tonal range could be made to match the inspirational image in this early step. As I take further steps I'm able to re-match the inspirational images tonal range by making small Curves adjustments.

I felt my work in progress was still a little to modern and sharp. So I passed it through the Gimp - FX_Foundary - Light and Shadow - Gothic Glow filter. I again chose different opacities for the various filter layers so as to not overpower my base work in progress.

I checked the softened image's tonal range against the inspirational photo and made what I'll call minor tweaks to bring it into line one last time with the target result. Then using the Gimp - Color - Map - Sample Colorize I "borrowed" the inspirational image's tones and put them on my work in progress.


With this I was able to declare victory and look forward to the image next project. The total project time from image capture through to final product was less than 5 minutes.
Looking critically at the inspirational image and you'll see that my photos' tones contain just a little too much micro-contrast in the shadow areas and the highlights are not quite as muted as the inspiration photo, either. Still, I'm very happy I was able to get as close as I could to the original.
No comments:
Post a Comment