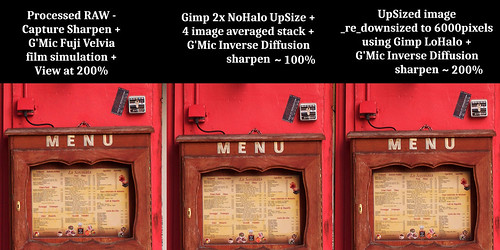
Gawds! Will it ever end? I have a seemingly bottomless well of curiosity that I dip into when photo-opportunities are slim.
When I revisited something I'd read some time back, it triggered another round of trying to come to grips with SuperResolution. I was curious to see if I could get the kind of results people have for years talked about.
Carefully re-reading the DPReview page I realized I could have a closer look at the up-size operators in the Gimp. Early on I'd used the "cubic" upsize method and found it gave slightly "fuzzy" results in both 2x and 4x area image upsizing.
Then I found a newer method called "nohalo". It seemed to work fairly well in 2x area image upsizing, but lacked a bit of "crispness" in 4x area stacked images. The DPReview article talked of using a "linear" method. It turns out that the Gimp has that, too.
So, I grabbed an old Sony NEX-7 24mpixel camera that a friend very kindly gave me, put on the sharpest APS-C lens I own (a Sigma 30mm f/2.8 EX DN), set the shutter to "splatter" mode (ie: 10fps), and wandered the streets looking for an "interesting" subject. A local pizza restaurant seemed to have enough detail of the kind that might lend itself to SuperResolution.
Here is the process/method I used.
Camera -
- Sony NEX-7
- Sigma 30mm f/2.8 EX DN
- Set to "Program" mode
- Set the ISO to 100
- Set the shutter to 10fps (focus once, shoot many)
Processing 1 - RawTherapee
- Select four individual images from the "splatter-fest"
- Process using the exact same parameters
- Color Management set to "Automatic"
- Color Management "curves" selected
- Lens distortion set to "Automatic"
- Lens distortion "vignetting" de-selected
- Capture Sharpen selected
- Set contrast and Saturation to taste
Processing 2 - Gimp
- Import four images as layers
- Upsize using either "linear" or "nohalo" methods
- Hand align layers *see Note
- Set Opacity of each layer to blend
- Base layer - 100%
- Layer 1 just above the Base - 50%
- Layer 2 just above Layer 1 - 33%
- Layer 3 just above layer 2 - 27%
- Flatten image
- Duplicate image as another layer and sharpen
- Viewed at 100 or 200percent, set Opacity of sharpening layer to remove possible "over-sharpening" effects
*Note: Hand aligning layers in the Gimp is somewhat easy. Using the Base Layer as the reference "registration" layer...
- Keep the Base Layer Opacity at 100%
- Making visible one layer at a time...
- Set layer Opacity to 50% on the layer being aligned so as to see how two images align compared to the base layer
- Viewed at 400% and in one corner find an image detail, select the move operator and align the layer over the base exactly using the detail reference point
- Select the rotation operation for the layer being worked on
- Set the rotation point directly over the newly aligned reference detail
- In the opposite corner of the image...
- View at 400%
- Click and rotate the Layer to align another reference detail over the Base Layer
- Deselect the Layer just worked on and repeat this process on another Layer
Results -
Here is the base scene followed by the results
[Best viewed at 100%]
Comments -
The SuperResolution process does, in fact, work. In the past I simply wasn't working carefully enough. I'd either relied too heavily on the Hugin align image operator, or I wasn't zooming in far enough to see how details were aligning.
I am reminded that this SuperResolution technique does more than add resolution. It does something that I find to be just as important. The process averages out noise. Aligned images are clean and smooth. Here is what I mean.
For this little study I deliberately used the early Sony NEX-7 24mpixel camera because it has stronger base ISO noise than the A6000 and A6300. So I was pleasantly surprised to re-learn the potential usefulness of eliminating noise by stacking and blending images.
One interesting thing about re-working this process is that I think I found the "Linear" ups-size function is ever so very slightly "sharper" after stacking/blending images than "NoHalo." But I think I have to stand on one toe while the full moon shines and sing three choruses of "Hair" before I'd fully swear by that. All things being equal, at this point I feel either up-size operator can do the required work and yield pleasing results.
I'm not ready to downsize from 24mpixel sensors just yet. Though I had thought seriously about picking up a Sony A7S, just for grins. Northlight has an interesting article about processing an old 11mpixel Canon image that "had me going" for a moment or two. And that image wasn't stacked/blended, either. Pretty incredible work, that.
No, I think 24mpixel is kind of a "sweet spot" for me and the kind of work I do and for the kinds of things I enjoy. It's not too heavy on the computer and RAW files don't take up an enormous amount of space. And if I wanted to make a huge print of, say, a classic automobile and if I had the luxury of planning ahead, it might be interesting to try image stacking/blending and maybe even use this SuperResolution technique.


No comments:
Post a Comment