A friend recently picked up a Nikon D850 and more recently a new Fuji GFX 50R. Both are very high resolution cameras. In my case, the highest resolution camera in the closet is a 24mpixel Sony A6000. Beginning to feel a little "behind the curve" in the Mpixel Race (whatever that is) I wondered how close I could come to 50mpixel sensor output given my current tool set.
Several years ago I saved a link to an article that described a process for creating very high resolution photographs. I found that recipe after having written about how to generate high resolution images from a single base image. This blog entry combines the two techniques, and adds a few things that I've learned along the way (which I will Note: in the text below).
Base setup -
Comments -
Regarding the optics, all three lenses performed very well, indeed. They are sharp and contrasty in the base image. Printing at 300dpi using the native 16mpixel sensor resolution of the Sony NEX-5T will easily generate a 17inch on the long dimension high resolution image.
As for the "superresolution" techniques, here is what I have thus far experienced.
My early understanding of how "cubic" up-rez works was insufficient. Up-rez'ing an image at 150dpi or 300dpi will yield jagged edge transitions and will amplify "noise" across an image field.
Note: What I've learned is that by increasing the sample rate of the "cubic" filter that the output up-rez'd image will contain fewer artifacts. In clear terms - to perform a 2x up-rez requires, minimally, a 600dpi filter sample rate. This is fundamental to understanding how to retain the most image quality when performing an up-rez.
For this comparison I set the "cubic" filter sample rate to 1200dpi.
Using the Gimp's "cubic" Image Scale function quickly generates a 9500pixel file from the base 4900+pixel image. No new information is added, of course. Image problems (shake, mis-focus, etc) and sensor "noise" are amplified. Following my early attempts at understanding "superresolution", this approach still has some promise. Compared with the following two "superresolution" examples that follow, the simple "cubic" up-rez technique is somewhat lacking.
Looking at the blended image stack examples I see the results can be pretty interesting. The very first thing I see is a dramatic drop in sensor "noise". The images are much smoother than even the original base image. In fact, blending just two images produces a very useful reduction in noise, even in a non-up-rez'd image, that this technique is worth utilizing.
The second thing I see is that stacked images do indeed appear to add information to the resultant image. This is much like what we expect out of the "superresolution" functions in some Olympus and Sony mirrorless cameras where, in those cases, they "wiggle" the sensor electronically. For the handheld technique, this is a very nice finding.
The technique of image stacking wasn't as straightforward as described in the recipe. My first attempts were actually rather soft. On close inspection I found that the Hugin "aligned" image output was not really "aligned." The images were all too often many pixels mis-aligned, but only in the "y" dimension. The "x" dimension seemed to be correctly positioned. There is something I don't yet understand about the Hugin image stack output and how to import them correctly aligned into the Gimp.
Note: To achieve correct image stack alignment I chose a scene segment with clear dark to light transitions (like a raindrop or door keyhole or a piece of paper with writing) and set the "view" to 400% so that I could see every pixel magnified. Using the base image (the image at the bottom of the stack) as the reference I worked with each layer, one at a time (turning off the visibility to all the other layers and by setting the "opacity" to 50% so I could see both the layered image and the base image). Then I used the keyboard arrows to move the layered image to set the exact alignment. It was time consuming but yielded, obviously, the best results.
Observation: The recipe calls for a minimum of 20 images stacked and blended to get the most information. In my case, I found that as few as 5 layers above a base image can yield outstanding results. Perhaps my process technique isn't as accurate as it could be, but I can't see any "improvement" in the amount of information an image stack gives by going beyond those first 5 layers.
The last item in the recipe was the strong suggestion that a 2 pixel unsharp mask sharpen function be applied to the up-rez'd blended "superresolution" image stack. To my eyes the results are quite impressive. It appears, at first glance, as if a 300dpi 30inch print can be made while retaining all the native blended layer file resolution of the up-rez'd image stacked file.
It appears that my output is similar to the recipe examples. Before declaring victory and moving on to another area of investigation I needed to compare my results, not only with the original "superresolution" recipe, but with the output of the latest generation of high resolution cameras. Looking thru Flickr for Fuji GFX full resolution images I have come to realize that the handheld "superresolution" technique produces a different "look." The native GFX file resolution is clearly superior to the approach being explored here. Have I missed something in my own process? Or is this just the way things are?
While clearly superior to native resolution base image output, using the handheld "superresolution" technique produces an image that reminds me of the soft, gentle tonal transitions I see in old contact print large format film. That is, the "feeling" of the image is that of light gently scattering through the gelatin surface coatings of traditional 20th century print papers.
Several years ago I saved a link to an article that described a process for creating very high resolution photographs. I found that recipe after having written about how to generate high resolution images from a single base image. This blog entry combines the two techniques, and adds a few things that I've learned along the way (which I will Note: in the text below).
Base setup -
- Sony NEX-5T set to jpg output (to streamline the stack blend processing)
- Lenses
- Sigma 19mm EX DN E
- Nikon Nikkor 50mm f/1.8 AiS
- Nikon Nikkor 85mm f/1.8 K pre-Ai
- Camera handheld
- Multiple exposures shot using the "S" fastest continuous shutter release function
- Shot 20 to 30 images of each subject that would next be used to create an image stack
- Follow the "SuperResolution" recipe (with two important Notes and one Observation) using
- Hugin to align the image stack
- Gimp (v2.8) to perform a linear 2x "cubic" uprez from approx 4900 pixels (native Sony NEX-5T file size) to 9500pixels
- Gimp (v2.8) to blend the layered image stack
- Gimp (v2.8) to apply a 2 pixel unsharp mask
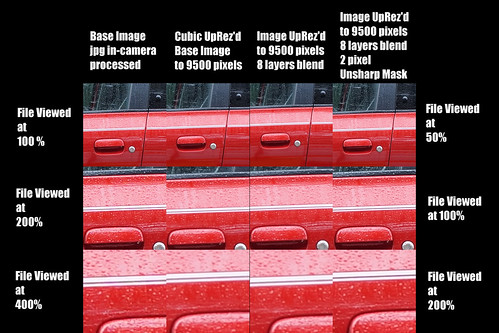
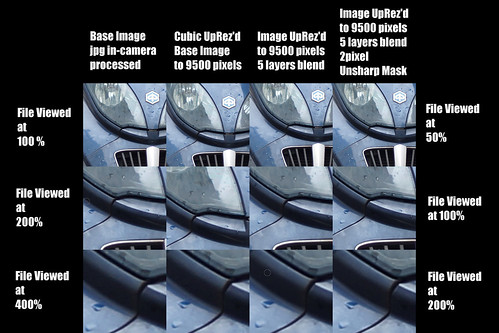
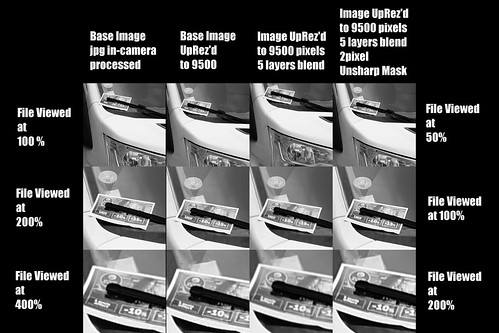
In the following side by side comparisons, along the left hand side I have labeled from "File Viewed at 100%" to "File Viewed at 400%". This applies in all three comparison cases to the left hand column only and represents the base image at its native resolution viewed at the indicated enlargements. The right hand indications of "File Viewed at 50%" thru "File Viewed at 200%" apply in all three cases to right three image columns. These three columns represent the output of various processing techniques I used to explore the idea of "superresolution".
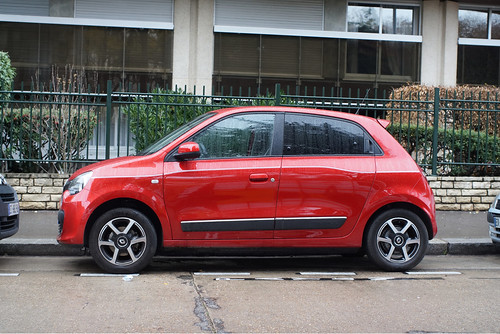
Setup One - Nikon Nikkor 50mm f/1.8 Ai set at f/8
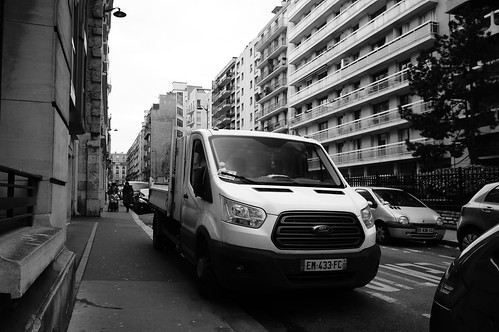
Scene Setup
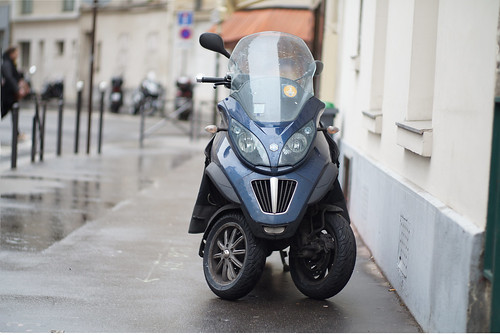
Setup Two - Nikon Nikkor 85mm f/1.8 K pre-Ai set at f/1.8
Scene Setup
Setup Three - Sigma 19mm f/2.8 EX DN E set at f/4
Scene Setup
Comments -
Regarding the optics, all three lenses performed very well, indeed. They are sharp and contrasty in the base image. Printing at 300dpi using the native 16mpixel sensor resolution of the Sony NEX-5T will easily generate a 17inch on the long dimension high resolution image.
As for the "superresolution" techniques, here is what I have thus far experienced.
My early understanding of how "cubic" up-rez works was insufficient. Up-rez'ing an image at 150dpi or 300dpi will yield jagged edge transitions and will amplify "noise" across an image field.
Note: What I've learned is that by increasing the sample rate of the "cubic" filter that the output up-rez'd image will contain fewer artifacts. In clear terms - to perform a 2x up-rez requires, minimally, a 600dpi filter sample rate. This is fundamental to understanding how to retain the most image quality when performing an up-rez.
For this comparison I set the "cubic" filter sample rate to 1200dpi.
Using the Gimp's "cubic" Image Scale function quickly generates a 9500pixel file from the base 4900+pixel image. No new information is added, of course. Image problems (shake, mis-focus, etc) and sensor "noise" are amplified. Following my early attempts at understanding "superresolution", this approach still has some promise. Compared with the following two "superresolution" examples that follow, the simple "cubic" up-rez technique is somewhat lacking.
Looking at the blended image stack examples I see the results can be pretty interesting. The very first thing I see is a dramatic drop in sensor "noise". The images are much smoother than even the original base image. In fact, blending just two images produces a very useful reduction in noise, even in a non-up-rez'd image, that this technique is worth utilizing.
The second thing I see is that stacked images do indeed appear to add information to the resultant image. This is much like what we expect out of the "superresolution" functions in some Olympus and Sony mirrorless cameras where, in those cases, they "wiggle" the sensor electronically. For the handheld technique, this is a very nice finding.
The technique of image stacking wasn't as straightforward as described in the recipe. My first attempts were actually rather soft. On close inspection I found that the Hugin "aligned" image output was not really "aligned." The images were all too often many pixels mis-aligned, but only in the "y" dimension. The "x" dimension seemed to be correctly positioned. There is something I don't yet understand about the Hugin image stack output and how to import them correctly aligned into the Gimp.
Note: To achieve correct image stack alignment I chose a scene segment with clear dark to light transitions (like a raindrop or door keyhole or a piece of paper with writing) and set the "view" to 400% so that I could see every pixel magnified. Using the base image (the image at the bottom of the stack) as the reference I worked with each layer, one at a time (turning off the visibility to all the other layers and by setting the "opacity" to 50% so I could see both the layered image and the base image). Then I used the keyboard arrows to move the layered image to set the exact alignment. It was time consuming but yielded, obviously, the best results.
Observation: The recipe calls for a minimum of 20 images stacked and blended to get the most information. In my case, I found that as few as 5 layers above a base image can yield outstanding results. Perhaps my process technique isn't as accurate as it could be, but I can't see any "improvement" in the amount of information an image stack gives by going beyond those first 5 layers.
The last item in the recipe was the strong suggestion that a 2 pixel unsharp mask sharpen function be applied to the up-rez'd blended "superresolution" image stack. To my eyes the results are quite impressive. It appears, at first glance, as if a 300dpi 30inch print can be made while retaining all the native blended layer file resolution of the up-rez'd image stacked file.
It appears that my output is similar to the recipe examples. Before declaring victory and moving on to another area of investigation I needed to compare my results, not only with the original "superresolution" recipe, but with the output of the latest generation of high resolution cameras. Looking thru Flickr for Fuji GFX full resolution images I have come to realize that the handheld "superresolution" technique produces a different "look." The native GFX file resolution is clearly superior to the approach being explored here. Have I missed something in my own process? Or is this just the way things are?
While clearly superior to native resolution base image output, using the handheld "superresolution" technique produces an image that reminds me of the soft, gentle tonal transitions I see in old contact print large format film. That is, the "feeling" of the image is that of light gently scattering through the gelatin surface coatings of traditional 20th century print papers.
7 comments:
Have you tried stitching images made with a long lens, into one image which appears to be made with a normal or wide lens ? If you orient your camera vertically and simply take 2 photos side-by-side, you double the size of the image. The more you shoot, the more the megapixels. See this article http://www.kennethleegallery.com/html/tech/sony.php#stitching where I use my 2 stitched images with my 1983 Zoom Nikkor at 80mm to out-perform a single image made with a 55mm Micro Nikkor.
Ken, that is a nice technique. I'll have to try that one, next.
Up to now I have had a bit of trouble stitching. The alignment and distortions were a bit annoying. Maybe I was using too many images? In any event, you've given me something new to explore. :-)
Stitching works best at infinity where parallax is effectively zero. Perhaps that's why we see a lot of wide landscape images made this way.
I haven't purchased one, but to really stitch precisely at close distance we need a special tripod head so we can rotate around the lens's nodal axis. There are several demo videos on Youtube, like this one which is a bit verbose: https://www.youtube.com/watch?v=IFQHoCjFTn8
It sort of defeats the appeal of portable gear but for cases where it works, a mosaic made of only 4 images with a 24MP camera starts to get really pretty detailed. To get the perspective of a normal lens we stitch 4 images made with a lens of 2X the normal length.
Your comments mirror my understanding of stitching. Most of my attempts that failed were with subjects closer than infinity and where I couldn't accurately find the lenses nodal point.
I have a couple perspective control lenses that could be interesting, again, if I can find their nodal points. I could simply rotate the camera body around the stationary lens and stitch up the full image later.
More and more projects. Keeps me off the streets, at least. ;-)
Happy Holidays Chris - Here's a thought: this thing lets you adjust the camera horizontally and only costs a fraction of the price of a real panoramic setup like the one made by Really Right Stuff. https://www.amazon.com/Neewer-Focusing-Close-Up-Shooting-Standard/dp/B009SJ7UWU
The reason we would need a complete setup like the RRS head is if we intend to orient the camera vertically to gain the pixels from what then becomes a taller image. But if we're taking the time to make many exposures we can make a mosaic of several rows if we want, and the advantage of vertical orientation begins to fade.
What's more, we can use a $25 item instead of a $250 item.
Oops - I was wrong about that. A 4-way horizontal head will let you center the nodal point over the tripod head so you can pan horizontally around that point, but it won't let you tilt the lens up and down around the nodal point. To do that properly, you need the right tool for the job. Oh well.
Ken - before we left the US I built a couple "L" brackets out of wood. They are surprisingly accurate and all the little bits and bolts and nuts were already on hand, so they came at zero cost. Now, do you think I've used them enough yet? Of course not. Ugh. I really should break them out. Soon. I promise.
Post a Comment