In this blog entry I would like to do the glaringly obvious and compare sided by side the results of the three different methods I tried for creating "super resolution" images.
The three methods are Cubic Up-Rez with USM, Image Stacking, and Image Stitching methods.
This started after reading articles on Photoshops "new" function that up-rez's an image. This, of course, comes on the heels of Topaz AI somethingorother "super resolution" product. The "super resolution" technique has even been applied to cell phone images.
REMINDER: Increasing image sizes using "super resolution" software products does not add information. If data isn't in the original file to begin with, it will not be added by increasing the dimensions of the image. This is potentially important as some software providers imply that Artificial Intelligence (AI) is being used to improve an image in ways that were not previously possible. This is a demonstrably false implication. Don't fall for it.
One last time, here is the base scene that I will work from.

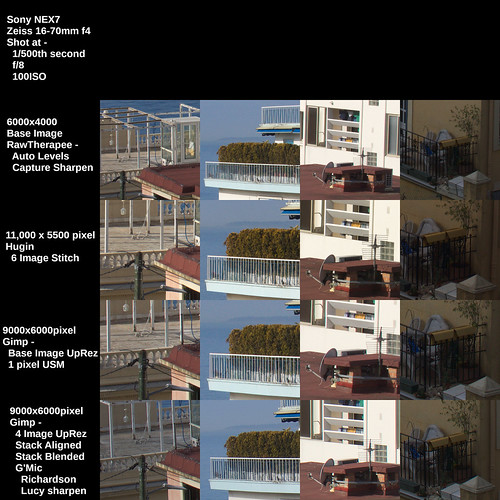
In the following comparison I show the base image as processed in RawTherapee and with "Capture Sharpen" applied. Then I selected what I felt were the best representations, best results of the Cubic Up-Rez, Image Stacking, and Image Stitching methods.

I ordered the "super resolution" results in order of preference, from best to worst.
Let's start with the worst method. Or, in the very least, the most difficult method to manage, and that is the image stacking technique. I've tried this method many times and I fail to see how information is added to the final up-rez'd output.
It sure seems to do a great job on smoothing out the noise, however, but I struggle to see where details to a scene are actually increased. So I'm left wondering what I've done wrong, or what I've not been careful enough about? This approach certainly works in the Olympus and Sony products (I think Pentax offers this, too, on some of their products).
Given the poor results, I've decided that if I really really need to increase image size and if I only have one image, then the next method is the way to go.
Using the Cubic interpolation coupled with USM light/careful/undramatic sharpening to increase image size can be rather good.
There's an important secret and this is to set the interpolation sample rate at least 2x higher than the native image dpi. Many software set the native file resolution to 300dpi. Therefore, when using the Cubic interpolation method, set the sample rate to at least 600dpi. I like 1200dpi when using the Gimp.
When done correctly and if you start with a "clean file" (ie: well controlled noise) the USM sharpened Cubic Up-Rez'd output looks pretty good. This is as good, in fact, as anything I've seen from the new Super Resolution products, because, as I said earlier, those products aren't really bringing anything new to the table.
Picking at a favorite scab of mine, I've found that the Sony APS-C sensors (even the 10+ year old sensors) out-perform Canon's current Full Frame sensors at low ISO when using the Cubic USM method. Canon CR2 raw images have a lot more noise in the shadow areas than Sony AWR raw files.
Moving on to the final, and obviously best way of making "super resolution" images, we come to Image Stitching. This is clearly the best way of making bigger images and retain all the resolution of the cameras sensor. There are no imaging tricks trying to increase apparent resolution, here. We are simply dealing with native off the sensor resolution, which can be pretty darned good.
So there you have it, my recommended methods for how to increase image size. If you have time and a subject that isn't moving, and if you need a large "super resolution" image file, use the Image Stitching approach. If you don't have the time, but you still need a larger image file than what you can get natively out of your camera, consider using the Cubic Up-Rez with Unsharp Mask image sharpening approach.
No comments:
Post a Comment