Previously I covered a simple cubic up-rez + USM "super resolution" technique and image uprezing stacking + two sharpening tools.
Continuing to look at how "super resolution" images can be made, I turn my attention now to image stitching. This is where you take a sequence of images that are smaller portions of a scene and then stitch them together to create a large image file.
To reiterate, this topic re-started for me when some folks talked about Photoshops "new" function that up-rez's an image. There are comments that Topaz AI somethingorother is better. And, of course, there have been comparisons showing how "good" an up-rez can be these days. But before all this there are the original instructions on how to image stack to hopefully gain resolution during an up-rez (ie: Olympus or Sony sensor "wiggle" functions).
Here is a third way to try and gain image resolution. Using a cameras native sensor resolution, the goal is to take a number of section images that can be stitched into an image of potentially far greater resolution. The technique is extensible and is at the basis for the creation of "gigapixel" images.
A much smaller (and therefore much easier to manage) than "gigapixel" is the image stitching approach I use here for this demonstration.
- Take a number of handheld images of portions of a scene
NOTES:- It can be helpful to set the camera to manual mode where you determine the shutter speed, aperture, and ISO. This will keep the exposure consistent between images, particularly when there are brighter and darker areas that the cameras exposure system might try to compensate for as you take each section image.
- Make sure you overlap adjacent images by at least 20percent. Some practitioners have suggested a 50percent overlap between images. The photo stitcher will need enough information between images to match the sections that will build the final output
- If your subject is fairly close, you might benefit from making sure you swivel the camera around the optical nodal point of the lens. Otherwise there will be position differences between images that the stitcher may have a difficult time matching.
- If you shoot RAW format, process images using the exact same actions/steps/processes.
NOTES:- Do not compensate for exposure. Choose one set of curves or contrast/lightness/exposure settings and use these for every image.
- Apply the exact same lens profile to all images.
- Correct for vignetting in the lens profile, too. This will help the image stitcher to not work too hard to keep the image to image transitions smooth.
- Load the images into a photo stitcher and create a large image from them smaller image sections.
NOTE:- If the stitcher can write 16bit tif/psd/xmf formatted output, you can then process the image to completion using your processing software. This can be helpful for further color corrections, applying a decent vignette, and any action that benefits from a 14bit or 16bit color depth.
- If the stitcher can write 16bit tif/psd/xmf formatted output, you can then process the image to completion using your processing software. This can be helpful for further color corrections, applying a decent vignette, and any action that benefits from a 14bit or 16bit color depth.
Here, one last time, is the base scene that I tried to emulate.

Here is the stitched image.
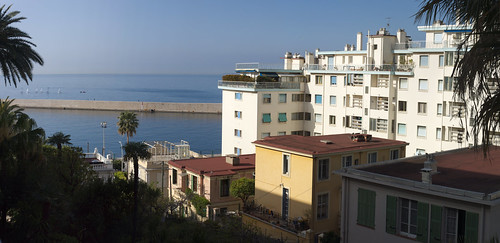
As you can see, it is broader than the above scene, as I took more image
sections on either end of the scene. Also note that the final output,
while over 11,000 pixels long is only 5,500 pixels high. I used a 6000x4000 24mpixel Sony
NEX7 and there was just enough "drift" between the handheld image
sections that I lost 250 pixels top and bottom.

Now we seem to be getting somewhere.
The stitched image retains all the "Capture Sharpen" goodness that the smaller section files contain. There's really no need to sharpen any further.
For grins, however, I did exactly that. I sharpened this already very sharp image. When is "more" ever too much?
An UnSharp Mask (USM) of 2 pixel width and 0.5 contrast step takes the big image resolution "over the top". If you like the effect, then here you go. You'll get nothing sharper.
Using the Richardson Lucy sharpened image looks even more "over the top", but it is starting to look "artificial" and "water colory."
No comments:
Post a Comment