I've taken three steps (step one, step two, step three) to reach this level of understanding around what is possible with selective toning of black and white images using Open Source Software image processing applications.
In this, the fourth and for now final step in my process of understanding I look at preserving as much image information as possible as the means to keeping histogram as smooth as possible.
As you will recall, when processing jpg images there are only 256 luminosity steps. Any changes made to the image quickly introduces gaps/spikes in the histogram. This indicates lost information.
Most of the time this is beyond the ability of the untrained human eye to perceive. But, to me at least, this is intellectually unsatisfactory. More practically there are many cases where we would like to preserve as much information as possible when we make any changes (strong or otherwise) to an image in processing.
For these reasons I turned my attention to using the image toning functions in RawTherapee.
This Open Source Software application handles a vast array of RAW formats and provides 16bit image color spaces as default, with the possibility of dealing with 32bit floating point color spaces, too.
Limiting our attention to three functions we will see how easy it is to selectively tone an image while keeping the histogram very smooth.
Step One - Open a RAW format image in RawTherapee
In this example I pressed the "Auto Levels" button and let the application sort out how to arrange the image tones automagically.
Then I opened "Tone curve 1" and snugged up the blacks and raised the whites in anticipation of emulating old silver halide prints.

Step Two - Convert to black and white (I like "luminosity" conversions, but you may prefer something different, like de-saturation or RGB conversions).
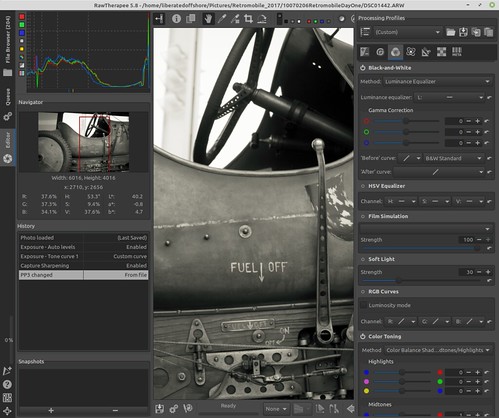
Step Three - Tone the image using "Color Toning"
Example A

Note the settings I used.
The highlights remain neutral in this example. So specular highlights in the image will remain pure white.
The mid-tones in this example are strongly Yellow, with a hint of Red and Green.
The shadow tones are just slightly blue to emulate a cool tone shade that we experience in nature (the color temperature of shadows are typically must lower than the color temperatures of highlights).
Example B

The highlights again remain neutral in this example. So specular highlights in the image will remain pure white.
The mid-tones, however, are now slightly Yellow, with a hint of Red and, in this example, Magenta.
The
shadow tones are stronger blue than the first example to more strongly emulate a cool tone shade that
we experience in nature (again, the color temperature of shadows are typically
must lower than the color temperatures of highlights).
Comments -
In your own work, I would suggest opening a toned image that appeals to you in a separate window. Then work on your RawTherapee image toning sliders until you match the tones of your favorite toned image(s).
If you save these settings you can then quickly recall them to be applied to any image. RawTherapee has a good set of instructions on how to do this.
2 comments:
Brilliant
Ken, not sure it's brilliant, but... at least there's a simple/easy solution, right? :-) :-) :-)
Post a Comment