Thursday, August 27, 2026

Soft Focus Photography ~ Comments

Can we, in the present day, appreciate just how much opticians, photographers (some, probably not all), as well as former artillery and naval officers knew when they designed lenses, classic and soft, in the early days of photography (1800's)?

Musée de BINIC ¨Patrimoine Maritime et rural du Goëlo  

Sony A7
Cosina Cosinon 55mm f/2.8
Nikon Nikkor Soft 1 

The soft effect is too strong compared
with early Expressionist/Pictorialist work 


The field of lens development for photography was not based on feelings nor emotions nor misunderstandings.  No.  Not at all.  Instead, early designers were able to apply knowledge of material science and math in a way that produced informed, repeatable, accurate solutions.  They did this including as it was applied to soft focus photography.

Remember that Herren Petzval und Voigtlander hired naval officers to calculate lens element shapes from the very beginning.  Herr Steinheil's optical designs were all based on calculations he'd made.  Monsieurs Pulligny et Puyo calculated the chromatic aberration diffusion disk at the point of focus which ultimately led to the les objectifs d'Ariste et le Hermagis Eidoscope.  And these guys were not at all unique.  

Anyone who ground lenses knew the math and the limitations and opportunities afforded by the materials at hand.  Knowledge diffused through the community such that people like Herr Kuhn and Mr. Taylor of Cooke Triplet fame all knew what each-other were doing and why.  Letters sent between opticians and interested parties as well as photography club proceedings, lectures, and articles show this was very much the case.

It came as little surprise to me when I recently stumbled across a calculation for optical "softness." The formula came after a long exploration of Expressionist/Pictorialist photography  possibilities through the use of lens imperfections.  "Softness" designed with purpose.

On Spherical Aberration ~

The primary optical "softening" agent that I've been familiar with is spherical aberration.  It came as a surprise to read where the French did not like to use this optical fault. 

Biblioteque de la Revue de Photographie by L. de Pulligny - C. Puyo "Objectifs d'Artiste Practique et Theorie des Objectifs et Teleobjectifs Anachromatique", page 20

[Aberration spherique] résulte un épaississement cotonneux du trait qui n’est pas agréable, et on ne peut admettre cette aberration que pour une très petite part à 1 oeuvre de simplification que nous poursuivons. En diaphragmant suffisamment, on peut atténuer a volonté l'aberration sphérique et en laisser juste assez pour qu’elle soit utile dans certains cas où cette réduction du diaphragme est admissible : par exemple, dans
la photographie du paysage
...

In English... 

[Spherical aberration] results in an unpleasant, cottony thickening of the lines; in the simplification process we are pursuing, we can tolerate this aberration only to a very limited extent. By stopping down sufficiently, one can attenuate spherical aberration at will, retaining just enough to be useful in certain cases where such a reduction in aperture is acceptable—for example, in landscape photography. 

So, scratch spherical aberration off the list as being largely uncontrollable as far as the French were concerned.  There is a "however" to this that I'll talk about later, perhaps in a separate post since the topic is rather interesting, but will require more than a few words to work through.  

On other optical aberrations ~

Of the other optical imperfections, field curvature (sharpness variation across a flat field), coma (insect shaped highlights off-axis), and field distortion (pincushion, barrel) are mostly of little use in soft focus photography.  Only field curvature can be of some interest and then only in portraiture where we might accept increased image diffusion toward the edges of a scene.

On Chromatic Aberration as the preferred optical "softening" agent ~

From Biblioteque de la Revue de Photographie by L. de Pulligny - C. Puyo "Objectifs d'Artiste Practique et Theorie des Objectifs et Teleobjectifs Anachromatique", page 29

Simplification des surfaces sans altération du trait, ce que nous cherchions, l’aberration chromatique tend à nous le donner. C’est donc un agent utile ; c’est, de plus, un agent docile, puisque nous possédons deux moyens simples et surs de régler l’énergie de son action.

In English...

Chromatic aberration tends to provide exactly what we were seeking: a simplification of surfaces without altering the outlines. It is therefore a useful agent; moreover, it is a controllable one, since we possess two simple, reliable ways to regulate the intensity of its effect. 

The authors then state that the use of Chromatic Aberration as an optical "softening" agent can help render a photograph in the sfumato style of many Jean-Jacques Henner paintings.  This is the painting technique first used by Leonard da Vinci and the effect can be stunningly gorgeous.  Just recently I was explaining to someone how I felt how Expressionist/Pictorialist soft focus images in photography can be as sfumato is to painting.  Of course I am very pleased to read that the French beat me to this observation by 120+ years!

Miniature Format Lens Selection -

I am interested in applying this as best I can to current materials and processes since I no longer have access to a darkroom, film, nor large format camera/lens gear.  I wanted to see if I can somehow duplicate the old Expressionist/Pictorialist soft focus "look" to digital 35mm/Full Frame/APS-C formats. 

The first step was to look at lenses.  I'd noticed that Wollensak's Velostigmat Series II is an old Tessar formula lens that came with a special feature.  It allows for the unscrewing/extending of the first element to introduce and control the level of "softness" in a photograph.  This was an important clue as to how I could proceed.  If moving the first element of an old lens design did as claimed, then something similar for miniature formats might duplicate the "look."

There are several Cooke Triplet and Zeiss Tessar design lenses that use this focusing technique.  To bend first element focusers to the Expressionist/Pictorialist task, the idea is to repurpose the traditional focusing ring to manage "softness." Then, use a separate focusing helicoid to do the actual focusing.  

The idea works on 35mm/Full Frame/APS-C digital formats just as anticipated (see: this chart from a prior post on this site). 

On Soft Focus Filters - 

Relatedly, I spent this summer trying to come to grips with the only soft focus filters I had at the time, which were one each Nikon Nikkor Soft 1 and 2.  I used these on both fully corrected lenses as well as a couple first element focuser "softies."  

It was a fruitful exercise in learning to view images small. But for viewing at Whole Plate size (on a 10inch tablet, for instance) the images nearly always "fell apart" and appeared to be too soft compared with Expressionist/Pictorlialist works.

What I wanted was a way to gently soften the highlights (to make them "glow") while expanding the blur radius in a way that adhered to the old brass lens Chromatic Aberration French formula. 

In a stroke of excellent timing, the Last Great Pictorialist Master pointed friends to the writings and comments of Dave Mullen ASC.  A buying spree ensued and the following are my thoughts on filtered introduction of blur and their radii.

  • Nikon Nikkor Soft 1 - Frosted glass diffusion.  Blur at all apertures with no additional artifacts when stopped down.  However, very strong diffusion with blur radii well beyond (2x - 4x) the old heavy crown meniscus Whole Plate optics.
  • Zeiss Softar 1 - Micro-lens of variable shape/dimension diffusion pattern.  Usable only at wider apertures without showing the "softener" pattern.  Strong diffusion with blur radii beyond (1.5x depending on the lens) the old heavy crown meniscus Whole Plate optics.
  • Minolta Portrayer 1, 2, 3 -  Flat micro-shapes of variable color/dimension diffusion pattern.  Interesting filters, these.  Need to verify, but I'm thinking the Hoya/Kenko/Hama Softener "A" series may be of similar design. The Minolta filters don't add much blur around the edges, but they do soften broad areas of similar luminosities.  If there is a filter that most closely matches sfumato in painting on top of any optical imperfections introduced by a base lens, it would be these.
  • Heliopan Duto - Usable only at wider apertures or on longer lenses (85mm - 135mm according to the marketing lit) without showing the "softener" concentric ring pattern.  Beautiful blur is possible in the center of the field, with gently increasing "softness" toward the edges.
  • Hoya/Kenko Duto - Usable only at wider apertures or on longer lenses (85mm - 135mm according to the marketing lit) without showing the "softener" concentric ring pattern.  Beautiful blur is possible in the center of the field, with gently increasing "softness" toward the edges.  The "softening" effect is not as strong as the Heliopan.

Expressionist/Pictorialist Blur ~ 

Remembering the "why" of soft focus lenses...

"... Faire de la Photographie avec art est une chose; faire de l'Art par le moyen de la
Photographie en est, sans doute, une autre... aux définitions diverses de l’oeuvre d’art :
Expression d’un tempérament, — Interprétation de la nature, — Déformation systématique et voulue du réel.
.."

Translated -

"...  Making a photograph with artistry is one thing. Making art through the medium of photography is, undoubtedly, another... given the various definitions of a work of art: the expression of a temperament—the interpretation of nature—the systematic and deliberate distortion of reality..." [emphasis mine]

From   Biblioteque de la Revue de Photographie by L. de Pullignyt - C. Puyo "Objectifs d'Artiste Practique et Theorie des Objectifs et Teleobjectifs Anachromatique"

 Using art and drawing as a guide, I think of it this way.  When a line is drawn by pencil to paper, the edges of the line are soft and rounded, and are not commonly abrupt and sharp.

One way of making art with photography is to use lenses of varying line softness qualities. This, in the same way an artist uses pencils of differing line weights (#2... #9), line opacity (hard... bold), and edge transition (the width of the line softness). 

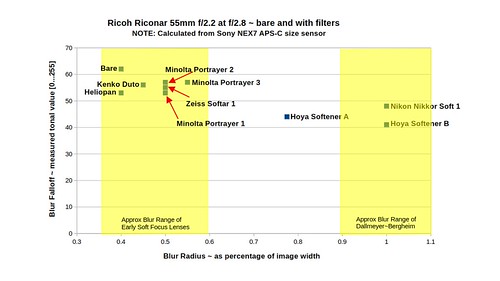
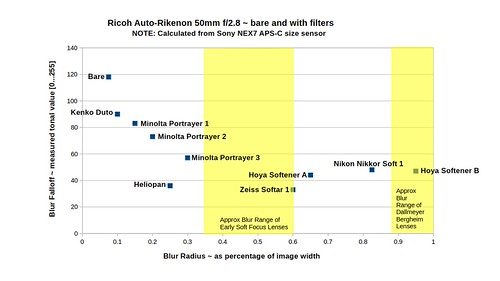
To verify the level of blur "scales" correctly between old chemical processes and the digital domain I had a close look at old Expressionist/Pictorialist prints and chose images where blur could be more or less accurately measured.  The blur radius is 0.60mm to 0.90mm when the image dimensions are 6.5inches x 8.5inches Whole Plate.  Thus proving L. de Pulligny et C. Puyo correct.

Now have a look at the sample chart I generated using miniature format lenses and softening filters. 

With this I feel the concept of equivalency between old and new is proven and a digital Expressionsit/Pictorialist path forward based on optics and optical effects is possible.


----------- Essential Reading --------------

Dr. Russell Young's thesis paper on soft focus photography

Biblioteque de la Revue de Photographie -  L. de Pulligny - C. Puyo "Objectifs d'Artiste Practique et Theorie des Objectifs et Teleobjectifs Anachromatique" - Biblioteque national de France (BnF) (in French)

----------- On Soft Filters -------------- 

Soft Filters in Cinematography 

M. David Mullen, ASC

M. David Mullen, ASC on cinema and photography 

Soft filtration options 

A question of diffusion  

----------- Additional Resources ------------

An illustrated guide to early soft focus lenses

Are you a softie?

Frederick H. Evans was actually a soft focus photographer 

History of Dallmeyer optics (on the Dallmeyer 3b in use)

Neo-Pictorialism by Guy Tal 

Objectifs de flou artistique (in French) 

When did Photography of Soft? 

Wollensak Velostigmat Series II as a first element focuser Expressionist/Pictorialist optic 

Tessar design - with scatter plots that show chromatic aberration distributions 

Wednesday, August 26, 2026

Soft Focus Photography ~ Blur Field Shapes

In looking at adapting a 1906 photographic lens blur calculations to small format lenses I came across something I feel worth mentioning.

At equivalent blur radii, all blur is not created equal.

I shared a couple 18pixel blur radius images with friends.  They noted that one looked softer than the other.  So I went back and reviewed images I made when calculating blur radius under varying conditions.

Consider the following photographs.  Both were calculated to have 18pixel blur radius using a 24mpixel digital sensor enlarged to 6.5inch x 8.5inch Whole Plate format.  

Recall that 18pixel blur radius is what an old brass 450mm f/6 meniscus "portrait" lens is calculated to have.  See: 1906 Biblioteque de la Revue de Photographie by L. de Pulligny - C. Puyo "Objectifs d'Artiste Practique et Theorie des Objectifs et Teleobjectifs Anachromatique", pages 26 and 90.

Upon closer examination of blur widths I found the "strength" of the blur fall-off varied by lens implementation.  While I'm not certain that was the case in old brass lenses, it is with the lenses I'm attempting to yoke to the Expressionist/Pictorialist Task.

Using extreme examples, here's an ISCO Iscotar 50mm f/2.8 Cooke Triplet with the first element fully extended (as the softness controler) and focused using an adapter helicoid.

ISCO Iscotar 50mm f/2.8 close focus

Here's a Steinheil Auto-Cassarit 50mm f/2.8, _also_ a Cooke Triplet, and _also_ with the first element fully extended (as softness controler) and focused using an adapter helcoid.

Steinheil Auto-Cassaron close focus

Examine the left most garlic bulb and notice how the ISCO blur strength is greater than the Steinheil's. Which led to the following understanding. 

Blur Falloff Types 

Comments ~

While it is possible to measure and graph the fall-off rate in a blur radius, the effect is readily apparent and I feel little would be gained by knowing _exactly_ the shape of the fall-off curve.  Instead, the examples should clearly illustrate and sufficiently describe the effect.

As a first quick pass, calculating blur radius of any lens might not be sufficient to fully describe just "softness" as an optical phenomenon and feel that adding the blur radius fall-off shape will help firm up my understanding of optical softness expression.

Blur radius and blur fall-off are, of course, not the only things that contribute to "softness"in a photograph.  To get to the meat of the matter I've ignored the roles of spherical aberration, coma, field distortion, and astigmatism, while only briefly glancing at the role of field of view.  I will cover these in a future post.


----------- Essential Reading --------------

Dr. Russell Young's thesis paper on soft focus photography

Biblioteque de la Revue de Photographie -  L. de Pulligny - C. Puyo "Objectifs d'Artiste Practique et Theorie des Objectifs et Teleobjectifs Anachromatique" - Biblioteque national de France (BnF) (in French)

----------- On Soft Filters -------------- 

Soft Filters in Cinematography 

M. David Mullen, ASC

M. David Mullen, ASC on cinema and photography 

Soft filtration options 

A question of diffusion  

----------- Additional Resources ------------

An illustrated guide to early soft focus lenses

Are you a softie?

Frederick H. Evans was actually a soft focus photographer 

History of Dallmeyer optics (on the Dallmeyer 3b in use)

Neo-Pictorialism by Guy Tal 

Objectifs de flou artistique (in French) 

When did Photography of Soft? 


Tuesday, August 25, 2026

Soft Focus Photography ~ Calculating Blur Radius

Using the blur radius calculations and test setup from 1906 in Biblioteque de la Revue de Photographie by L. de Pullignyt - C. Puyo "Objectifs d'Artiste Practique et Theorie des Objectifs et Teleobjectifs Anachromatique" I would like to begin to apply a bit of objectivity and rigor to Soft Focus lens evaluations.  Recognizing, of course, that this is _not_ the only evaluation important in understanding how old lenses worked.  If done correctly, an objectif/measurable outcome would be excellent for better understanding what would, hopefully, be adaptable using more modern miniature format optics.

Goal ~

To see if it is possible to mimic old brass lens blur/softness using optics designed for miniature formats. 

Methods ~

Selecting Whole Plate 6.5inch by 8.5inch print size as the target viewing framework...  

  • Calculate the blur radius of two meniscus "portrait" heavy crown lenses
  • Using a sharp white to black line, measure the blur radius of more recently designed lenses in various configurations using...
    • Unit focusing lenses
    • First element focusing lenses at various first element separation distances
    • Several varieties of soft focus filters 

Calculation -

Pulligny/Puyo calculate the radius of blur as -

    ( Focal Length / Aperture ) / 100

The formula is very simple, but is based on several other formulas that aren't quite so simple.  Reading "Objectifs d'Artiste Practique et Theorie..." is helpful to understand what's going on.

Selecting 300mm f/5 and 450mm f/6 as the old brass lens soft focus lens reference focal lengths, we see that...

  • 300mm f/5 blur radius = 0.6mm
  • 450mm f/6 blur radius = 0.75mm

To measure the sample lenses in the digital domain, it is helpful to convert the mm measurement of these old lenses to pixels.  In this case I've chosen a 24mpixel sensor and its 4,000pixel narrow dimension.

Number of pixels per mm is calculated as -
    ( Pixel Width of Digital Sensor ) / ( Whole Plate Width inches x 25.4 mm/inch )

Therefore, the reference lens blur radius is calculated as -

    (( Pixel Width of Digital Sensor ) / ( Whole Plate Width x 25.4 mm/inch )) x (( Focal Length / Aperture ) / 100 )

Reference lenses -

  • 300mm f/5 blur radius in pixels = 14pixels = 4000 / ((6.5inches x 25.4mm/inch) x (300mm / f5 ) / 100 ))
  • 450mm f/6 blur radius in pixels = 18pixels = 4000 / ((6.5inches x 25.4mm/inch) x (450mm / f6 ) / 100 ))

Recap of the calculations - 

- Blur radii in millimeters
    - 450mm f/6 = 0.75mm
    - 300mm f/5 = 0.6mm

- Blur radii converted to 24mpixel sensor pixels in whole frame size
    - 450mm f/6 = 18 pixels
    - 300mm f/5 = 14 pixels

Measuring blur radius of more recent optics ~ Test Setup

Using a simple, empirical approach...

  • Place a white sheet of paper on a black background 
  • Photograph it an import it into, in this case, the Gimp
  • Enlarge to 200percent
  • Viewing the center of the image
  • Using the measurement tool
  • Note the radius of blur from pure white to black

Repeat for as many lens setups/configurations/etc as there are on hand. 

Blur Measurement Setup 

Results ~

Lens Blur Measurements

Comment ~ 

This sets an interesting foundation for understanding how lenses behave.  However, this is not all.  If I carefully study prints/images made with old lenses it's easy to note that the transition from light to dark in blur is not always/often equal between lenses.  

To develop a more complete understanding of what's going on with soft focus lenses I will address blur transition in the next post.  Further, recognizing that I'm moving very quickly on this topic and not explaining things in my haste to get to the bottom of all this, I will address the "why" of my choice of lenses and filters in an analysis that will come after looking at blur falloff.


----------- Essential Reading --------------

Dr. Russell Young's thesis paper on soft focus photography

Biblioteque de la Revue de Photographie -  L. de Pulligny - C. Puyo "Objectifs d'Artiste Practique et Theorie des Objectifs et Teleobjectifs Anachromatique" - Biblioteque national de France (BnF) (in French)


----------- Additional Resources ------------

An illustrated guide to early soft focus lenses

Are you a softie?

Frederick H. Evans was actually a soft focus photographer 

History of Dallmeyer optics (on the Dallmeyer 3b in use)

Neo-Pictorialism by Guy Tal 

Objectifs de flou artistique (in French) 

When did Photography of Soft? 


Monday, August 24, 2026

Soft Focus Photography ~ Lenses as Tools of Art

Understanding soft focus lenses in photography has not been easy for me.  Things didn't start well, either, what with being under the influence of Group f/64's proclamations of "pure" photography and the cult-like obsession with "sharpness".  There seemed to be only subjective means of considering soft focus lens qualities.  It seemed to come down to simply asking "does this look good?"


Abbaye de Beauport

Sony A7
Cosina Cosinon 55mm f/2.8
Nikon Nikkor Soft 1 

The soft effect is strong compared
with early Expressionist/Pictorialist
work, but it gave impetus to looking
deeper into soft focus work
in miniature formats 

Things started to change after many failed attempts at coming to grips with soft focus optics in film large format work.  I've owned more than a few specialty soft lenses over the years and really only met with success once, and that was with a Mamiya RB 150mm f/4 SF. I'd completely failed to come to grips with PortLand, Wollensak, Fuji SF, Rodenstock Imagon optics.

During decades of stumbling around in the darkness of ignorance and confusion, several influences were quietly at work.

Pictorialist images can be wonderful to look at.  The Taschen book of the whole series of Stieglitz's  "Camera Work" is on the bookshelf next to a large show catalogue of Clarence White's work and a smaller show catalogue of Celine Leguarde's magnificent images.  From time to time I take them down, look, and wonder "how did they do that?"

One of the Last Great Masters of Pictorialist photography taught me more than a few things.  One, Expressionist/Pictorialist photography did not die when the "official" histories tell us it did.  He'd been the editor of the "New Pictorialist" magazine well into the 1970's, decades after the "official" records had declared the movement dead, buried and gone.  Further, the Last Great Master would suggest from time to time that "there is another way.  It might appeal to you.  It's uniquely French."

Only recently did it occur to me that I'd been looking at this all the wrong way and my understanding could quickly improve if only I knew how to better write my questions: What were Pictorialists really after?  Why and how did they do what they did?

The Why ~ 

"... Faire de la Photographie avec art est une chose; faire de l'Art par le moyen de la
Photographie en est, sans doute, une autre... aux définitions diverses de l’oeuvre d’art :
Expression d’un tempérament, — Interprétation de la nature, — Déformation systématique et voulue du réel.
.."

Translated -

"...  Making a photograph with artistry is one thing. Making art through the medium of photography is, undoubtedly, another... given the various definitions of a work of art: the expression of a temperament—the interpretation of nature—the systematic and deliberate distortion of reality..." [emphasis mine]

From   Biblioteque de la Revue de Photographie by L. de Pullignyt - C. Puyo "Objectifs d'Artiste Practique et Theorie des Objectifs et Teleobjectifs Anachromatique" -

To make a photograph with artistry is described as the classic approach. The art is applied up front in the process with subject, light, and composition.  The materials then follow the processes required to make a print with minimal to no further intervention.  The chemical and materials magic unfolds and a print approximating reality is the finished product.

To make art with photography is described as the Expressionist/Pictorialist approach. The art is applied in the process of creating a print.  There can be quite a bit of intervention after a negative is processed.  Paper internegatives, drawing scenes/details, dodging/burning using pencil, Pt/Pd applied to both sides of print paper, gum over Pt/Pd (gum bichromate), carbon tissues of varying tints, and oil stipple (bromoil) were the common intervention methods used to make a photograph into art.

With making art with photography placing emphasis on print manipulation, it's reasonable to wonder what the role of lenses was.  Why use a soft focus lens instead of a sharp one (as in classic photography)?

Expressionists/Pictorialists, it turns out, were looking for a good starting point for their manipulations.  They used art as their guide and example, primarily looking at a line drawn by a pencil to paper.  The edges of the line are soft and rounded, not typically abrupt and sharp.

Making art with photography looked to begin in the same way.  Lenses of varying line softness qualities were deployed in the same way an artist uses pencils of differing line weights (#2... #9), line opacity (hard... bold), and edge transition (the width of the line softness).

In short: Expressionists/Pictorialists looked for lenses with artists pencil-like drawing qualities. 

The How ~

The French text provides a method and means of calculating and measuring the width of edge transition (softness).  Without translating the text (the reader can certainly refer to the text for a fuller comprehension - something I would strongly encourage) here are a few key points in design and optical choices.

The available glass types were crown and flint, and heavy crown was chosen for its refractive index.

For the French, chromatic aberration (CA) was chosen as the softening agent over spherical aberration (SA).  CA in heavy crown was well understood with blur radii that could be accurately calculated.

Blur radii varied based on lens design, focal length and aperture.  The longer the focal length the larger the blur radius.  The smaller the aperture, the smaller the blur radius.  

Meniscus (single element), Semi-achromat (Crown/Flint doublet - requiring a different blur radius calculation), and Rectilinear (two element Crown facing each other on opposite sides of an aperture) were the lens designs of choice. 

The center of the field of view was described as preferable as it avoided aberrations at the edges of the field. Expressionists/Pictorialists could balance lens "drawing" in these three dimensions.

Coming back to my earlier angst, what's appealing to me about this text is the way blur radius can be calculated and managed.  There are, in fact, and after all, ways of defining optical "softness."

Readers following my wayward adventures of trying to duplicate the "look" and "feel" of early large format soft focus lenses in miniature formats (35mm Full Frame digital, to be specific) will not be surprised when I write - Alerted to this ancient knowledge and armed with a  touch of math I will now set off to see how any of this might be adaptable to non-chemical light weight good on aging bodies handy potentially cheap small format digital photography.  

This is what I will pursue in subsequent posts. 


----------- Resources ------------

An illustrated guide to early soft focus lenses

Are you a softie?

Biblioteque de la Revue de Photographie -  L. de Pullignyt - C. Puyo "Objectifs d'Artiste Practique et Theorie des Objectifs et Teleobjectifs Anachromatique" - Biblioteque national de France (BnF) (in French)

Frederick H. Evans was actually a soft focus photographer 

History of Dallmeyer optics (on the Dallmeyer 3b in use)

Neo-Pictorialism by Guy Tal 

Objectifs de flou artistique (in French) 

When did Photography of Soft? 


Wednesday, July 15, 2026

Links to more soft focus lens resources...

Sky Repeat Dinard 

I've been adding links since first posting this. A bit more Philosophy and more on Dallmeyer. In no particular order...

Dallmeyer -

An interesting overview -  https://deltalenses.com/the-dallmeyer-story/

Dallmeyer site entry point - http://thedallmeyerarchive.com/index2.html

 Portrait 2B settings - http://thedallmeyerarchive.com/Records/lensident/portrait.html

 Serial numbers starting from 1863 - http://www.thedallmeyerarchive.com/Records/Identification.html

3B -  https://negativnacestach.cz/en/dallmeyer-3b/

https://antiquecameras.net/softfocuslenses.html 

http://thedallmeyerarchive.com/Records/biog.html 

https://timlaytonfineart.com/dallmeyer-bergheim/ 

An image made using a 3b - https://blog.markus-hofstaetter.at/2025/11/the-white-rabbit-make-your-choice/


Philosophy -

Pulligny/Puyo - Les Objectifs d'Artistes - Photo Club de Paris 1906 - Dr Russell Young turned me on to this text and it's really outstanding.  Well worth a reading for comprehension.  https://gallica.bnf.fr/ark:/12148/bpt6k1091147q.texteImage 

https://galerie-photo.com/soft-focus-objectif-portrait-flou.html in French

https://grisebouille.net/lhdg35-pourquoi-je-fais-de-lart-libre/ in French 

https://negativnacestach.cz/en/when-did-photography-go-soft/

This and that -

Hermagis Eidoscope interview - https://negativnacestach.cz/en/eidoscope/

Hermagis Eidoscope -  https://apenasimagens.com/en/eidoscope-hermagis-som-berthiot/

Hermagis landscape-  https://apenasimagens.com/en/landscape-lens-hermagis/

Nice history of soft focus lenses -  https://antiquecameras.net/cameralensinformation/softfocuslenses.html

Did you know he did excellent soft focus work? - https://spenceralley.blogspot.com/2019/11/soft-focus-photography-by-frederick-h.html

 https://timlaytonfineart.com/ps-vs-verito/

https://timlaytonfineart.com/2025/06/30/why-i-kept-these-soft-focus-lenses/

 https://1library.net/article/development-soft-focus-lens-focus-anglo-american-pictorialism.qvl3n5dy

https://timlaytonfineart.com/hermagis/ 

https://imaging.nikon.com/imaging/information/story/0051/ 

This isn't pretty, but I'm on a mobile device until further notice. However , these should do the needful.  

Flickr - how to downrev mobile app to something useful

Just this week Flickr updated their Android mobile app.  It's what I use when on the road. The latest version, v5, however, is half baked and lack functions I rely on.  The new version does not (yet?) ...

  • Allow image selections that then upload through Flickrs app
  • Name multiple images on import
  • Add images to groups from the uploader
  • Tag multiple images on import 

The v5 app is very clumsy and forces a user to deal with one image at a time for naming, tagging, and group submissions.

Frustration breeds solutions, but only after I calm down.  Here's one way to downrev the Flickr mobile Android app to the last known good state.

  • Uninstall Flickr
  • Download the last known good version - I use APKmirror
  • Go to Play Store and install APKmirror Installer
  • Run APKmirror Installer 
  • Select the older Flickr version 
  • Follow the directions
  • Go to PlayStore - settings - manage and disable Flickr auto-update

I've left out certain details as I'm typing this on a mobile device. But this is a decent outline of how to get around Flickrs latest mobile app version deficiencies. 

 If further clarification is useful,  let me know and I will update this when I get in Big Computer range. 

Sky Repeat Dinard 

Thursday, May 21, 2026

Lenses ~ soft focus on miniature formats - Cosina Cosinon 55mm f2.8

Taking a Pictorialist photo with a tonal range and color tint I like, I ran a quick comparison between sharp optical rendition and soft focus.

I though it might be interesting to illustrate how first element focusing lenses can behave in the field.  Walking around I came across a modern motorcycle and thought I'd use it as the demonstration. 

Setup ~

  • Sony A7
  • Cosina Cosinon 55mm f/2.8
    • One photo taken at f/8
      • Lens focusing ring set to infinity
      • Helicoid m42 to Sony E adapter used to focus on the bike 
    • One photo taken at f/2.8
      • Lens focusing ring set to closest focus
      • Helicoid m42 to Sony E adapter used to focus on the bike

I picked up the Cosina for very little money.  The trick is it is a first element focusing lens.  I have several Cooke triplets that offer first element focusing, but no Tessar formula.  Until now.  The Cosina Cosinon m42 mount is a Tessar formula optic and I had to have it.  In the interests, of course, of furthering my research into soft focus lenses on small formats.  Right. 

Processing ~

  • Using a reference image
    • measure the highlights
    • measure the shadows
    • measure the mid-tones 
  • Transfer measurements to the motorcycle image
  • Sample colorize the reference image's tints onto the motorcycle image

Quick.  Easy.  Here's what I see -


Cosina Cosinon 55mm f/2.8


Et voila!  Controllable soft focus work in miniature formats using first element focusing SLR-era lenses. 

Sunday, May 17, 2026

Lenses ~ MORE soft focus in miniature format optics

There must be a support group out there somewhere for un-repentant Soft Focus lens junkies.  Perhaps I could use a bit of support?  Or perhaps not.  Either way, the Madness continues unabated.

I've been looking specifically for first element focusing lenses.

Covering old ground, opticians designing and manufacturing "pictorialist" era lenses sometimes made them with configurable gaps between lens elements.  This capability provided softness controls for when softness was desired.  

I often stop and drool a bit when I see a full, original Dallmeyer casket set at local camera swaps or when I see a gorgeous Hermagis Eidoscope sitting on a vendors table.  There's Serious Wonderfulness in those that I wish I had the time and tools to explore.  These days I'm limited to miniature formats with digital sensors - ie: APS-C and Full Frame mirrorless.

Looking at SLR special purpose lenses, I find 35mm SLR specialty Soft Focus optics to be too strong and nearly uncontrollable.  That certainly was the case of a Pentax 85mm f/2.2 where it was so difficult to control that I traded off against something else.

What I've been looking for, instead, are lenses with potentially gentler, more easily controlled levels of softness.  Enter the first element focusers.

Normally, I've thought of lenses moving as a block or "unit" when effectuating a good focus.  Until very recently, every single G. D. 35mm SLR manual focus lens I'd ever used were unit focusers.  Moving the focusing ring moved the lens elements together and there was no convenient way of altering the gap between various element. 

Only recently, as in the past couple years, I've stumbled upon first element focusing lenses.  I found one, talked a bit about it with friends, who then turned me on to another, and another, and as I continued my research, yes, I found yet another. 

Here's my current list of Miniature Format not made purposely as Soft Focus optics that actually could work well as in-camera Soft Focus photo-makers. 

  • Cosina Cosinon 55mm f/2.8 - m42 Tessar formula
  • ISCO Iscotar 50mm f/2.8 - m42 Cooke Triplet
  • Ricoh Riconar 55mm f/2.2 - Pentax K 4 element 4 group _not_ Dylite/APO Artar/203mm Ektar
  • Steinheil Auto-Cassaron 50mm f/2.8 - m42 Cooke Triplet

To turn these into controllable soft focus lenses, here's the setup -

  • Note the ffd (flange focalplane distance) of the lens, destination camera, and calculate the gap to be filled by a...
  • Helicoid close focusing adapter this the shortest length measuring at or smaller than the gap calculated above

For instance, Sony E ffd is 18mm.  M42 ffd is 45.5mm.  The gap is 27.5mm.  There's 17mm to 30mm close focus helicoid on the market that works well enough.  If 17mm on the short length of the helicoid is intellectually un-inspiring, add a short m42 extension tube and you'll get closer to the correct combined 45.5mm ffd.  No worries, though, as I've used m42 lenses on the helicoid I have without an extension tube and have been able to focus at infinity as well as get a little closer focus as a bonus.

Here's how to use the setup -

  • For sharp work - first case
    • Set the m42 focus ring on infinity
    • Use the helicoid to focus the subject
  • For soft work - second case
    • Set the lens' focus ring at its closest setting
    • Use the helicoid to focus on the subject

When using first element focusing lenses, in the first case the lens elements will be "squashed" together.  It seems, based on what I've observed so far, that this is the designed point of maximum sharpness.  The helicoid has turned the first element focuser into a unit focuser hereby.

In the second case, sticking with first element focusers, the first element is moved as far away from the other elements as the mechanical design (focus ring) allows.  This introduces optical imperfections in both Cooke Triplet and Zeiss Tessar design lenses from what I can see.

What this means is that a first element focusing lens, used in concert with a helicoid adapter can be used in two ways - as a unit focusing sharp lens, or as a soft focus optic. In both cases the helicoid is being used to set the focus and the lens' traditional focusing ring is being used to define overall scene "sharpness."

Adding a Carl Zeiss Jena Tessar 50mm f/2.8 (early) and a Steinheil 45mm f/2.8 m39 Paxette to the mix, here's what I see -

Scene for a Big Glow comparison 

Sony A7 - Steinheil 45mm f/2.8 at f11 

Exploring Optical Defects ~ Unit Focusing and First Element Focusing

Comments ~

It should be obvious that focusing rings can be used as softness control on first element focusers when a helicoid adapter is deployed to effectuate the overall focus.  The closer the lens focus, the more optical imperfections are introduced.

Carl Zeiss Jena Tessar 50mm f/2.8 - Unit Focuser

This lenses is nearly "modern lens" sharp from wide open in the center.  It takes going to f/8 and below to clean a scene up across the field, as expected.  If I were to gripe about anything, it's that the extreme corners never fully clean up, even at smallest apertures.  Overall, the Tessar is gently lower contrasted compared to a modern optic, which I feel adds to a sense of beauty to an image.

It comes with a nice multi-bladed round aperture.  The out of focus rendition is creamy smooth, even stopped down. 

I think the copy I have is the "cat's meow", as _all_ the other 50mm Tessars I've owned over the years (nearly a dozen) weren't worth holding onto.  This one's a "keeper."  I finally begin to see what people have been trying to tell me for decades about Zeiss optics. 


Cosina Cosinon 55mm f/2.8 - First Element Focuser

This has a Soviet-era "industrial" feel to the aperture ring, even coming from Japan.  Having nothing to do with the aperture ring, I re-lubed the focusing threads and that part of the lens now moves "smooth as butter." 

It comes with 5 aperture blades, so caution needs be exercised when considering out of focus rendition and specular highlights.  Stopped down a scene can feel "choppy" in the out of focus regions compared with, say, the Tessar or Steinheil Paxette. 

More contrast than the CZJTessar stopped down.  Like the Ricoh 55mm, this Cheap as Chips lens is shockingly sharp when stopped down and could easily be a dual purpose soft/sharp daily carry lens. Yields a "modern" looking image at f/8 and f/11.  

Quite lovely "pictorialist" qualities at f/2.8, f/4, and leaning perhaps toward f/5.6.  This becomes an interesting option for creating "pictorialist" effects in-camera on miniature formats.

Nearly give-away priced in the marketplace.  Pretty interesting "find", this one.    The optic was also sold under the Porst, Casenar, and Reuvenon labels.  I wouldn't pay more than 10Euro/12USD for any of the branded versions.


ISCO Iscotar 50mm f/2.8 - First Element Focuser

Not many aperture blades, so I need to be careful with specular highlights when stopped down.  Sharpens up across most of the field as the aperture drops, but never really cleans up the extreme edges. 

Wide open and at f/4 the lens could work well in rendering young skin in a "pictorialist" manner. Focus on infinity, however, shows the intrusion of the first element as a strong circle of distortion about 3/4s the way out on the field.  

Widely available in the marketplace for not a lot of money.  Overall, an interesting lens, perhaps, but not the most flexible optic in the Toy Box.  I wouldn't pay more than 20Euro/25USD for one.


Ricoh Riconar 55mm f/2.2 - First Element Focuser

This is in Pentax K-mount.  I can't use it on my little helicoid setup, even though this is first element focuser.  Fortunately, there are optical imperfections at f2.2, f2.8, and f4 which can be useful at any subject distance.  This lens can be used in a "pictorialist" manner for portraiture all the way out to landscape.  

Not many aperture blades, so there's the usual caution of watching the specular highlights when stopped down.  However, however, however... from f/5.6 and below the lens shows a surprising (to me, at least) level of sharpness that, frankly, bowled me over when I first saw it.  Like the Cosina Cosinon 55mm Tessar, this 4 element 4 group Strange Design lens is sharp enough when used properly for me to consider using it as a dual purpose soft/sharp optic.  It's really that good.

I find these widely available in the marketplace for around 20Euro/25USD.  For the kind of soft focus work I'm looking to implement, this is really quite a good lens.


Steinheil Auto-Cassaron 50mm f/2.8 - First Element Focuser

Typical of the Steinheil I've experienced, there's softness and then there's a beautiful underlying sharpness.  The softness is more prominent in the optic at wider apertures. 

Stopping down sort of/kind of cleans up the veiling softness in the Auto-Cassaron, but never in a modern sense.  So I'll put this down to having been designed as a lower contrast, sharp at the point of focus optic.  I've seen this in other Steinheil lenses, which is why I mention the potential purpose design aspect to the veiling/lower contrast.  

Having written all that, I have two friends who say their Steinheil give crisp/clear images.  One even says his is the sharpest lens he's ever seen in the format he wants covered.  Makes me wonder if there's something about the Steinheil I own.  Or perhaps there's a certain variability in Steinheil optics, which I would doubt, knowing the long history of optics design and manufacturing the company had.  Frankly, I'm stumped. 

One caution, however, is that like with the ISCO, using the focusing ring to control softness level can lead to a dreaded distortion circle for subjects nearer to infinity than not when using the softest setting.

OK.  I lied.  Another caution is that there are fewer aperture blades in this lens than in its sister 45mm m39 Paxette.  Specular highlights quickly go wonky, so care needs be taken to avoid the ick. 

 
Steinheil Cassarit 45mm f/2.8 - Unit Focuser

There's Steinheil veiling softness and then there's the beautiful Steinheil underlying sharpness, which never really subsides at lower multi-bladed very round apertures.  As I wrote somewhere above, friends' Steinheils are sharp sharp sharp.  Not sure what's going on with the Steinheil I have, but this 45mm, the 50mm Auto-Cassaron, and a 135mm Culminar f/4.5 all show similar behavior.

Still, even with the discrepancies in different people's experiences, I LOVE this lens.  Gorgeous round aperture.  Super light.  Super small.  I took this lens to Italy with me last winter for it's Soft Focus "pictorialist" qualities (see: Napoli and Rome).  I can feel the infinity energies of the "pictorialist" potential pushing outward into the cosmos beyond the moon of the fantastic sky... er... I'd better stop now...


Summary ~

If I were to "grade" the lenses, I'd say the Steinheil are like Hermagis Eidoscope-like smooth in the way they render.  The Ricoh and Cosina are Dallmeyer-Bergheim-like gorgeous.  For soft focus work I just wish these two, Ricoh and Cosina, had round apertures, then things would be perfect.  But, there's little perfection in life, right?  The Carl Zeiss Jena Tessar... on the other hand... ah... that CZJT... even though it has zero soft focus capability...  I must be in heaven... I'm up to my armpits in lenses I never thought I'd find for miniature formats...
Friday, May 15, 2026

In-camera black and white image processing ~ Sony A7

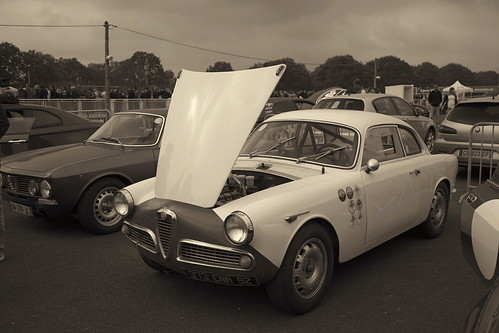
After tone mapping Creative Style Black and White where Contrast [0..-3] a Sony A7RII, I applied a setting to a Sony A7 and went to an exhibition of automobiles.  The event was the avant depart of the Tour Auto 2026.

My setup was the aforementioned Sony A7 plus one of my garbage/trash/crap lenses - Ricoh Riconar 55mm f/2.2 in Pentax K mount.  

I wanted to see if the wide open magik the lens comes with could translate well to cars.  I already knew it would be outstanding at f/8 and f/11.  To confirm the tone map findings I shot RAW + jpg with the following in-camera settings  -

  • Creative Style Black and White
  • Contrast -1
  • DRO 

This recipe matches the in-camera black and white default jpg processing of a Fuji GFX100RF.  I like that "look."

The event was interesting and I had a wonderful time.

Once back home and without reviewing the in-camera output I moved all the jpgs into a separate folder and processed the RAW.  There were a few images I liked in BW and processed those RAWs using my Digital Zone System 0EV as Zone 5 recipe.

On a lark I compared a RAW processed black and white against the in-camera jpg.  Here is what I found -

Sony A7 Creative Style BW incamera vs RAW process 

Sony A7 - shutter speed 1/200th sec
Ricoh 55mm f/2.2 at f/2.2 - highlight glow galore
Matrix metering - no Digital Zone System 
spot metering required 


To me, all the thinking, wondering, measuring and futzing about is well worth the effort.  Understanding and knowledge is unbeatable.

Onward. 

Thursday, May 14, 2026

In-camera black and white image processing ~ Sony A7RII

I enjoy learning about how Sony processes black and white images in-camera.

Using an A7RII I mapped the tonal response as a matrix of settings with tone patches that express the numeric value measured.  

Selecting Contrast [0...-3] and DRO [Off...3] and normal jpg, and then adding as reference points two different tone mappings, which are outlined in 18percent gray - 

  • 1EV steps from -2EV to +7EV and letting the highlights linearly roll off to +4EV pure white and shadows to linearly toe to -5EV as pure black (which Sony has chosen as the bottom end of the processing range) - maximum tonal separation by luminance (not color)
  • Fuji GFX100RF tonal response mapping - which I particularly like

Here is the (rather giant) map -

Sony A7RII Creative Style BW in-camera tone map

Comments -

Looking carefully at the map I see why our visit to Vienna and my use of Contrast -3 "worked" as well as it did.  The shadow tones are fairly decent compared with any of the three references.

If I want the whites to "sparkle", Contrast -1 + DRO1 is quite nice.

If I want "creamier" highlights, Contrast -2 + DRO1 does the trick


Monday, May 11, 2026

Image Processing ~ matching tones black and white

Lets say there's a reference image with tones we'd like to match.  In black and white it's as simple as loading that image into an image processing software and measuring the tonal values.

It's then an easy matter of taking those tonal values and processing a different image where shadow, highlight, and various mid-tones match the reference.

To prove this works, I took an image that I like that was made by Clarence White of Eugene Debs.

Reference Image: Clarence White of Eugene Debs

As can be seen, this is a Pictorialist era work.

For the exercise I'm embarking on here, there are three things to note from the above photo.

  • Tonal placement
  • Image softness
  • Image tint 

For tonal placement I measured portions of this reference image (desaturated to eliminate the tint making it easier to directly note the tonal values).  The dark areas raise up off pure black to 2Bhex/43dec.  The light tones are suppressed with a maximum value of ADhex/173dec.  This is a rather narrow tonal range by modern visual practices/expectations and I find the old Clarence White image to be quite beautiful.

To emulate the sense of softness I used an ISCO Iscotar 50mm f/2.8, racked the focusing ring on the lens to it's closest point, then used a focusing helicoid to effectuate the final focus.  The ISCO is a Cooke triplet first element focusing optic.  The first element focusing introduces aberrations as it's focused on close subjects.  In miniature formats this lens and the effect of the first element focusing is an approximation of how soft focus lenses behaved on larger formats.

Borrowing the tint of the reference image is as easy as opening two images in the Gimp and using the Sample Colorize tool. 

As for the subject matter I guess I should apologize.  He's not the best of models, but I take what I can get.

Here are the steps used to mimic the reference image of Eugene Debs.

Load the new image into image processing software - enabling demosaicing (of course), auto-select camera color management - turning OFF tone curve - which leaves the image looking very flat.

Step 1 ~ default color management, no Curves 

Using Channel Mix, turn the image into black and white.  It looks gawd-awful, right?

Step2 ~ BW Channel Mix NoFilter 

Continuing with Channel Mix, emulate a late-1800's emulsion sensitivity filter - 0% red channel, 25% green channel, 75% blue channel.  It still looks gawd-awful.  I know, there's zero helping the model.

Step3 - Wetplate emulating Blue Green filter 

Find the lightest tone and move curves until that tone measures ADhex/173dec.  Maybe if one squints real hard things might be looking a bit better.

Step4 - Forehead Match 129dec 

Find the darkest tone and move the curve until it measures 2Bhex/43dec.  OK, now we're beginning to see the full disaster the model brought to imaging.

Step5 - Shadow Match 47dec 

By inspection, move the bottom of the curve until the dark tones look like the reference and add a slight vignette (if the lens hasn't already done that itself).

Step6 - Midtones Nose Bridge Shadow Match 52dec Vignette 

Tone the image by sampling the reference and... well... pretty close but no cigar.  It's too sharp.

Step7 - Sample Colorized Tint 

Nice, but too sharp 

Step8 - Comparison to reference 

Comparison to reference 

Using the fact that soft focus lens spherical aberration returns a depth of field that anastigmat optics don't, I slightly defocused myself by moving behind the optimal point of focus.  In doing this there is still an underlying "sharpness", but diffusion that comes from spherical aberration transforms the images into something that more closely matches the Clarence White, Eugene Debs reference.  In fact, if one reads Kodak's instructions on how to use the 12inch Portrait lens they made in the late 1940's it clearly states that focusing on the tip of the nose and letting the depth of field build from there will yield better results.  Rather like the Heinrich Kuhn "Tiffenbuilder" - aka: Depth of Field Builder lenses of earlier era and design.

Here are a couple examples of letting the depth of field build itself.

Further Example - 2

Further Example - 1 

Pretty decent sense of softness, eh? 

Step8 - Comparison to reference 4

 Now 'er cook'n with gas!

OK.  I'm done.  Enough is enough already.  Again, sorry 'bout the model.  Some things just can't be helped.

Thursday, April 23, 2026

Lenses ~ going small

Two Flickr friends have me falling down yet another Wabbit Whole.

It started with trying to find soft focus lenses for 35mm format that are more controllable than the special purpose built optics.  Chetworth del Gato and I had been talking about old large format soft focus lenses work.  To mine this vein of potential richness it was a matter of trying to find lenses that might exhibit similar properties optically and mechanically.

Once on the soft focus for miniature formats path it became evident there was a whole field of lenses I'd avoided and/or, knew nothing about.  Bonzo Din suggested I consider a lens or two of a specific kind and the next thing I knew I was enjoying learning about and understanding German lenses built during the 1950's for the 35mm format. 

Here is where I'm currently at -

Lens Portraits ~ the Insanity

Lens Portraits ~ the Insanity

Clockwise from bottom left...
- Staeble Choro 38mm f3.5 - 3 element 3 group
- Staeble Telon 85mm f5.6 - 4 element 3 group Antiplanet
- Roeschlein Telenar 135mm f5.6 - 4 element 4 group
- Steinheil Cassarit 45mm f2.8 - 3 element 3 group Cooke 

As can be seen, these are m39 thread mount lenses made for the Braun Paxette series of cameras. To illustrate just how small that 35mm lenses can be I added the NEX5T/Pentax-M 28mm f2.8 kit as size comparison to the first image shared above.  

NOTE: The m39 Paxette have a 44mm ffd, and NOT the 28.8mm of the more commonly known m39 ltm Leica Thread Mount.  These are the smallest lenses currently in the Toy Box.  

In terms of sharpness and character...

- Staeble Choro 38mm f3.5 - Sharp in the center at f3.5 with softness increasing towards the edges.  Sharp at f11 across the field. Decent chromatic aberration control and excellent field flatness.  Rumored to be better than the first Leitz 35mm f3.5 tessar formula, which also was best at f11.

- Staeble Telon 85mm f5.6 - Sharp.  Period.  Well, OK, perhaps not clinically sharp wide open, but close enough.  Quite the surprising lens, actually.  Field flatness and chromatic aberration are well controlled.  If there's a downside it is the lack of decent flare control.  Shooting toward off-axis brightness very quickly shows the challenge.  So this is pretty much a Sun Over The Shoulder kind of lens.

- Roeschlein Telenar 135mm f5.6 - Sharp in the center from wide open. The edges never really clean up, even at small apertures, where chromatic aberration, particularly in the out of focus areas, is some of the strongest I've ever seen.  Though I must admit that my Nikon Nikkor 10.5cm f2.5 "tick mark" behaves rather similarly towards the field edges, and I LOVE that lens.  Perhaps I'll come to appreciate this tiny Roeschlein, too?

- Steinheil Cassarit 45mm f2.8 - I used this as a soft focus lens for two months in Italy. First in Napoli and then in Rome.  It's underlying sharpness mimics that of large format film soft focus lenses quite well.  Bright areas glow correctly.  Sharp in the center from wide open.  By f11 it's sharp across the field.

At first I wondered if there was something wrong with this Cassarit as the "glow" remains pretty much constant across all apertures.  Bonzo Din's Cassarit doesn't do this, but there's someone  using a Sony A7 that showed two slightly different versions of the Cassarit, both of which do exactly the same thing mine does.  So who knows? 

------------ References ---------------

Lists of Paxette lenses - incomplete

Fitting a m42 adapter for Paxette use 

My own blog post on adapting Paxette lenses to mirrorless cameras 

Manual Focus forums has slightly different information 


Saturday, April 04, 2026

Things that caught my attention ~ Winter in Italy

While away this winter my mind wandered and stumbled and came upon a few things.  

While not immediately photography related, I find the process of musing over these topics informs and directs how I approach the craft.

Roma - Story Telling 

~ Culture Defined

The first is a renewed appreciation for how received culture impacts my view of, well, just about everything.  

Culture is delivered/given to us.  We consume it.  We participate in it - for or against.  It's something I seldom think about but (all too often passively) agree/disagree bound by limits set by culture itself.  

Which led me to a question: Can I think beyond those boundaries?  What would it mean if I did?  How would I see the world differently?  How would I behave in the future?

Fortunately there are plenty of hints and ideas.  

 In Europe Antonio Gramsci and Stuart Hall explored how the control of a small class of people defines culture for the rest of us.  In the US there are Howard Zinn, David Graeber, and Noam Chomsky who looked at the imposition of culture through politics and money.  In literature we have the example of Cervantes in the early 1600's and his hero, Don Quixote.  More recently we have Albert Camus, Jean-Paul Sartre, and Jack Kerouac, all of whom looked at culture from various perspectives.

What I do, what we all do, in photography and art is caught up in culture as we experience it.  How we see.  How we react.  How we do.  All of it.

Roma - Story Telling 

- The Renaissance

European art experienced a "rebirth" starting in the late 1300's.  I wondered, a "rebirth"?  What was the first "birth?"

Our trip to Napoli and Rome helped me see.

Renaissance paintings commonly show we humans as we are.  Architectural features correctly rendered.  Compositions and subject are proportionally correct.  This was obviously different than the iconography of the Eastern Roman Empire what were simplistic with subjects and elements disproportionately distributed.

What came before? 

In Napoli we visited a museum that holds many wonderful fresco that were taken out of Pompeii.  One room is filled with what I found to be incredible examples of correct human shapes, an correct architectural proportion and perspective.  All pre-dated the Renaissance by 1500 years.  It was instantly clear to me that Roman artists knew quite well what they were doing.  This had to be a bit of the first "birth."

Similarly, with sculpture I've marveled at the incredible beauty of Bernini's figures, Michelangelo's sculptural stout firmness and power, and Canova's exquisite line and execution.  For me many of their works have the power to emotionally move me.  

It turns out so can classic Greek and Roman sculpture. The Capitoline Museum and the Villa Doria-Pamphilj in Rome house early works that I've found to be absolutely exquisite.  The Greeks and Romans led the way and I finally understand what is meant by "Renaissance." 

An incredible world of art existed many centuries prior.

This made me wonder if everything had been forgotten and needed to be re-discovered?  Or if everything remained in the continuum of art but had to be left out due to the demands of those who employed artists? 

Napoli - Story Telling 

- Caravaggio 

One artist is credited with the introduction of "chiaroscuro" lighting.  

It's the kind of light that, if we are speaking in photographic "Zone System" terms, moves skin tones from Zone 6 up to Zone 7 or even 8 and takes the shadows and moves them from Zone 4 down to Zone 2 or 1.  

At the Doria-Pamphilj we saw several of Caravaggio's early paintings.  They are quite "classic" with open shadow details and muted highlights. They could've been executed by any of the early Renaissance masters as they fit the general style of the time.   The arc of his work spans from early flat, calm paintings to later contrasty drama.  His later works are what we tend to know him by, and I was quite surprised to see examples of his earliest paintings.

However... his lighting (as important as it is, what with the immediate impact it had on European painters during Caravaggio's lifetime) is most definitely _not_ the thing I find the most interesting about Caravaggio's work. 

When we were in Napoli we visited a chapel in the Pio Monte della Misericordia where a Caravaggio hangs over the altar.  It's titled "The Seven Works of Mercy."

At first I wasn't sure what to make of it since it failed to conform to expectations I had about, what?, I don't know, just about everything.  The lighting was harsh and slashing, which I expected from Caravaggio.  

There was something else going on in there.  After a minute or two a 5watt bulb turned on in my mind.  I had to stand and look and experience and appreciate what he'd done.  He'd broken one of the prime "rules" of painting.  *snap*  As if it were a little twig to be played with and disfigured. 

All the important action was pushed to the edges of the frame.  The center, ah, yes, the center contained shockingly nothing of interest, and in that light it could be seen as nothing more than a black space, dead center, a black nothingness.

Could it be that Caravaggio's greatest contribution to art was his sense of composition?

Oh my.  There could be freedom in this.  Maybe.  Yes.  Likely so.

Things are shifting. 


Monday, March 30, 2026

Lenses ~ finally found one

I swore I'd never ever own another Carl Zeiss Jena Tessar 50mm f/2.8 (nor a f/3.5 for that matter).  

In my hands they've never ever been any good.  Terrible wide open.  Maybe OK if you squinted hard at f/11.  Edges never cleaned up.  

After struggling with the famous name optic I wiped the thought of ever trying to own another one from my mind and moved on.


Tulips ~ 2026 

Sony A7RII, Carl Zeiss Jena Tessar 50mm f/2.8 

Went to a swap meet recently and tried to sell a few of unloved/unused lenses.  Met a little success, but not to the degree I was hoping for.

Stumbled around and looked at everything I could.  Had everything I wanted or could find.  Did as many deals as I could.

Being human can be "interesting."  Bright shiny objects attract, right?  And here I was thinking/hoping I was immune. 

Tulips ~ 2026 

Sony A7RII, Carl Zeiss Jena Tessar 50mm f/2.8  

Casually looking through a milk crate of m42 lenses my eye was drawn to a bright shiny object.  *natch*hooked*  The front cap was made of beautifully machined aluminum.  The rear cap was beautifully machined from, well, more aluminum.  The lens barrel was, oh yes, machined from beautiful aluminum.  The knurled focusing ring was honed from beautiful aluminum. 

Instant lust swamped my being.  I had to have it.  Whatever it was.

Taking the front cap off I saw it was a Zeiss Jena 50mm f/2.8.  Removing the rear cap I confirmed it was indeed m42.  Lenses were clean and clear.  So...

OK.  How much is this?  It didn't matter. It was going home with me.  Here's my wallet.  Take whatever you need.

Swapped a Ricoh 55mm f/2.2 Pentax K mount for it and a couple Euros and the deal was done.

Tulips ~ 2026 

Sony A7RII, Carl Zeiss Jena Tessar 50mm f/2.8  

As the endorphin rush subsided and my emotional chemistry returned to near normal I remembered: These lenses are horrible.  I've owned far too many of them and know this as deeply as anything I've ever known.  Just awful.  Even with a famous name engraved around the front ring.

Ugh.  Would I ever learn???  I could always use it as a paper weight.  My mother collected them.  Maybe it was in my blood.  Paper weights.

To confirm how horrible it was I put it through it's paces.

f/2.8 Center is... hmmm... wot's all this then?  This one is sharp in the center wide open.  Never saw that before.  Seriously.  Cheap supposedly worse Meyer Domiplan triplets were _always_ better than any Zeiss tessar I tried. Edges, not so much, as expected of early tessar... forgivable perhaps... and... again... not nearly as bad as the dozen or so others that've passed my way.

f/4 Field of sharpness expands from the center but doesn't yet cover the field in Glorious Sharpness on Full Frame. Still, impressive.  Maybe this could be the Sweet Aperture for portraiture? where edges typically go soft in the Old Style.

f/5.6 Huh.  Not 1/2 bad across most of the field, though, actually, the edges are still a touch soft.  Eminently usable. Eminently.

f/8  Holy Flipp'n Moly dear Molly.  So _this_ is why people talk about Zeiss Tessar so lovingly.  This looks like an nicely corrected modern lens.  OK, then.  Early 1950's traditionally designed optics can still do it.  Glorious Sharpness with a sense of depth and heft.

f/11 As good as anything in the Toy Box.  Still ever more Glorious Sharpness with a sense of depth and heft and... and... OK... I'll stop now...

Found a keeper.  Finally.  When I least expected it.  Why did this take so long?  Oh well.  There's no use asking questions with no answer to.  

Did I mention the lens comes with a many bladed aperture?


Tulips ~ 2026 

Sony A7RII, Carl Zeiss Jena Tessar 50mm f/2.8  

---------- Resources ------------

Does the tessar layout predate Zeiss' patent by 1/2 a century

Notes on the Carl Zeiss Jena Tessar

Notes on the humble tessar - with design suggestions  

Saturday, March 28, 2026

Lenses ~ adapting m39 Paxette

As a placeholder to a longer conversation...

Leica Thread Mount lenses (m39 LTM) ~

  • m39 - 39mm diameter by 1mm thread
  • FFD of 28.8mm precisely

Paxette lenses ~ 

  • m39 - 39mm diameter by 1mm thread - same as LTM
  • FFD of 44mm  - which means Paxette will NOT work natively on LTM adapters, event though the threads are the same
 
Napoli

 Sony A7RII, Staeble Choro 38mm f/3.5
Tiny little lens, plenty sharp stopped down

So the question arises of how to adapt m39 Paxette to digital mirrorless?  Here are three solutions.

Modify m42 adapter ~

As previously noted, the ffd of Paxette is 44mm.  m42 has a ffd of 45.46mm precisely.  Using this knowledge, here is one solution for adapting Paxette lenses.

  • m42 adapter
    • Remove the front m42 ring 
    • Remove 1.5mm off the rear surface of the ring (machine or sandpaper grind)
    • Reinstall the ring into the adapter 
  • One each m39 to m42 ring for as many Paxette lenses as are on hand
    • Mount m39 to m42 stepup ring on the Paxette lens
  • Mount the lens on the m42 adapter 
  • Mount m42 adapter on camera
  • Take photographs 

The downside of this is one is limited to focusing distances as set by the lens. 

m39 to m39 extension tube on LTM adapter ~ 

Another approach requires a specialty extension tube.  Here's that solution.

  • m39 Leica Thread Mount (LTM) adapter
  • 14mm m39 to m39 extension tube 
  • One each m39 to m42 ring for as many Paxette lenses as are on hand
    • Mount m39 to m42 stepup ring on the Paxette lens
  • Mount the lens on the m39 extension tube
  • Mount extension tube on LTM adapter 
  • Mount LTM adapter on camera
  • Take photographs 

The downsides of this is one is limited to focusing distances as set by the lens, and the precise extension of 14mm is difficult to find.  I know of two possible suppliers but I'm not sure the part is always in stock. 

Adapt a m42 close focusing helicoid ~

A third approach is proving to be rather flexible. 

  • m42 close focus 17mm-33mm helicoid adapter
  • One each m39 to m42 ring for as many Paxette lenses as are on hand
    • Mount m39 to m42 stepup ring on Paxette lens
  • Mount the lens on the m42 helicoid 
  • Mount helicoid on camera
  • Take photographs 

Simple.  Direct.  Inexpensive. Flexible.

Using a helicoid allows for flexible focusing.  There's no need to measure the adapters for infinity.  Just turn the adapter threw to find the focus point.  And the lenses own focusing ring is still available for use as well.  Lastly, because everything remains m42, this approach is good for Pentacon/Pentax mount lenses and even provides a bit of close focusing capability.


Napoli 

Sony A7RII, Staeble Telon 85mm f/5.6
Smallest 85mm I've ever seen, plenty sharp 

Why all the Monkey Motion?  

There are more than a few tasty German optics with many aperture blades (think: beautiful out of focus rendition at all apertures) to be found in the Paxette family lens tree.

  • Carl Zeiss - 50mm tessar 
  • Enna - reportedly excellent, though I've yet to try them
  • ISCO - nice, simple optics from a Jos Schneider division
  • Roeschlein - I'd not heard of this company until recently
  • Schacht - decent contrast and resolution selection of lenses
  • Staeble - another decently sharp/contasty selection of lenses
  • Steinheil - my current favorite for in-camera soft focus/pictorialist-like work


Napoli 

Sony A7RII, Steinheil Cassarit 45mm f/2.8
Tiny little lens, pictorialist effects at all apertures
with underlying "sharpness" that'll cut the
paper it's printed on

------------ References ---------------

Lists of Paxette lenses - incomplete

Fitting a m42 adapter for Paxette use 

Manual Focus forums has slightly different information 

Friday, March 27, 2026

Lenses ~ another whack at software intervention

On lens "corrections" -

While researching a lens I was interested in I stumbled across a comment that struck me.  It went something like (yes, I'm paraphrasing in the following)...

 "... you can use software to sharpen up this old lens, but you won't have a true understanding of how bad this lens really is..."

I wondered if the writer understood something fundamental to digital photography and current image processing. Software "corrects" for all manner of lens design and implementation "faults."

To see what I mean turn off software intervention.  Specifically, turn off -

  • Capture Sharpen - which ostensibly counters AA filter effects
  • Lens Correction Profile (LCP)  - which corrects for
    • Chromatic Aberration
    • Field Distortion 

For in-camera jpgs this means locating and changing the settings there on the camera.  For RAW this means locating these settings in the image processing software, where switches and controls could be very well hidden.

Now have a close look at an image and compare it against a software "corrected" image of the identical scene.

It can take a lot of image processing  just to reach a decent starting point.  What's good for the goose might be good for the gander, right?

Question: Why not apply software "corrections" to old manual focus lenses?


Spring ~ 2026 

Sony NEX05T + Sigma 24mm f/3.5 DG DN
Illustrating the results of
all the software interventions applied
by default on file import into a RAW
image processing software
 

On Lens Diffraction limits ~ 

Who hasn't read lens reviews that tell us things get mushy when shooting at apertures below the limits of what a sensor can resolve?  The phrase "diffraction limits" comes up shockingly often.

For full frame cameras 12 to 24mpixel that's f/16 and for 40 to 60mpixel that's f/11.  The caution is to avoid those apertures if you want the sharpest rendition possible.  The implication being that images shot at apertures below the resolution limits of a sensor are <insert favorite unsavory expletive>.

In light of software intervention capabilities, I wondered if this was strictly true.

Taking the question seriously, I used a beautiful old Nikon Nikkor 20mm f/3.5 Ai lens, focused two feet, adapted to a 42mpixel Sony A7RII (shooting RAW) and shot three photos starting at f/11, then f/16 and finally at f/22.

Looking at the images with Capture Sharpened turned off I could see a slight difference in the sense of sharpness between f/11 and f/22.  Between f/11 and f/16 it was a little more difficult to tell a difference at full rez or 200 percent rez.

Then I turned Capture Sharpen on and... <drum roll, please>... I see zero sharpness difference between them.  As in, it don't matter (bad English intended).  Software did what it was designed to do: Make things sharp.  OK.  OK.  There was, however, a clear difference in depth of field.  But that's also the point of shooting at small apertures, right?  

To check if this was strictly true I then took a fine little Pentax-M 28mm f/2.8 and reran the f/11, f/16, f/22 comparison.  In this case the sharpness difference between f/11 and f/22 was more obvious, even when using Capture Sharpen.  Because of the way the Nikkor performed, there's likely something in the Pentax-M design that adds a bit more softness at really small apertures.  However...

... for grins, I took the Capture Sharpened f/22 Pentax-M image and applied a gentle UnSharp Mask (USM) and compared the result to a Capture Sharpened bitingly/critically/fabulously sharp f/11 image.  The result is... <another roll on the drum, please> ... zero, zip, nutt'n, nada difference between them.  Software intervention of the kind applied to digital lenses now applied to the wee-Pentax-M is able to make a f/22 image look as good as a Capture Sharpened f/11 shot.

Question: How many people avoid shooting at small apertures because they've been told something awful happens down there? 

Recap question: With the kinds of beneficial image improving software tools available to us, why not use them, regardless of the lens?