Upsizing articles are targeting me. I know it. It's clickbait. Yes. But I can't help myself. I read an article that had my mouth wide open, ready for the hook, line, and sinker.
Could it be true? The images in the article were rather small, so it was difficult to tell.
I've been looking at this question for years. It's appealing to take a single image and upsize it, while retaining a certain pleasing sense of "sharpness." The thing that had me blocked was pixelation. Cubic, NoHalo operators found in the Gimp are good, but I never was able to get rid of certain forms of pixelation.
Thinking that "SuperResolution" stacked imaging might provide the answer, I worked hard on the process until I was finally able to declare success. But that process did not remove pixelation any better than Cubic and NoHalo on single or stacked images. There was always some little raggedy edge somewhere that caught my attention.
Before going to sleep I often look around the 'net looking for solutions to various photographic problems that I encounter. Lighting, composition, the physics of diodes, and such silliness. One night I happened to put into the search engine a properly formatted question and lo and behold, a possibility. An answer.
Back in 2015 there was a conversation in the G'Mic discussion forum about the very problem that had me stumped. Someone gin'd up an implementation and suddenly DCCI 2x was incorporated into the G'Mic suite of tools. I already added many years ago G'Mic to my Gimp toolset.
DCCI 2x upsizes bi-directionally, one scan 90 degrees from the other. There is no choice on how much upsize one gets. It's fixed at 2x and this clue is embedded in the name of the function. But there's nothing stopping anyone from doing two 2x upsizes back to back, or more, should they want.
In any event, pixelated edges on upsize seem to have vanished into thin air.
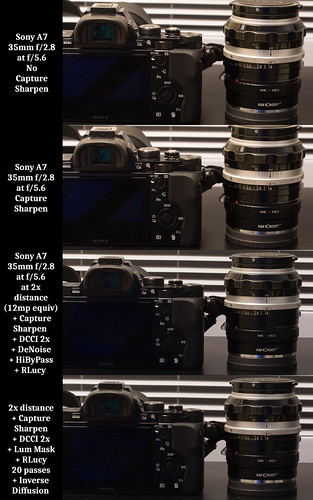
So I set up a scene similar to the clickbait that had me. Using a tripod, setting the ISO to 100 and aperture to f/5.6, the 2 second timer lit off on frame 70cm from the subject to the camera. Then I backed up the tripod another 70cm and took another photo.
There was now one 24mpixel image, and another that was equivalently 12mpixel (when cropped to the closer image field). Image processing was pretty straightforward. For one of the images I did not use Capture Sharpen in RawTherapee. But for the other three Capture Sharpen was applied. The 12mpixel (equiv) images were then opened in the Gimp for further processing.
For one of the DCCI 2x (G'Mic) images I added de-noise on the DCCI'd image, then added a hi-bypass filter (G'Mic) as a first sharpen step, then added a single pass Richardson Lucy sharpen (G'Mic).
For the second DCCI 2x (G'Mic) image I created a Luminosity Mask to isolate the edges of the various elements in the scene so that the next step with Richard-Lucy sharpen (G'Mic) would act locally, and then, finally, I did a light global sharpen using Inverse Diffusion (G'Mic).
What did I find? The clickbait isn't entirely full of BS. It's not quite what was promised, as I can see differences between the standard images and the DCCI'd work. The original size images are clear and crisp and filled with detail. Pixel-peeped DCCI'd images are just a touch softer, even after several rounds of sharpening.
Further work would certainly improve the DCCI'd photos. On the other hand the DCCI'd photos are already surprisingly pretty close to the 24mpixel no Capture Sharpen output.
What the recipe came down to is simply this -
- Starting with a sharp image
- Capture Sharpen to reveal as much detail as possible (PS does this in their SuperResolution tool)
- DCCI 2x the image (in PS is the upsize selectable?)
- Reduce noise as needed (PS has this option, too)
- Selectively sharpen (not sure how PS handles this, if it's global or if it's local to the edges of a scene)
Sharing my homework -
No comments:
Post a Comment